Unity Products:Amplify LUT Pack/Manual and Unity Products:Amplify Occlusion/Manual: Difference between pages
AmplifyWiki (talk | contribs) m (1 revision imported) |
ampwiki>AmplifyWiki |
||
| Line 1: | Line 1: | ||
{| style="width: 920px; horizontal-align: left;" | {| style="width: 920px; horizontal-align: left;" | ||
| | | | ||
== Installation == | == Installation == | ||
1. Import Amplify | 1. Open the AmplifyOcclusion_Unity5.6+.unitypackage | ||
2. After Unity loads it will display the “Importing package” window, select All and click Import | |||
3. Amplify Occlusion should now be installed in your Unity project and it should have the following directory structure: | |||
:: YourProject\Assets\AmplifyOcclusion\ | |||
:: YourProject\Assets\AmplifyOcclusion\Plugins | |||
:: YourProject\Assets\AmplifyOcclusion\Resources | |||
:: YourProject\Assets\AmplifyOcclusion\Samples | |||
:: YourProject\Assets\AmplifyOcclusion\Textures | |||
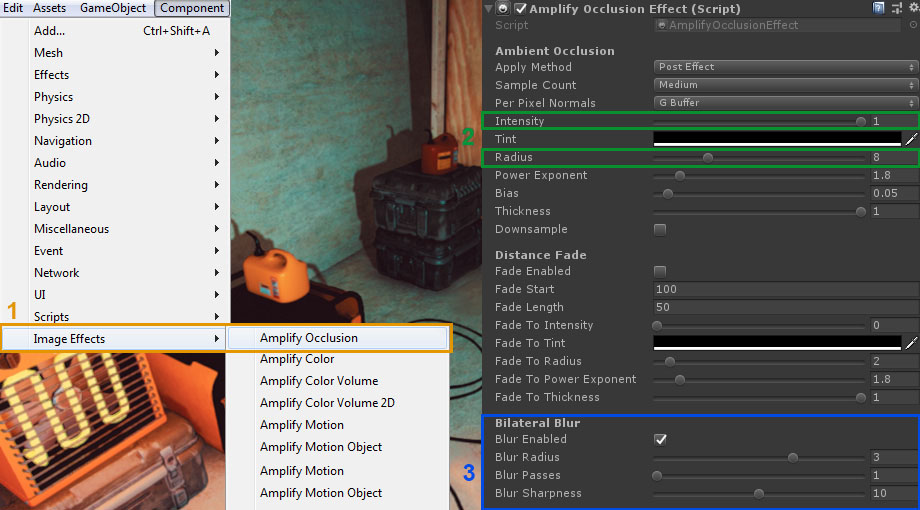
== Workflow Overview == | |||
http://wiki.amplify.pt/images/wp-content/uploads/2018/07/cam.jpg | |||
1. Select and apply “Image Effects/Amplify Occlusion” to your main camera | |||
2. | 2. Adjust the intensity and radius. | ||
3. | 3. Adjust the blur values until you are satisfied with the results. | ||
== HD and Lightweight SRP == | |||
WARNING - SRP support is only available with Post Processing Stack V2. Unity 2019 integrated PP can't be supported until adequate means are provided by Unity, this affects all images effects not just ours. | |||
1. Import the required dependencies via the Package Manager(Window\Package Manager, Advanced -> Show preview packages) | |||
:: Render-Pipelines.Core | |||
:: Render-Pipelines.High-Definition | |||
:: Render-Pipelines.Lightweight | |||
2. Setup your project to use the intended SRP. | |||
3. Import the Amplify Occlusion package. | |||
4. Import the Amplify Occlusion SRP package. | |||
:: Assets/AmplifyOcclusion/Packages/PostProcessingSRP_XXX.unitypackage | |||
5. Add Amplify Occlusion to your Post Processing Stack profile. | |||
Be sure to check the official Unity information on how to setup your Post Processing Stack. | |||
https://github.com/Unity-Technologies/PostProcessing/wiki | |||
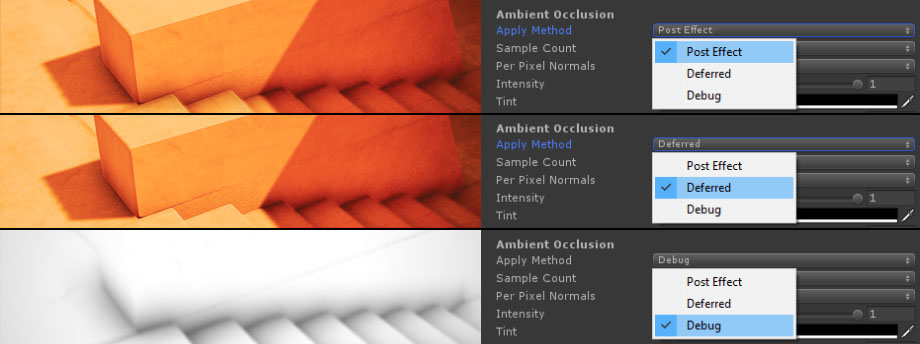
== Ambient Occlusion Control == | |||
Amplify Occlusion offers two occlusion methods, the Post Effect mode resembles standard SSAO and will apply the effect to all objects, the Deferred option preserves bright lit surfaces by injecting SSAO before the direct light stage. A debug option is also available for added scene tweaking and flexibility. | |||
http://wiki.amplify.pt/images/wp-content/uploads/2018/07/method.jpg | |||
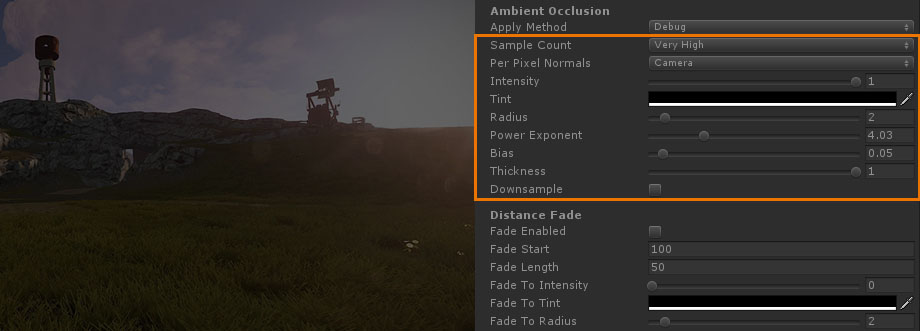
=== Occlusion Parameters === | |||
http://wiki.amplify.pt/images/wp-content/uploads/ | http://wiki.amplify.pt/images/wp-content/uploads/2018/07/occparam.jpg | ||
'''Sample Count'''<br/> | |||
*Higher values will provide the best results at the cost of reduced performance. The default Medium value should suffice for most projects. | |||
'''Per Pixel Normals'''<br/> | |||
*The Default Camera value is recommended for the Post Effect method, Gbuffer/Octa Encoded available for the Deferred. | |||
'''Intensity'''<br/> | |||
*Defines the intensity of the occlusion effect. | |||
'''Tint'''<br/> | |||
*Defines the color of tint of the occlusion effect. | |||
'''Radius'''<br/> | |||
*Defines the radius, or spread, of the occlusion effect, the blur amount is usually adjusted in relation to the spread size. | |||
'''Power Exponent'''<br/> | |||
*Defines the power exponent value of the occlusion effect, it allows you to easily exaggerate or reduce the overall strength. | |||
'''Bias'''<br/> | |||
*Occlusion bias, this value will directly influence which areas of your scene will display the effect. | |||
'''Thickness'''<br/> | |||
*Occlusion thickness heuristic, which allows for tweaking thin occluders such as vegetation. | |||
'''Downsample'''<br/> | |||
*The downsample value option provides a quick and efficient way to improve overall performance. | |||
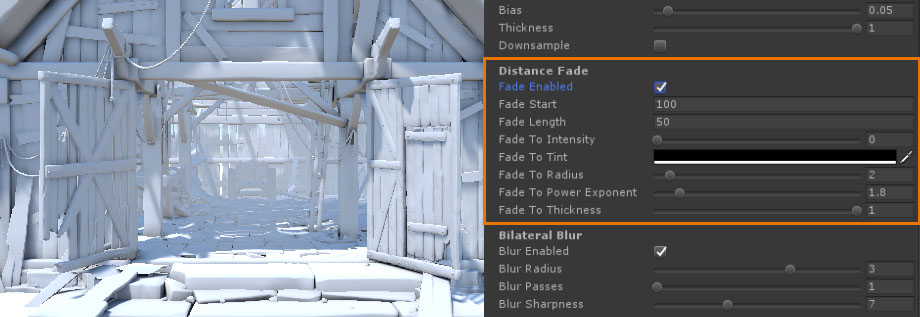
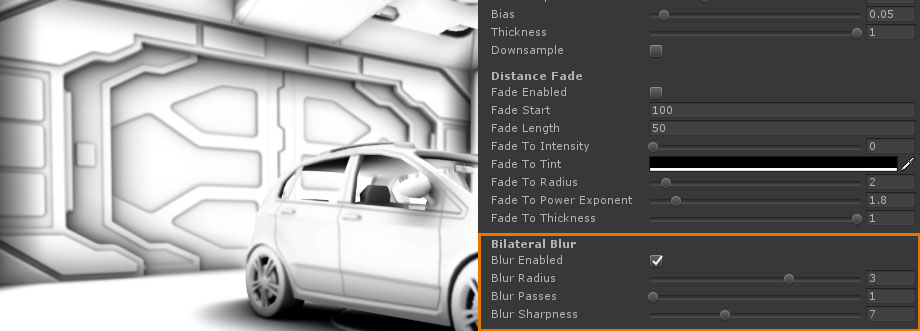
== Distance Fade == | |||
http://wiki.amplify.pt/images/wp-content/uploads/2018/07/fade.jpg | |||
The Distance Fade option provides a flexible method of fading the Intensity, Radius and Power Exponent. | |||
'''Fade Start''' | |||
*Starting point value for the fade effect. | |||
'''Fade Length''' | |||
*The length of the fade effect, you can think of it as a feather effect. | |||
'''Fade Intensity''' | |||
*The Intensity value to fade to. Keep in mind that you will be fading from the value set in the [[Unity_Products:Amplify_Occlusion/Manual#Occlusion_Parameters |Occlusion Parameters]] to the value set here. | |||
'''Fade Tint''' | |||
*The Tint value to fade to. | |||
'''Fade Radius''' | |||
*The Radius value to fade to, also from the value set in the [[Unity_Products:Amplify_Occlusion/Manual#Occlusion_Parameters |Occlusion Parameters]]. | |||
'''Fade Power Exponent''' | |||
*The Power Exponent value to fade to. | |||
'''Fade Thickness''' | |||
*The Thickness value to fade to. | |||
== Bilateral Blur Control == | |||
http://wiki.amplify.pt/images/wp-content/uploads/2016/04/blur.jpg | |||
Amplify Occlusion uses bilateral blur to eliminate dithering artifacts, several options are available for added control. | |||
'''Blur Radius''' | |||
*The blur radius of the blur effect applied. | |||
'''Blur Passes''' | |||
*Defines the number of passes used for the effect, higher values are more performance intensive. | |||
'''Blur Sharpness''' | |||
*Provides control over the occlusion blur sharpness, higher values sharpen the blur effect. | |||
== Temporal Filter == | |||
Amplify Occlusion uses temporal filtering to smooth the occlusion effect through the accumulation of occlusion calculations over time, improving the quality of the effect with a slight performance trade-off and possible ghosting. | |||
'''Filter Blending''' | |||
*Controls the overall accumulation decay by defining the contribution weight of either recent occlusion calculations to reduce ghosting at the expense of quality ( 0 ), or older calculations to increase quality at the expense of possible ghosting ( 1 ). | |||
'''Filter Response''' | |||
*Controls the amount of calculations that are discarded based on the motion of the scene and objects, in which 0 discards the least, improving the quality at the expense of possible ghosting effects, and 1 discards the most, lowering the quality but becoming less susceptible to ghosting. | |||
== Technical Considerations == | |||
=== Mobile Devices === | |||
Amplify Occlusion requires Metal or OpengGL ES 3.0 or higher. | |||
Be sure that the Auto Graphics API is not enabled in order to avoid using older OpenGL ES versions on Android devices. | |||
|} | |} | ||
[[Category:Manual]] | [[Category:Manual]] | ||
Revision as of 13:08, 16 May 2019
Installation1. Open the AmplifyOcclusion_Unity5.6+.unitypackage 2. After Unity loads it will display the “Importing package” window, select All and click Import 3. Amplify Occlusion should now be installed in your Unity project and it should have the following directory structure:
Workflow Overview
1. Select and apply “Image Effects/Amplify Occlusion” to your main camera 2. Adjust the intensity and radius. 3. Adjust the blur values until you are satisfied with the results. HD and Lightweight SRPWARNING - SRP support is only available with Post Processing Stack V2. Unity 2019 integrated PP can't be supported until adequate means are provided by Unity, this affects all images effects not just ours. 1. Import the required dependencies via the Package Manager(Window\Package Manager, Advanced -> Show preview packages)
2. Setup your project to use the intended SRP. 3. Import the Amplify Occlusion package. 4. Import the Amplify Occlusion SRP package.
5. Add Amplify Occlusion to your Post Processing Stack profile. Be sure to check the official Unity information on how to setup your Post Processing Stack. https://github.com/Unity-Technologies/PostProcessing/wiki Ambient Occlusion ControlAmplify Occlusion offers two occlusion methods, the Post Effect mode resembles standard SSAO and will apply the effect to all objects, the Deferred option preserves bright lit surfaces by injecting SSAO before the direct light stage. A debug option is also available for added scene tweaking and flexibility.
Occlusion Parameters
Sample Count
Per Pixel Normals
Intensity
Tint
Radius
Power Exponent
Bias
Thickness
Downsample
Distance Fade
The Distance Fade option provides a flexible method of fading the Intensity, Radius and Power Exponent. Fade Start
Fade Length
Fade Intensity
Fade Tint
Fade Radius
Fade Power Exponent
Fade Thickness
Bilateral Blur Control
Amplify Occlusion uses bilateral blur to eliminate dithering artifacts, several options are available for added control. Blur Radius
Blur Passes
Blur Sharpness
Temporal FilterAmplify Occlusion uses temporal filtering to smooth the occlusion effect through the accumulation of occlusion calculations over time, improving the quality of the effect with a slight performance trade-off and possible ghosting. Filter Blending
Filter Response
Technical ConsiderationsMobile DevicesAmplify Occlusion requires Metal or OpengGL ES 3.0 or higher. Be sure that the Auto Graphics API is not enabled in order to avoid using older OpenGL ES versions on Android devices. |