What's in the Package
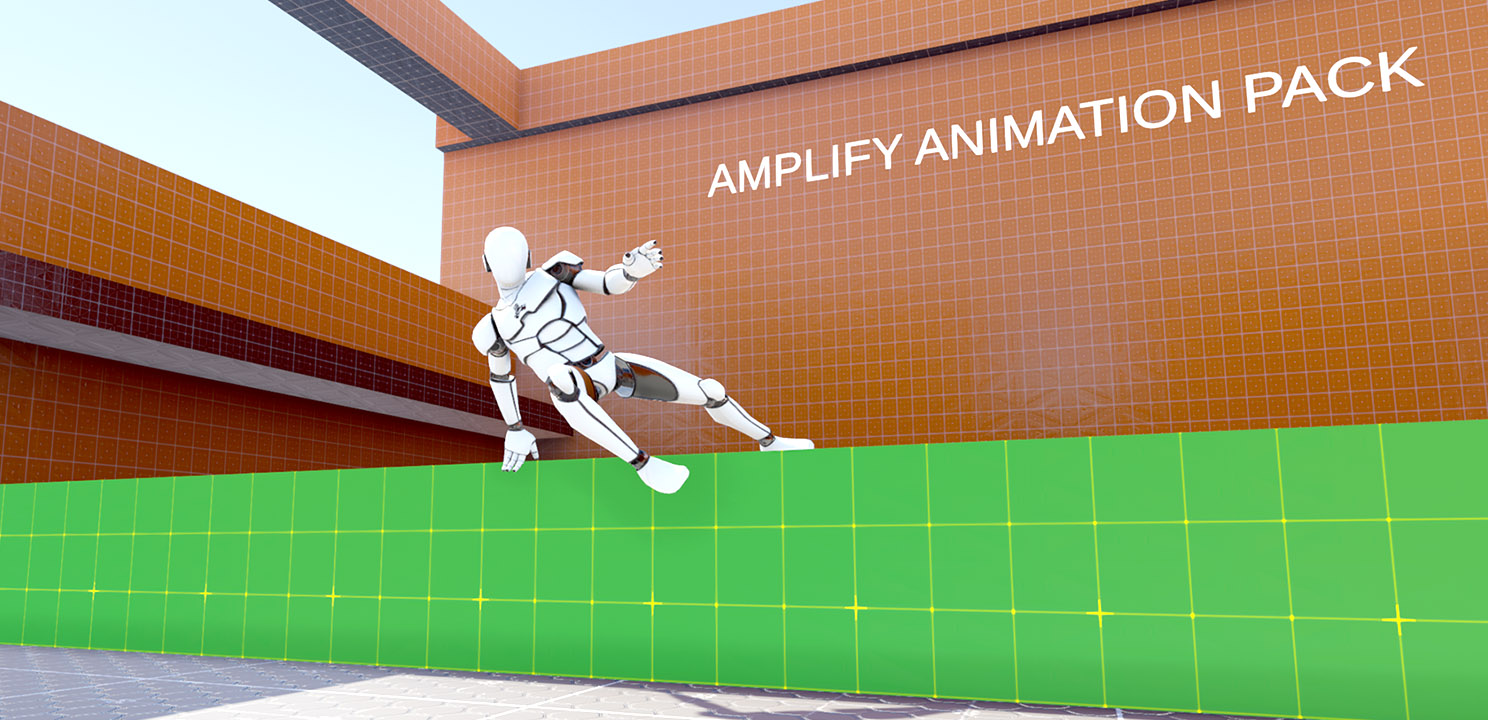
Amplify Animation Pack includes a varied collection of over 600 animation sequences for third-person projects, a starter Character Controller, and Blender source files. Entirely built with Blueprints, you can start using with just a few simple steps. This is primarily an animation library, the Character Controller is complementary and still in development.
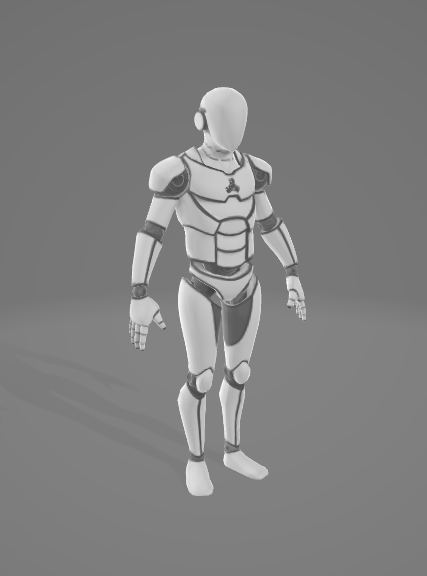
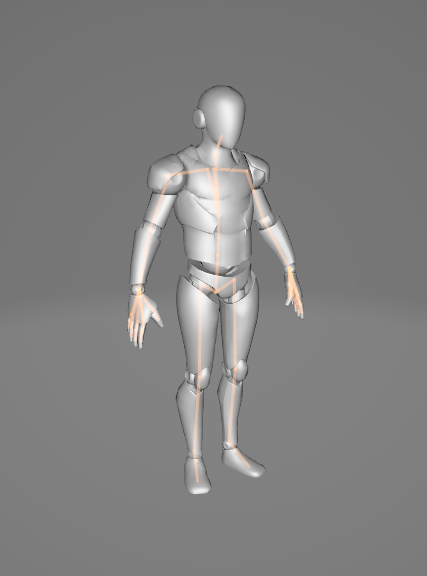
Demo Character and Rig

|
Character Mesh
- Triangles - 19,180
- Vertices - 57,480
|

|
Humanoid Rig
- Bones - 55
|
Animation Catalogue
Collection details available in its dedicated page: Animation List
Blender Source
This pack includes the Blender Source project used to create all animations; you may adjust and re-export them as necessary.
In addition to the project and editable animation content, it also includes a few scripts and the appropriate required rigs for Unreal use.
Demo Scene
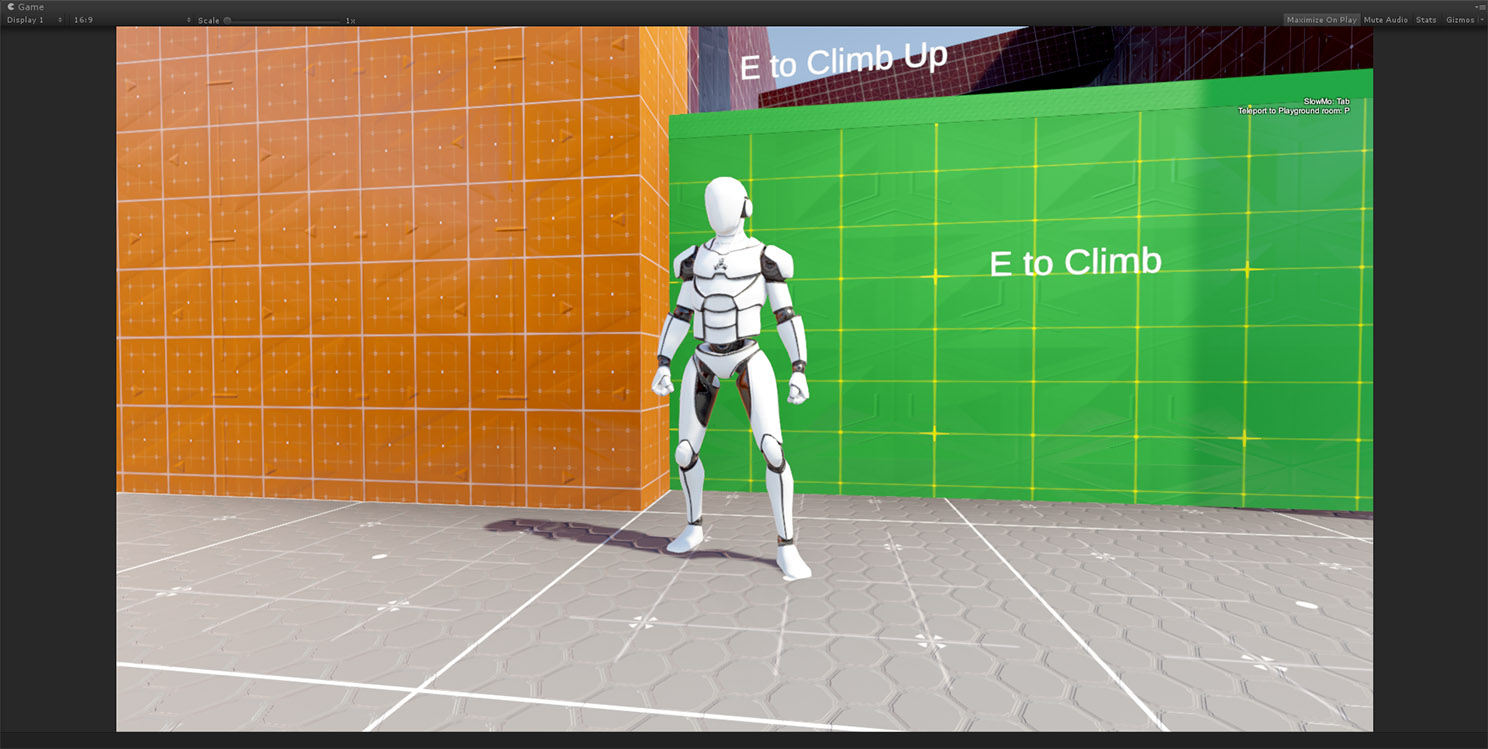
A simple level with the core Prefabs already set up, it's the perfect playground to test the available animations.
Demo Build: Download

How to use
SRP Compatibility - URP/HDRP
The project works on any renderer as it contains mostly animations without any custom shader.
If you intend to use it with URP or HDRP, be sure to first use the automated Unity provided converter, else the DemoScene and all other Materials will render pink/magenta.
Click Convert All or Selected near the bottom.
- URP - Render Pipeline Wizard
- HDRP - Render Pipeline Wizard
Quick Start Instructions (Readme first!)
1. Ensure that Cinemachine is imported if you wish to use the controller, else you will see errors.
2. Ensure that TextMesh is imported so that tutorial labels and accompanying controller interaction text is visible in the Demo Scene.
3. Ensure that Post Processing Stack is imported so that the scene looks as intended and as advertised.
4. Open and Play Demo Scene.
Using the included Animations
1. Make sure your character is set to Humanoid. (Alternatively, use the rig in our Blender Source Files)
2. Make any adjustments required as per-Unity documentation:
- https://learn.unity.com/project/re-targeting-and-re-using-animation
- https://docs.unity3d.com/Manual/AnimationsImport.html
- https://blog.unity.com/technology/mecanim-humanoids
3. Add our Animation Sequence to your Animator Controller.
Using the Third-Person Controller
1. Change the FixedTimeStep value on the Time section of the Project Settings to 0.0166667.
- At this point you can either open the pre-configured Demo Scene located under AmplifyAnimationPack\Scenes or proceed to Step 2 if you wish to set it up manually.
2. Go to our prefab folder Import the character prefab "Character" into your desired scene. Alternatively, the pack includes a non-robot humanoid prefab you can also use called "DemoCharacter".
3. Import the CharacterUIManager prefab into your scene.
4. Import the CharacterCameraManager prefab into your scene.
5. In the Character prefab you've imported, set the "FollowCam", "LockCam" and "UIManger" variables to the FollowCamManager, LockCamManager (both childs of the CharacterCameraManager) and CharacterUIManager prefabs respectively.
6. In the CharacterCameraManager prefab you've imported, on the FollowCamManager set the "Follow" and "LookAt" variables to the "Root" and "HeadMarker" childs of the Character prefab you've imported.
7. In the CharacterCameraManager prefab you've imported, on the LockCamManager set the "Follow" to the "Root" child of the Character prefab you've imported.
Replacing the Default Character
1. Ensure that your character rig is set to Humanoid.
2. Add our character prefab, "Character" to your scene and Unpack it.
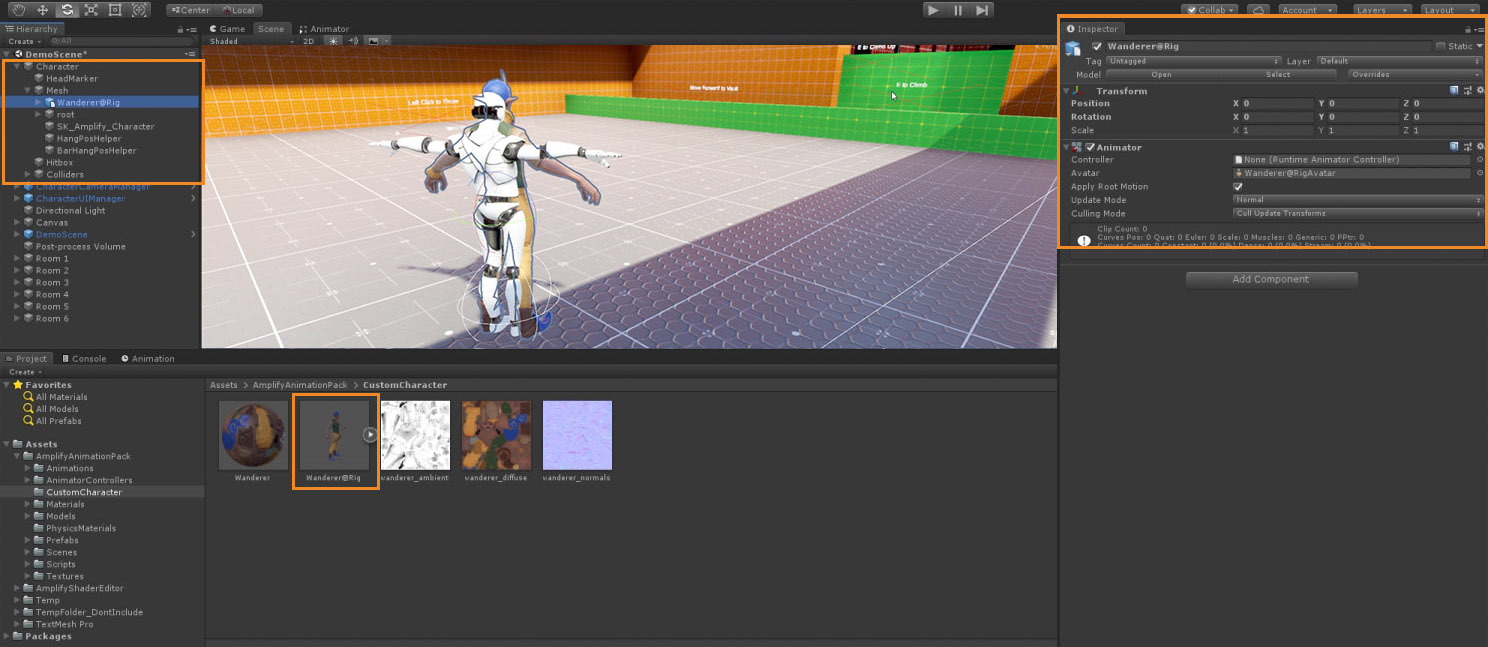
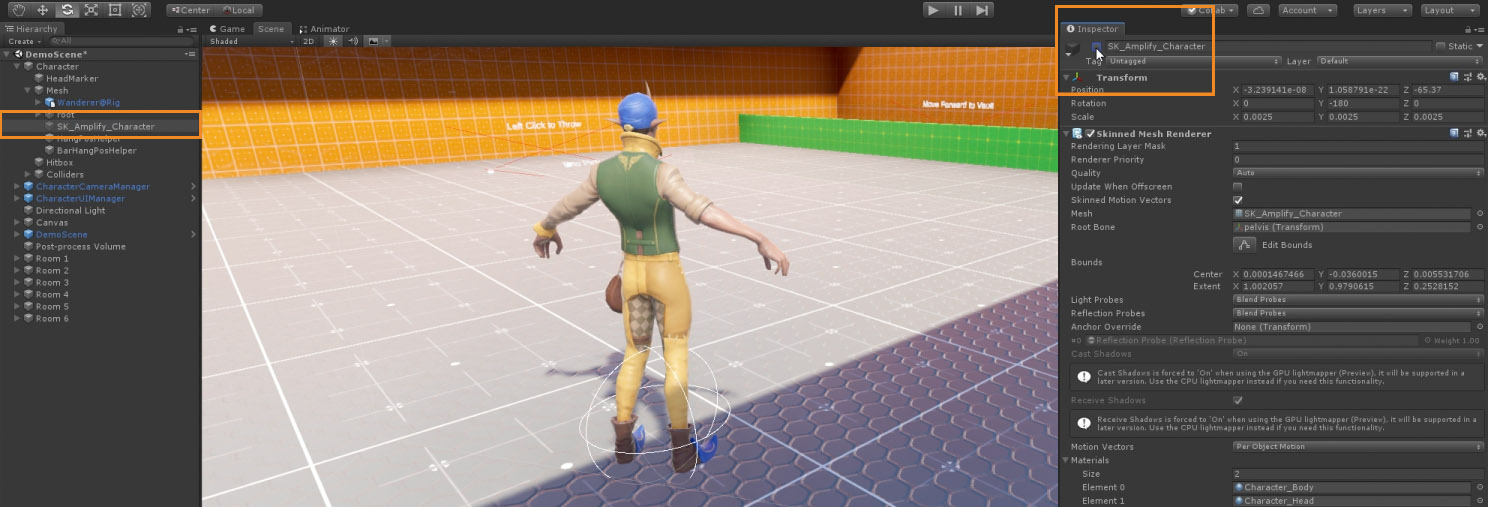
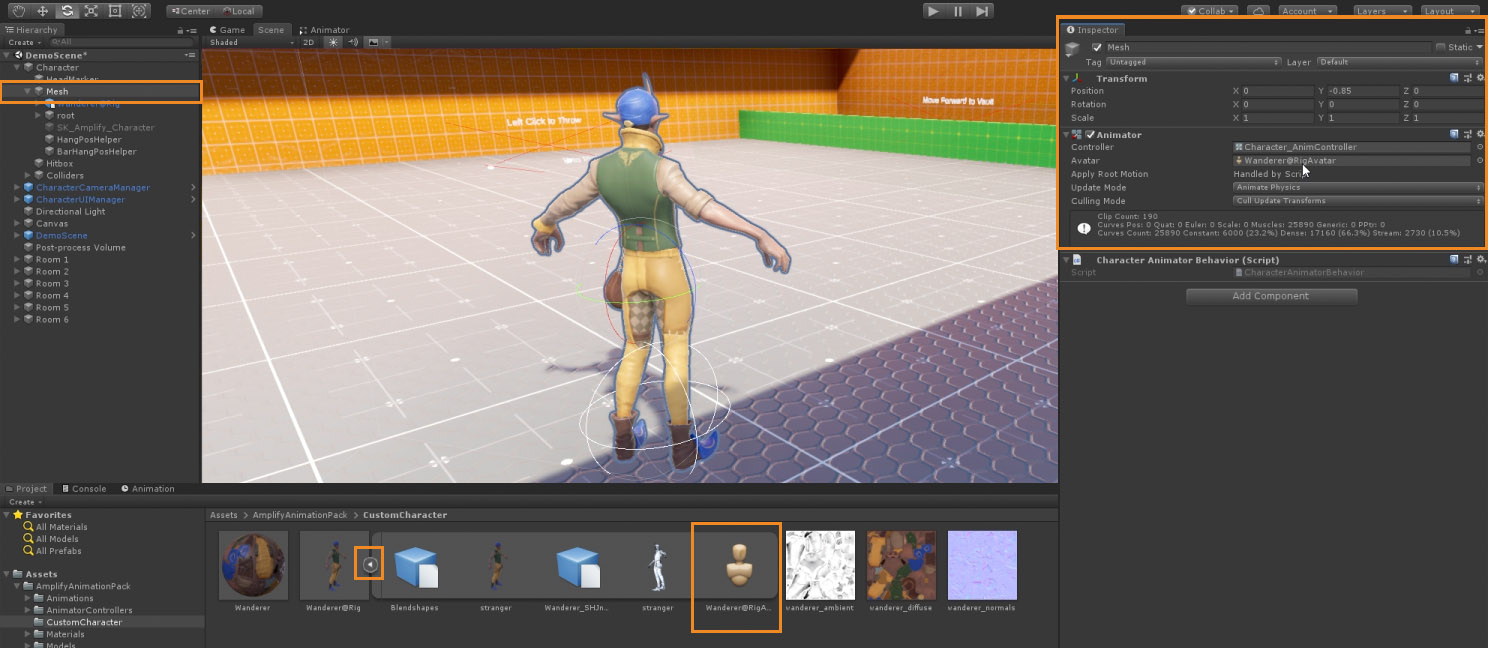
3. Place your character model under "Mesh" in our character prefab; ensure that Position and Rotation are set to zero and Scale set to 1; if present, delete the Animator Component in your model. To be more precise, the Animator Component in the model you intend to use, your custom model, not on our prefab; in this example we remove the Animator Component from the "Wanderer@Rig"

4. Remove or disable our own character model "SK_Amplify_Character".

5. Select the GameObject "Mesh" in our prefab and replace our Animator Avatar with your own model Avatar. This step assumes you've followed step 1 which means your Rig is set to Humanoid.

6. You can press Play at this point but there a few additional steps you should take to ensure it works correctly so make sure you follow the instructions set in Using_the_Third-Person_Controller section starting with step 3.
Accessing Blender Source Files
1. Unpack the BlenderSource files in the BlenderSource Unity Package located under AmplifyAnimationPack/BlenderSource.
2. Move files to an external folder. (Optional, avoids a Unity re-import when making changes to the Blender file)
3. Open file in Blender, edit as required and export.
Package Dependencies and Requirements
- Unity Packages used:
- Unity's Cinemachine (Required for Camera)
- TextMesh(Optional, only used in the DemoScene)
These are specifically for the controller, you can still use the animations on any project as you would with regular animations.
- Minimum Unity Version
Animation sequences may be imported into other Unity versions, Blender source available if required.
Input Mappings
The following table provides a list of all the actions and inputs available in the Character Controller.
| Debug |
Keyboard |
Description
|
| Slow Motion |
Tab |
Enables debug slow motion mode.
|
| Playground |
P |
Teleports the player to the end section "Playground" area.
|
| Walk Only |
Left Alt |
Makes it so that the character can only walk when this key is pressed.
|
| Invert Y Camera |
I |
Inverts the Y mouse input for the camera.
|
| Action |
Keyboard and Mouse
|
| Movement |
W/A/S/D or Up/Down/Left/Right, Arrows
|
| Camera Rotation |
Mouse Rotation
|
| Sprint |
Left Shift
|
| Crouch |
Left Ctrl
|
| Jump |
Spacebar
|
| Interact |
E
|
| Roll/Dodge |
Middle Mouse Button
|
| Light Attack |
Left Mouse Button
|
| Heavy Attack |
Right Mouse Button
|
| Lock-On |
Q
|
Character Controller
The Character Controller is a plug-and-play implementation of a character to be used on third-person projects. This implementation does not include all the animations provided in the pack as it's still in development. In this section you'll find a thorough explanation on how the Character Controller works and all of its technical details. This will include:
- The Character’s Actions and its Input mappings.
- The Character Controller implementation architecture.
- Rules and specifications for setting up contextual actions.
Character Controller Actions
Movement
- In its default “GroundedState”, the character can move in all the major directions relative to the camera. In regards to rotation, the character will rotate according to the camera direction and the movement axis desired by the player. When locked-on, the character adopts a movement relative to its target; the Character is only able to strafe during this phase.
- The character movement can be restricted to a single axis in states such as Cover; partially relative to the camera when Crawling or, as an example, not possible at all when in the air or in the AttackState.
- Note that all of these movement types are governed by Root Motion. This means that the speed at which the character moves is dictated by the speed of the current movement animation and its Speed (go to the corresponding Animator state and locate the Speed parameter on the Inspector panel).
Camera Rotation
- The rotation of the camera follows its assigned Axis input. This can be inverted with the “isYInverted” variable of the “CharacterClass” which, as we all know, is the superior way to play.
Sprint
- The sprint mode is activated by holding the corresponding button while moving forward. This only works in situations where the character can actually move forward. As with basic movement, this is governed by Root Motion, meaning that the speed will change along with the Speed value of the corresponding animation state.
- It should also be noted that the Sprint button is used in other states to trigger specific actions. One example of this is the Sideways Roll, executed by pressing the Sprint button while Crawling.
Crouch
- The character can also go into a crouching pose when grounded. The capsule component height is reduced during this state but the same rules from the general movement still apply.
- Like the Sprint, when in other states this action button can also produce different actions relative to the active state of the character. Consider the barHang state, Crouching while hanging will make the character turn 180°.
Jump
- As the name implies, the Jump action allows the character to jump. This can be done only from the “GroundedState” and will take into account the character’s velocity to calculate the jump trajectory. When activated in the crouching pose, this action will make the character enter the “CrawlingState” instead of jumping.
- As the Sprint and Crouch actions, the Jump action will vary with the character’s current state. For example, when in the “CrawlingState” the Jump action will make the character go back to the default standing “GroundedState”.
Interact
- The Interact action is a multi-purpose contextual action that triggers specific behaviors/states/actions depending on what object the character is interacting with. This is triggered by pressing the corresponding button near an interactable Prefab. The Prefab that the character interacts with is defined using a mix of colliders and raycasts and is represented by the objToInteract variable in the “CharacterClass” class.
- As with the Sprint, Crouch and Jump actions, the Interact action will also trigger separate actions depending on the state that the character is in. One example of this would be exiting the BarHangState by letting go of the bar when pressing the Interact button.
Roll/Dodge
- The Roll/Dodge action can only be executed when the character is on the default “GroundedState”. When executed, this action will take into account the character’s current movement direction to perform the action.
- The difference between the Roll and Dodge comes to if the character is locked-on to a target when performing the action. The character will perform a Dodge when locked-on and a Roll when not locked-on to anything.
Light/Heavy Attack
- The character can perform two types of Attacks, light and heavy. Each of these attack types has a dedicated button and can be performed when the character is in its default “GroundedState”. These attacks are performed in the direction that the character is facing. If the character has picked up a PickupActor beforehand, the Attack button will instead throw this same object.
- One aspect that should be referenced when it comes to Attacks, is that you can execute combos. As such, and with two Light Attacks implemented, the character can execute a basic combo of Light Attack - Light Attack - Heavy Attack. The timing required for each attack can be found on the Animation Notifies of the animations themselves.
- Although the basic attacks only work on the “GroundedState”, there are state specific attacks that the character performs when the button is pressed on other states. These attacks include the hang attacks when in the “HangState”, the plunge attack when in the “FallingState”, or throwing an object when in the “CoverState”.
Lock-On
- Lock-On is an action that allows the character to always align itself to a specific target. This means that, once the lock-On is activated, the character's rotation will always be relative to its target.
- As stated in the Movement action section, when this is activated the character will move by strafing around this target.
- There are two extra aspects that should be noted regarding the Lock-On. The first one is that this action can only be activated from the “GroundedState”. The second is that, while in Lock-On, certain actions are not possible. This includes crouching, the free camera rotation and the contextual Interact action.
Controller Architecture
In this section, we will detail the architecture of the Character Controller implementation. The following topics will be discussed here:
- The Character prefab
- The CharacterClass script
- Class customizable values and parameters
- CharacterStateBase Class
- The auxiliary Manager prefabs
The Character prefab
The Character prefab is the gameObject that encapsulates all of our Character related logic. This gameObject is designed as an “holder” for the different components and child parts that end up forming the Character. As such, the components are the following:
|

|
- RigidBody - the component responsible for handling the character’s physics
- CharacterClass - the script that is responsible for properly managing the Character’s inputs, states and general behavior. This class is detailed in the following section.
- As childs of the Character prefab, there are several other gameObjects that contain other fundamental parts of the character. These are:
- HeadMarker - an empty gameObject that is used as the target for the camera to look at
- Mesh - the representation of the mesh for the character. Inside this you can find the skeleton we provide, the mesh itself (which contains the Animator component) and two empty gameObjects that are used as helpers for specific actions in a State
- Hitbox - a trigger Collider that’s used by the melee combat system
- Coliders - an empty container for the different physical colliders that are used in the different movement states of the character.
|
CharacterClass script
The CharacterClass script is responsible for managing, updating and handling all the general behavior relative to the character. This means that the class is managing the following:
- Getting Inputs - handled by the GetInputs() function, this will process all the inputs described in the section Inputs. Right now all the inputs are hardcoded, but this can easily be integrated with either Unity’s new Input System, Unity’s legacy Input System or any other desired plug-in for the effect.
- Debug Inputs - similarly to the GetInputs() function, the GetDebugInputs() will handle all the Debug Inputs described above. If this is not wanted for a specific project, the function can be commented or deleted entirely.
- State management - the character operates on a state pattern implementation, meaning that it’s always in any unique given state. The CharacterClass is therefore responsible for updating the state, updating its physics and knowing (via the currState variable) and changing the current state (via the ChangeState() function). The class of this State is always derived from the CharacterStateBase class described below.
- References and enums - this class also contains all the references to any component from the character that is needed. Additionally, this class also contains all the enums that derive many Animator state changes, with all of the functions required to change their values.
Class customizable values and parameters
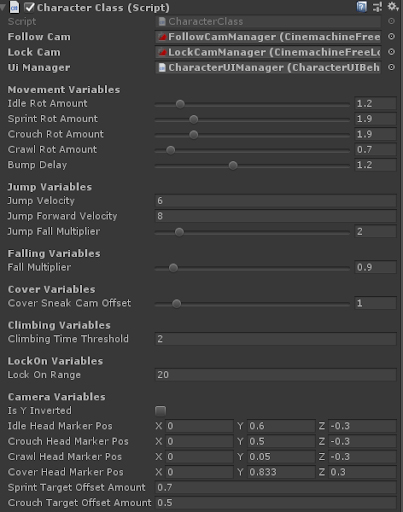
The following variables can be customized out of the gate in the Inspector panel of the CharacterClass script:
|

|
| Variable Name |
Description
|
| IdleRotAmount |
The Character’s rotation rate, when idle/jogging
|
| SprintRotAmount |
The Character’s rotation rate, when sprinting
|
| CrouchRotAmount |
The Character’s rotation rate, when crouching
|
| CrawlRotAmount |
The Character’s rotation rate, when crawling
|
| BumpDelay |
The time that it takes for the bumpState to trigger when in front of an obstacle, in seconds
|
| JumpVelocity |
The Jump height velocity
|
| JumpForwardVelocity |
The Jump forward velocity, when going forward
|
| JumpFallMultiplier |
The gravity multiplier when falling from a Jump
|
| FallMultiplier |
The gravity multiplier when falling
|
| CoverSneakCamOffset |
The amount that the camera offsets, when entering the coverSneak action
|
| ClimbingTimeThreshold |
The threshold that is takes for the character to give up climbing
|
| LockOnRange |
The range to trigger the LockOn
|
| IsYInverted |
Is the camera Y inverted
|
| IdleHeadMarkerPosition |
The position of the HeadMarker when in Idle
|
| CrouchHeadMarkerPosition |
The position of the HeadMarker when in Crouch
|
| CrawlHeadMarkerPosition |
The position of the HeadMarker when in Crawl
|
| CoverHeadMarkerPosition |
The position of the HeadMarker when in Cover
|
| SprintTargetOffsetAmount |
The offset amount of the camera when Sprinting
|
| CrouchTargetOffsetAmount |
The offset amount of the camera when Crouching
|
|
CharacterStateBase Class
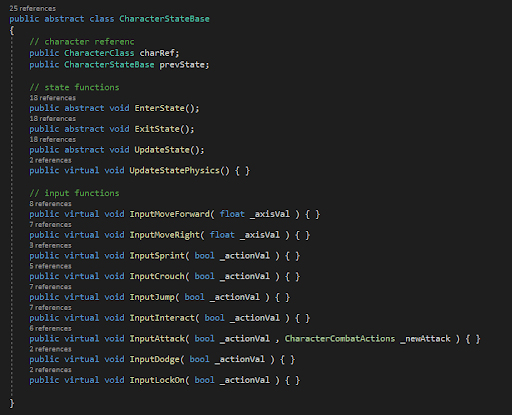
The CharacterStateBase is a class that represents any state that the character can be in. This class is not a MonoBehavior, which means that it cannot be added as a component for a gameObject. With this, every state to be added to the system must inherit from this class.
This class has several functions related to specific events in the class:
|

|
- EnterState: Triggered when the system enters this class.
- ExitState: Triggered when the system exits this class.
- UpdateState: Triggered every frame when the system is in this class.
- UpdateStatePhysics: Triggered every frame when the system is in this class, during the FixedUpdate() callback.
This class also has functions triggered on every input action press/axis change:
- Input_MoveForward
- Input_MoveRight
- Input_Sprint
- Input_Crouch
- Input_Interact
- Input_LockOn
- Input_Attack
- Input_Jump
- Input_Dodge
|
Additionally, this class also defines a charRef variable. This is a reference to the "CharacterClass" that is assigned when the class is constructed, it's used to access everything related to the “CharacterClass” that contains the state.
The auxiliary Manager prefabs
Along with the Character prefab, there are also two other auxiliary prefabs implemented that are provided for the correct operation of the Character. These are the CharacterCameraManager and the CharacterUIManager. The CharacterCameraManger controls the camera behavior. This is an empty prefab that, in its children, has all the gameObjects required for a typical behavior of a third person game camera.
Keep in mind that our implementation is dependent on the Cinemachine package. As such, this prefab comprises of:
- The “Main Camera” - the camera gameObject responsible for the viewing of the game.
- The “FollowCamManager” - a Cinemachine FreeLook camera that is setup to follow the player and accept mouse inputs. This is the default behavior of the camera. This camera should be set so that the “Follow” parameter is set to the root bone transform of the character’s skeleton and the “LockAt” parameter is set to the HeadMarker child object of the character.
- The “LockCamManager” - a Cinemachine FreeLook camera that is activated when the character enters lock-on. This camera should be set so that the “Follow” parameter is set to the root bone of the character’s skeleton and the “LookAt” is set to the lock-on target.
The CharacterUIManager controls the UI. This is also an empty prefab that contains all the different components and gameObjects that comprise the UI. These are:
- The Event System - the default eventSystem that comes with any Unity UI object.
- The Main Canvas - the canvas that contains both of the texts displayed by the UI, the InteractionsText (the text shown when an interaction is possible) and the HelperContent (the helper text shown on the right).
When importing the character into a new scene, both of these prefabs should be imported as well. Furthermore, the following references need to be assigned:
- In the CharacterClass script, the FollowCamManager, the “LockCamManager” and the CharacterUIManager need to be assigned to the “FollowCam”, “LockCam” and “CharacterUI” parameters, respectively.
- In the FollowCamManager, the “Follow” parameter should be set to the root bone transform of the character’s skeleton and the “LockAt” parameter should be to the HeadMarker child of the Character prefab.
- And in the LockCamManager, the “Follow” parameter should be set to the root bone of the character’s skeleton.
Contextual Actions
Actions that the player can execute are directly linked to interactable prefabs created for the effect. The pack includes a varied collection of generic Prefabs that serve as a starting point for your own game requirements.

| Action |
Prefab
|
| Bar Walk / Bar Hang |
BarObject
|
| Climb / Short Climb |
ClimbObject
|
| Cover |
CoverObject
|
| Open / Close Door |
Door
|
| Push / Pull Lever |
FloorLever / WallLever
|
| Vault |
ObstacleObject
|
| Pickup Object |
ThrowableObject
|
| Push Object |
PushObject
|
| Hang / Climb Down |
WallPointObject
|
All of these prefabs can be customized in their appearance, size and behavior. However, the colliders provided must be left untouched or, at the very least, replicated when it comes to their collision Layers. There are also some positioning rules to be followed in regards to certain actions of these contextual objects. This is required to better accommodate the animations provided.
| State |
Prefab to interact with |
Action |
Positioning Rule
|
| BarHang |
BarObject |
Entering the BarHang state |
The BarObject must be 2.55 units above where the Player is standing
|
| BarHang |
BarObject |
Jumping between bars |
The two BarObjects must be 3.7 units apart
|
| BarWalk |
BarObject |
Going from BarHang to BarWalk |
The BarObject width must be 0,3 units
|
| Hang |
WallPointObject |
Jumping vertically or diagonally between WallPoints |
The two WallPointObjects must be 1.16 units apart in terms of height (Y axis)
|
| Hang |
WallPointObject |
Backwards jump |
WallPointObjects must be 4.3 units between each other.
|
Additionally, each action that involves climbing has the character moving a set fixed units upward. As such, all the heights for these actions can be found in the following table.
| Climb Action |
Height
|
| ShortClimb (when the character climbs a short obstacle from its GroundedState) |
1.02
|
| HangClimb (when the character climbs from the HangState) |
1.89
|
| BarClimb (when the character climbs from the BarHangState) |
2.14
|
Blender Source
Overview
Source files are located under the Content folder, AmplifyAnimationPack\BlenderSource.
Consider moving the Blender file to an external folder, else Unity will re-import the file every time the file is saved.
The Scene contains the control rig and the export rig (SK_Mannequin Collection)
- Control rig contains the NLA animation data.
- The SK_Mannequin is the required Unreal skeleton hierarchy and should be used to export your data.
- Animations are stored in the NLA layers, you can access them via Nonlinear Animation.

Here you'll find all the animations included in the pack, you can also search for them in the action editor.

You can enter an animation by right clicking and Start Editing Stashed Action. The layer will turn green signifying that you can now edit it.

Make sure you have the dope sheet open in Action Editor Mode.

Press [N] to bring up the menu. You can use animation layer interpolation to work on existing motion.

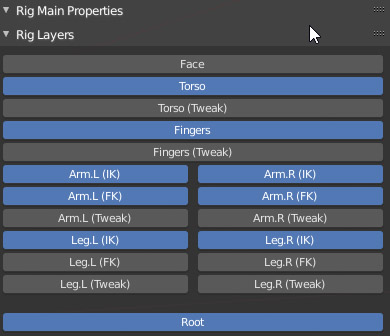
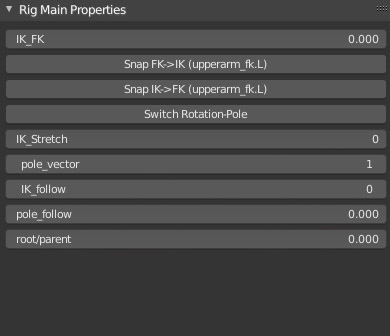
The control rig is based on Rigify so you'll have all the default properties and options.
Scripts
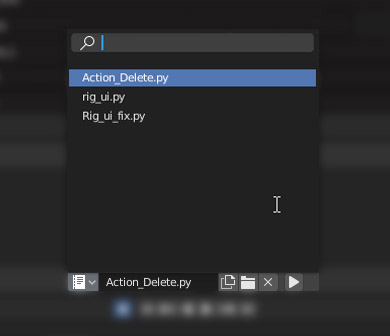
The file contains 3 scripts.

Action delete lets you delete actions by name, newer Blender versions already have this options. Since the rig was created in Blender 2.79 you have to load rig_ui.py, press run and select the rig_ui_fix.py, and press run to use IK snap and FK snap. If you don't do this step the IK to FK snap will throw an error
Export Settings
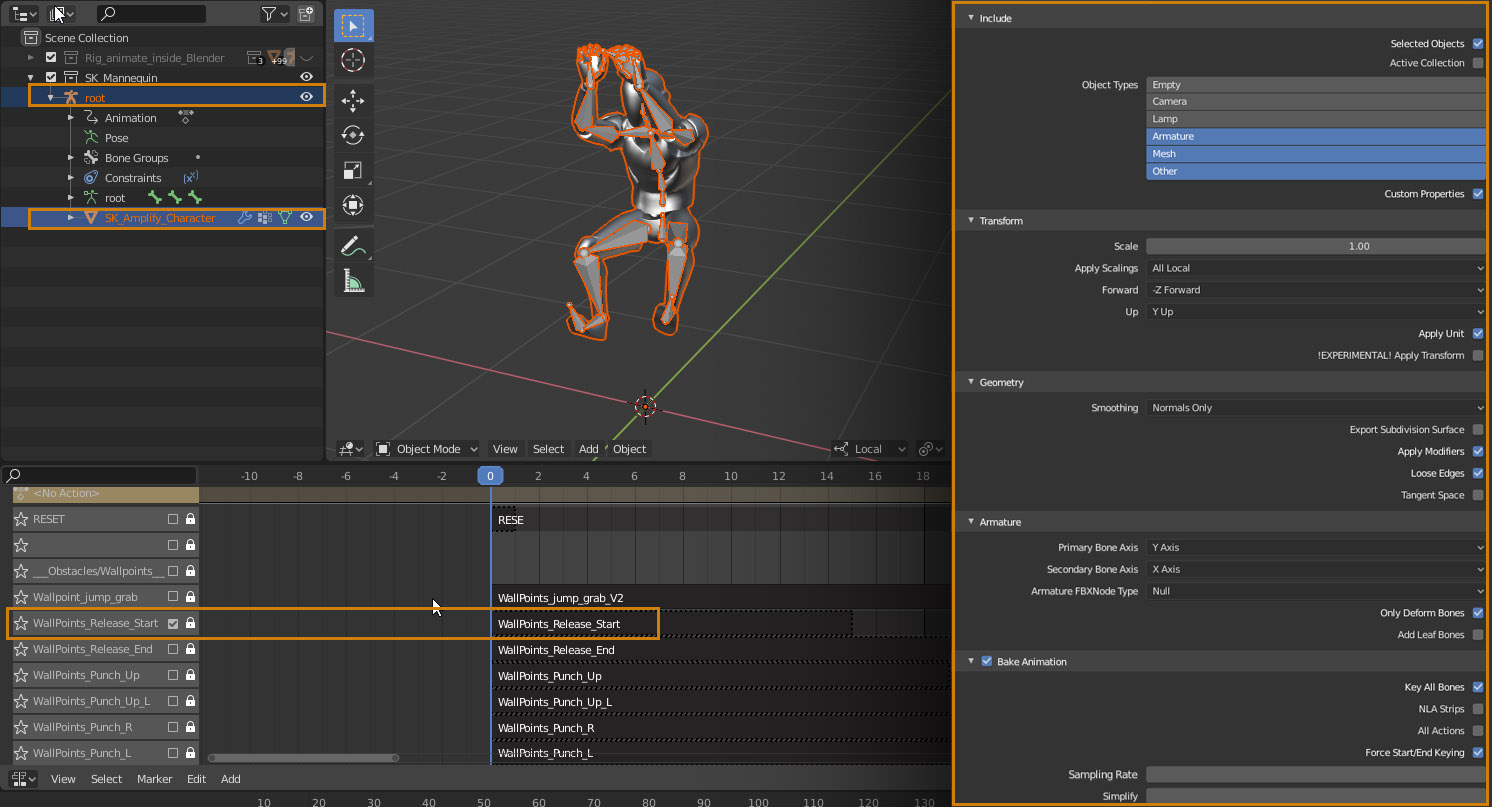
With the rig(root) and mesh(SK_Amplify_Character) selected, and the correct NLA strip active, Go to File - Export - FBX and use the following export settings. Make sure you only have one NLA toggled, also be sure to adjust the timeline to have the same time as the NLA; for example if the NLA has 30f and your timeline is at 50f, you should set it to 30f before exporting it to Unreal in order to avoid exporting the actual 50 frames.

DISCLAIMER - Character Controller
The third-person system is meant to be used solely as a starting point for your own controller, it's a complement to the package but not a production ready option.
| 