Unity Products:Amplify motion/Manual
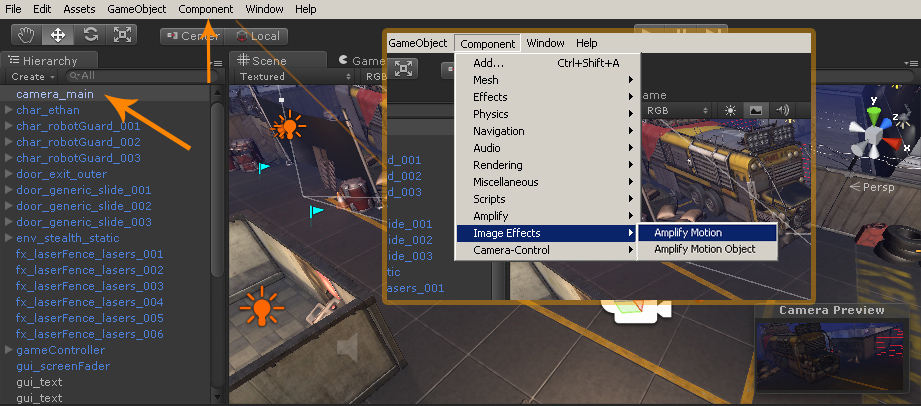
Installation1. Open AmplifyMotion###.unitypackage 2. After Unity loads it will display the “Importing package” window, select All and click Import 3. Amplify Motion should now be installed in your Unity project and it should have the following directory structure: YourProject\Assets\AmplifyMotion\ YourProject\Assets\AmplifyMotion\Plugins YourProject\Assets\AmplifyMotion\Resources Workflow Overview1. Select and apply “Image Effects/Amplify Motion” to your main camera
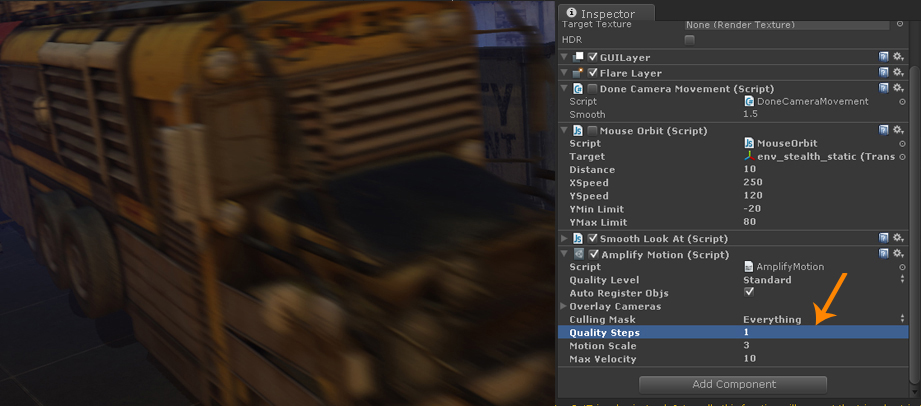
2. Adjust “Quality Steps”, “Motion Scale” and “Max Velocity” to fit your needs
3. When using overlay objects using secondary cameras (e.g. first-person shooter), simply add the camera to the list of “Overlay Cameras”. That way both the primary, and secondary cameras will get proper motion blur, as expected.
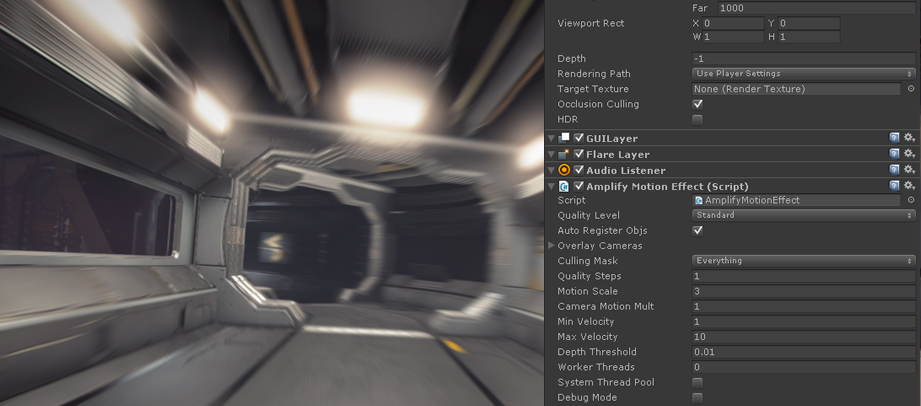
Quality Level
Auto Register Objs
Overlay Cameras
Culling Masks
Quality Steps
Motion Scale
Camera Motion Multiplier
Minimum Velocity
Maximum Velocity
Depth Threshold
Work Threads
System Thread Pool
Debug Mode
Dynamic Objects Instantiated at RuntimeAmplify Motion works by adding a special script to all non-static objects. To enable Motion Blur on non-static objects instantiated at runtime, you have two options: A. A static method, best performing. Scripts are added at edit time:
B. A dynamic method, more convenient. Scripts are added at runtime:
// Instantiates 10 copies of prefab each 2 units apart from each other
} An easier, yet more expensive, alternative is also available. Simply call AmplifyMotionEffect.Instance.UpdateActiveObjects() after instantiating all the objects. // Instantiates 10 copies of prefab each 2 units apart from each other
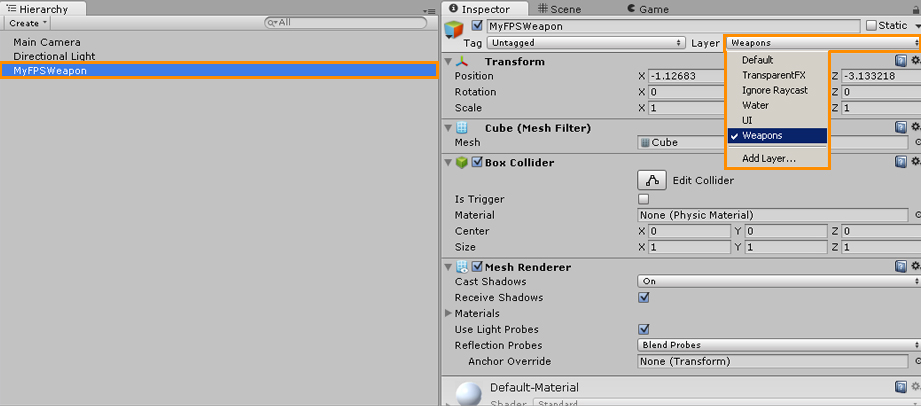
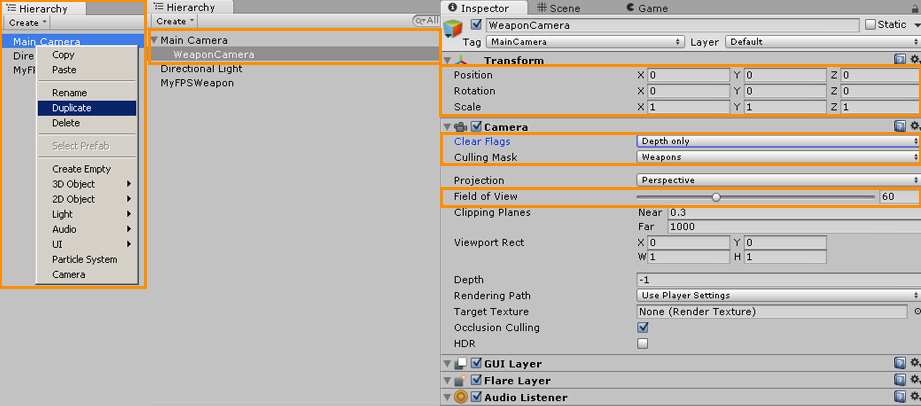
Overlay Cameras & Excluding AssetsOverlay cameras allow you to associate additional cameras without the need to add extra AM camera components. It’s usually used for FPS games where the FOV of the game view is different from the actual weapon camera. 1. Add the visible model to a new layer, in this example we used the “Weapons” layer.
2. To create the second camera duplicate your main camera or create a new camera and adjust the Position/Rotation and FOV manually. Attach the secondary camera to your main camera(Parent to the main camera). In the secondary camera set the Clear Flag to Depth only or Don’t clear and the Culling Mask to “Weapons” only, or any another layers that you might need to use; be sure to remove all unnecessary components.
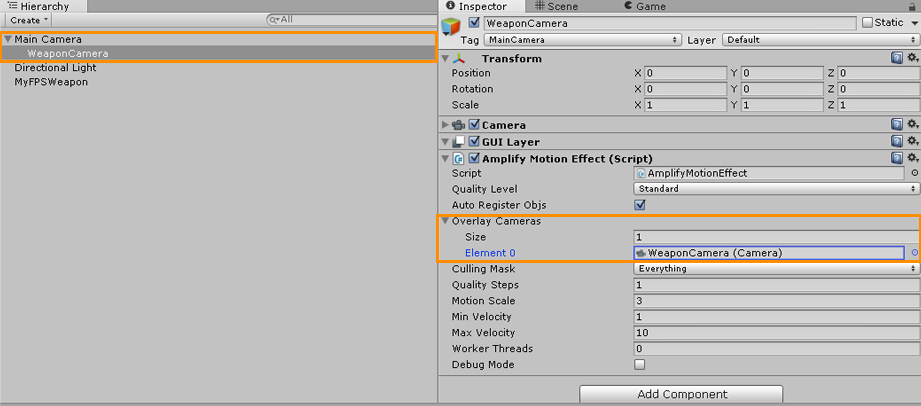
3. In the main camera with the Amplify Motion Effect applied, add the secondary camera to the Overlay Camera array; you can use more than one camera if necessary. Be sure to remove the “Weapons” layer from your main Camera Culling Mask options.
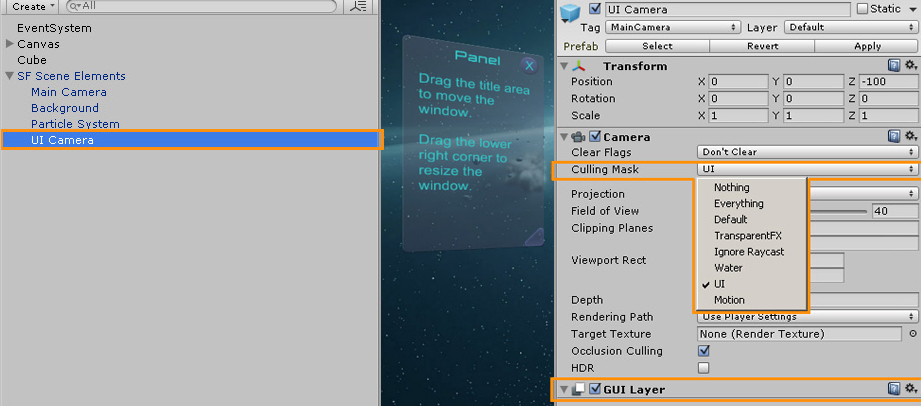
If you experience motion blur related issues in your UI elements consider using a secondary camera to render all UI components separately. 1. Create a second camera, remove any unneeded components keeping only the Camera and GUI Layer component. In the camera culling mask options select only the layer(s) that contain your UI elements, in this case we selected the UI layer.
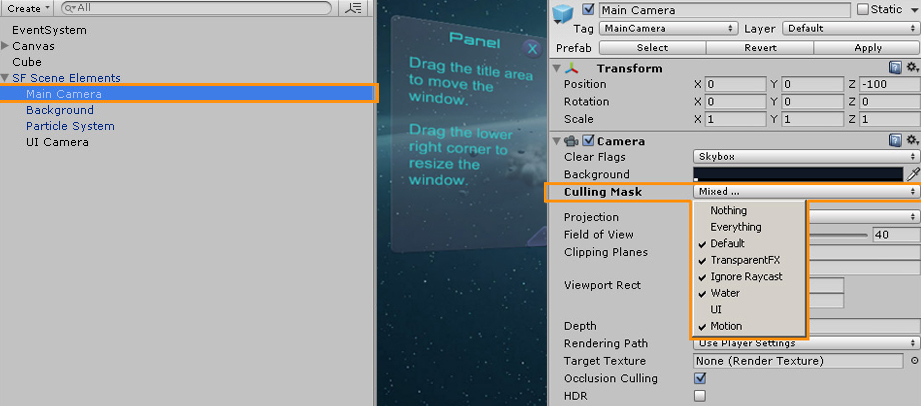
2. In your main camera, remove the GUI Layer component and exclude the UI layer in the camera culling mask options.
From simple 3d planes to fully animated characters, you can exclude any AM compatible asset. Be sure that excluded assets have the Amplify Motion Obj script in their component list. You can learn more about asset exclusion in the second Amplify Motion tutorial. Technical Considerations1. Be sure to enable the Read/Write option on Skinned and Cloth models. 2. “Motion Scale” defines the distance scale for the directional blur, disproportional/extreme values might result in inconsistent motion blur issues. 3. Transparent/Alpha-blended are not directly supported. Transparent surfaces will be blurred according to the vectors defined by the opaque or coverage/alpha-test surfaces below them. 4. At the moment the “Optimize Game Objects” option in the Rig tab of the object inspector is not supported. Since the vertex information is not made available by Unity the motion effect cannot be applied.
5. Cloth tearing motion blur is currently unsupported. 6. For accurate results the Amplify Motion Object component should be applied to moving/dynamic objects, regardless if they are included or excluded from the MB effect. Although lightweight each dynamic object does have an associated cost, not adding the AM Object script to slow moving objects is a completely acceptable option. Slow moving animated models such as plants or trees will work great with just Camera Blur and the performance boost will be noticeable, especially on older or weaker devices. Do note that excluded objects should have the AM Object script applied, e.g. Skybox Model. Threshold ValueUnder specific circumstances the blur effect on dynamic objects might “bleed” into background objects resulting in visual artifacts such as the character feet example below. The threshold value is directly tied to Near & Far Camera Clip values, low Near Clip values such as 0.03 (default) or lower tend to be problematic; we recommend values of 0.10-0.20 or higher. If raising the Near Clip value is not an option for your particular project try using a lower Threshold value such as 0.001 or lower. High Motion Scale and Max Velocity values could also be problematic on some setups, setting the Threshold value to 0 will maintain dynamic object motion blur whilst removing background Blend/Bleed blur effect.
StutteringAlthough most rigidbody blur issues can be resolved by enabling interpolation, we recommend checking the article bellow. It’s a great reference that will likely help you fix most of your issues, not only Amplify Motion related. Timesteps and Achieving Smooth Motion in Unity Warnings & Error handling1. Skin/Bone related warnings: Check you model for invalid bones and make sure the “Optimize Game Objects” option in the Rig tab of the object inspector is disabled. 2. [AmplifyMotion] Invalid object type: Amplify Motion currently does not support object motion blur on Particles, only camera blur will be visible. |
