Unity Products:Amplify Texture 2/Manual: Difference between revisions
ampwiki>AmplifyWiki |
AmplifyWiki (talk | contribs) m (1 revision imported) |
(No difference)
| |
Latest revision as of 00:06, 2 December 2023
Installation
1. Open AmplifyTexture####.unitypackage
2. After Unity loads it will display the “Importing package” window, select All and click Import
3. Amplify Texture should now be installed in your Unity project and it should have the following directory structure:
- YourProject\Assets\AmplifyTexture
- YourProject\Assets\AmplifyTexture\Plugins
- YourProject\Assets\AmplifyTexture\Plugins\Editor
- YourProject\Assets\AmplifyTexture\Scripts
- YourProject\Assets\AmplifyTexture\Scripts\Editor
- YourProject\Assets\AmplifyTexture\Scripts\Editor\Internal
- YourProject\Assets\AmplifyTexture\Scripts\Editor\Utility
- YourProject\Assets\AmplifyTexture\Scripts\Runtime
- YourProject\Assets\AmplifyTexture\Scripts\Runtime\Containers
- YourProject\Assets\AmplifyTexture\Scripts\Runtime\Material
- YourProject\Assets\AmplifyTexture\Scripts\Runtime\Packing
- YourProject\Assets\AmplifyTexture\Scripts\Runtime\Math
- YourProject\Assets\AmplifyTexture\Scripts\Runtime\VirtualTexturing
- YourProject\Assets\AmplifyTexture\Shaders
- YourProject\Assets\AmplifyTexture\Textures
- YourProject\Assets\AmplifyTexture\ThirdParty
- YourProject\Assets\AmplifyTexture\Tools (Full Version)
- YourProject\Assets\Plugins
- YourProject\Assets\Plugins\x86
- YourProject\Assets\Plugins\x86_64
Third Party Packages
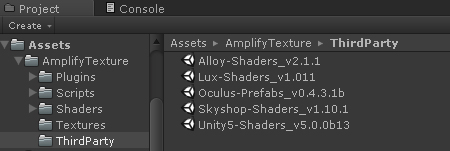
When Amplify Texture 2 detects a compatible third party product it will give you the option to automatically import the necessary pre-converted AT compatible shaders. When using the Alloy, Skyshop or other compatible products, make sure that when importing the provided Unity package that it corresponds to the third party shader version in your Project.
Steps to Amplify Your Scene
1. Add the Amplify Texture Manager to your scene.

2. Create a new Virtual Texture Asset and configure the appropriate values as required.

Virtual Textures
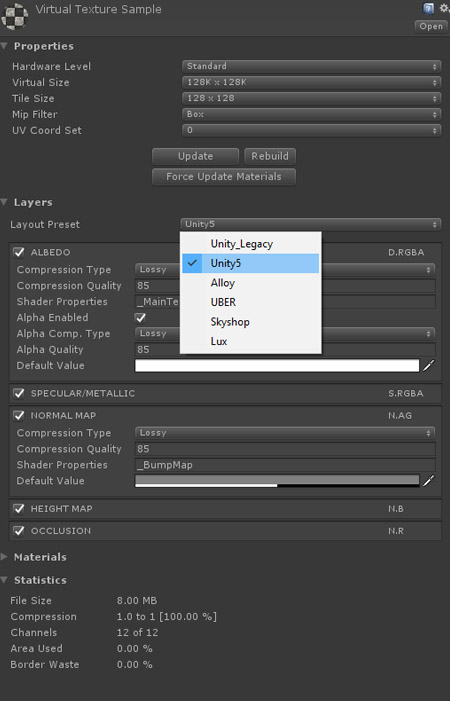
Virtual Texture setup is crucial in order to fully take advantage of the features provided. Keep in mind that you can use several virtual textures per-scene, it’s a good practice to seperate virtual textures by type in order to avoid rebuilding the entire collection. e.g. 1 Virtual Texture characters and another for vehicles.
PropertiesHardware Level
Virtual Size
Tile Size
Compression Type
UV Coord Set
Additionally, as you can see from the image on the right, you can also trigger a virtual texture update, rebuild or material update, directly in the inspector window. LayersLayout Preset
Channels
|
|
3. Define which Material folders will be monitored by the Virtual Texture.
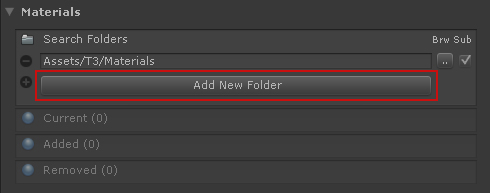
This is one of the most important steps in setting up Amplify Texture 2. Here you can directly define which material folders should be included in a given virtual texture, you can add as many folders as required.
Alternatively, if you plan on using a single Virtual Texture, simply add the Unity Asset Project Folder in order to include all the compatible materials available.
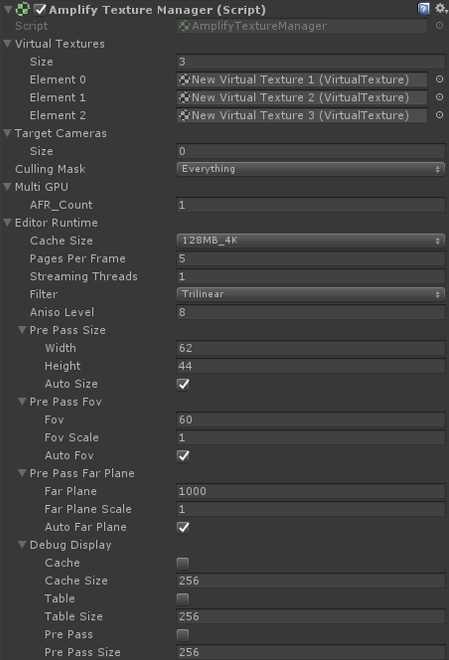
4. Add the created Virtual Texture into the Amplify Texture Manager.
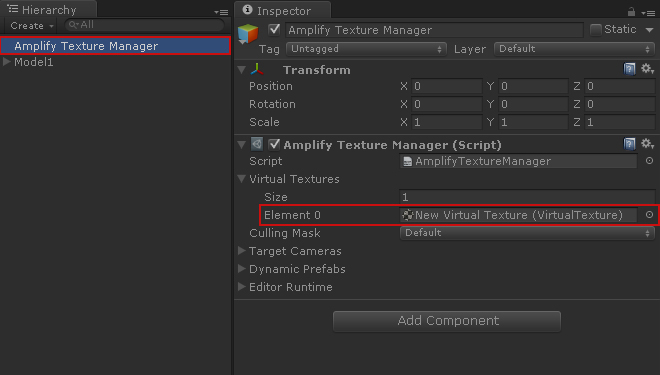
Amplify Texture Manager
|
Virtual Textures
Targeted Cameras
Multi GPU
Editor Runtime
Cache Size
Pages Per Frame
Streaming Threads
Pre Pass Width/Height
Auto Pre Pass Dimensions
Pre Pass Fov/Scale (Pixels)
Auto Pre Pass Fov Dimensions
Mip Bias
Debug Display
|
|
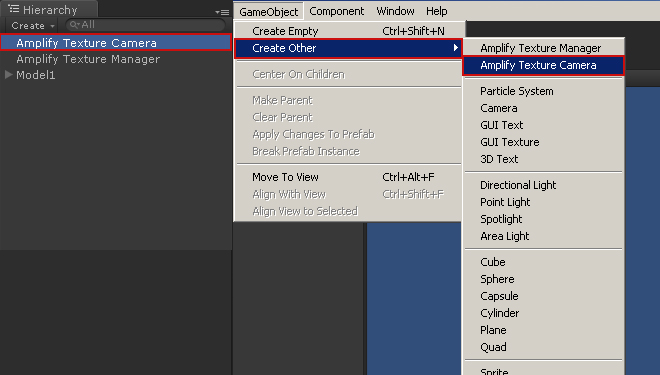
5. The next step is to create an Amplify Texture Camera.
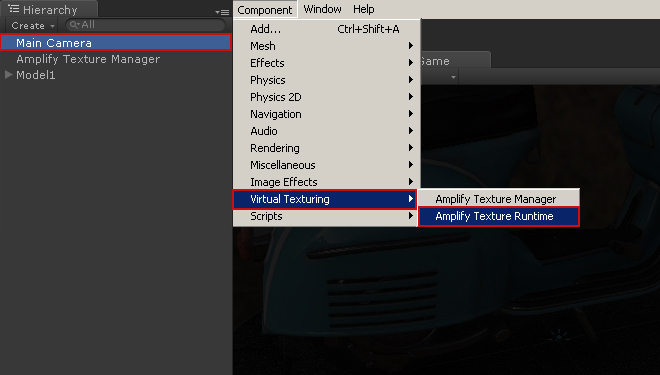
6. Alternatively you can add the Amplify Texture Runtime script to your own camera.
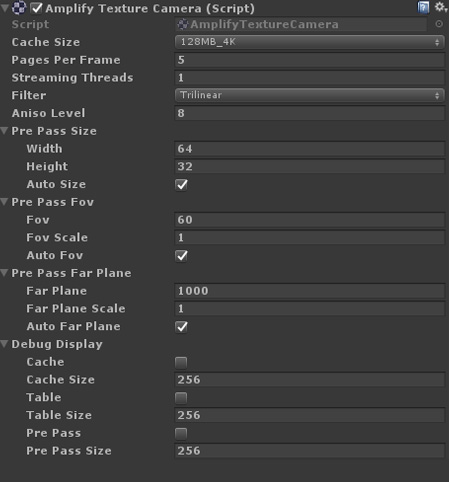
Amplify Texture Runtime
|
Cache Size
Pages Per Frame
Streaming Threads
Pre Pass Width/Height
Auto Pre Pass Dimensions
Pre Pass Fov/Scale (Pixels)
Auto Pre Pass Fov Dimensions
Mip Bias
Debug Display
|
|
7. Finalizing the scene setup.
Automatic Conversion
Amplify Texture 2 provides a simple method of automatically converting your standard Unity scene into an amplified version or vice versa. Alternatively, you can setup your scene as you would with any other shaders and trigger the Virtual Texture build process manually.
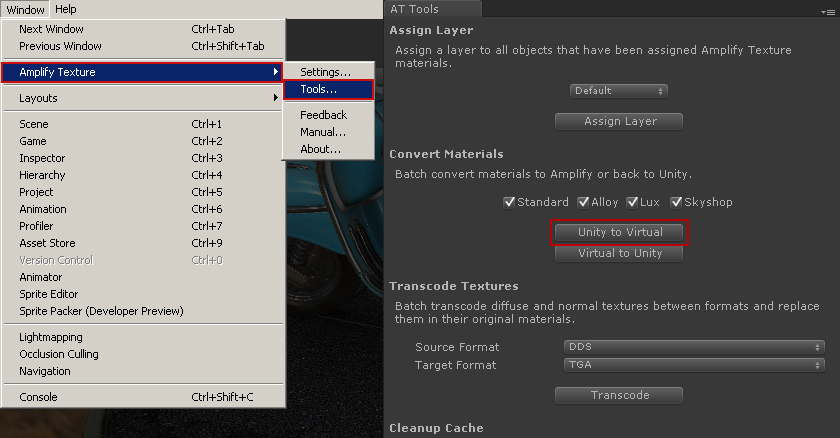
After setting up AT2, simply open the Tool window and click on “Unity to Virtual”. That’s all you need to do in order to amplify your existing scene
Manual Conversion
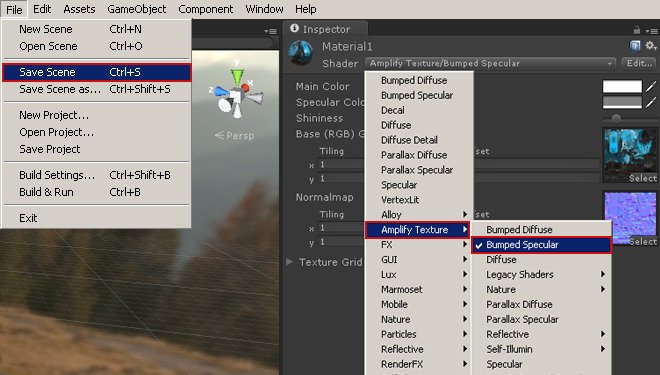
Alternatively, you can directly add your materials as you would with any other shaders and simply trigger the virtual texture build when required. By applying a Amplify Texture compatible shader and saving your scene, Amplify Texture 2 will automatically build the required virtual textures. Applying or creating virtualized Unity materials follows the same steps as Standard Materials, the only difference being the shader used.
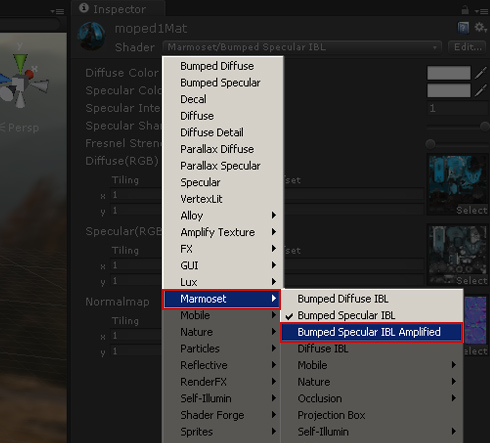
Likewise, using third party shader frameworks is just as simple.
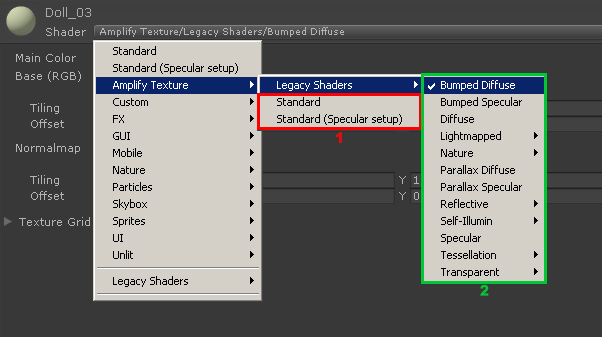
In Unity 5(1), after importing the shader package the legacy Unity 4 shaders will still be available for use. Do note that Unity 5 virtual textures can only be used with the new Standard(Metallic)/Standard Specular shaders, for legacy Unity 4(2) shaders use the Unity 4 virtual texture preset.
Node-based Shader Editors
Amplify Shader Editor
There's an easy way to build AT2 compatible shader without writing a single line of code
Check out our node-based shader editor, it's the quickest way to create AT2 compatible shaders.

Try it today: Amplify Shader Editor
Troubleshooting
Installation & Update Issues
When upgrading from very early development builds we strongly recommend doing a complete re-install. A new installation will ensure that Amplify Texture 2 performs as expected.
1. Close Unity and Backup any custom data.
2. Delete the Amplify Texture folder [PROJECT]/Assets/AmplifyTexture
3. Delete the native AT2 DLLs AmplifyTextureNative.dll and AmplifyTextureNativeEditor.dll, both present in [PROJECT]/Assets/Plugins/x86 and the /x86_64 folder.
4. Delete the AT2 Cache Folder [PROJECT]/Library/AmplifyCache
5. Follow the installation instructions in chapter 1.
Installing the full version over the trial version with your scene open may cause some Unity errors related to native plugins. To avoid these, unload your scene – or shutdown Unity – and delete any Amplify Texture related DLLs in the “Assets/Plugin” folder – where the native plugins reside – before loading up your project again importing the new package.

Do not install Amplify Texture over our older product “Amplify Virtual Texturing” or “Amplify Texture 1”, this will certainly cause technical issues. Only one of the plugins may be used at any time.
We advise you to always use the latest version of Amplify Texture 2.
Abnormal Third Party Materials
1.Check if the third party package version matches the provided AT2 package.
2.Make sure the Virtual Texture is using the correct Preset and that the required channels are active; Diffuse, Specular, Normal etc.
Keep in my that in Unity 5 the legacy AT2 shaders use the Unity 4 Preset; the Unity 5 Presets are reserved for the new Standard and Standard Specular Setup shaders.

Debug Information
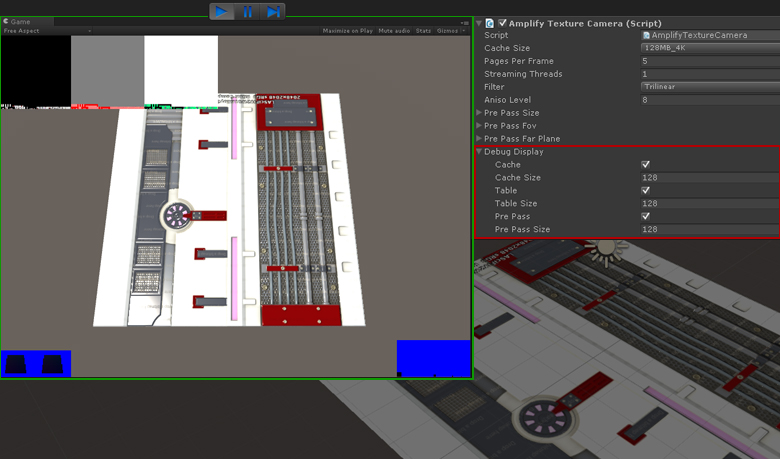
1. Runtime debug information can be enabled in the Amplify Texture Camera component. Visible only during Play mode using the active camera. 1 – Texture Tiles, 2 – Culling Pre-Pass, 3 – Page Table.
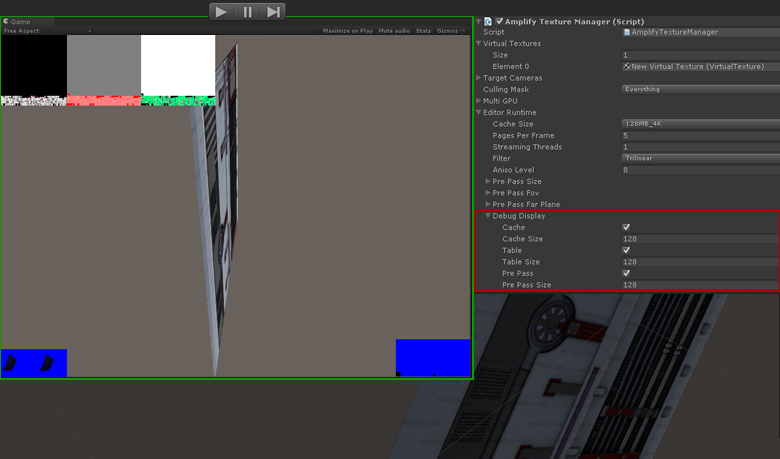
2. Editor debug information can be enabled in the Amplify Texture Manager component . Visible only in the editor Game window during edit mode using the active Editor windows view camera. 1 – Texture Tiles, 2 – Culling Pre-Pass,
Common Pitfalls & Possible Solutions
Black Scene without textures
- Possible incorrect cull mask setup, check the cull mask options in the Amplify Texture Manager component. Non-virtualized materials/object layers should be removed from the selection.
Missing page file warnings
- The virtual texture was not built or is empty due to miss configuration or other possible issues.
Material search folder warnings or virtual texture not building
- Check if the virtual texture is pointing into the correct folder(s).
Virtual texture not updating
- There were significant shader changes, “Force Update Materials” in the virtual texture inspector panel. In some cases if the problem is not solved users should rebuild the virtual texture.
Textures are blurred during play
- Check if the active camera has the Amplify Texture Runtime component and the state (on/off). If the component is off check the log for possible errors.
Textures are blurred when occluded by particles or semi-transparent materials
- Add all non-virtualized materials, such as particles for example, to a specific layer and disable it in the Amplify Texture manager culling mask options. The non-virtualized semi-transparent materials block the pre-pass process used to determine which materials to stream.
Incorrect normal maps, color inconsistencies
- Do not use any of the Unity image tools such as “normal map from grays” and do not use the Unity automatic CMYK to RGB conversion.
Unexpected code issues on existing projects with previously working AT2 non-source code builds
- As of Alpha 32 the full AT2 version includes source code that might conflict with some of your existing Classes.
If you are still experiencing AT2 related issues, please contact [email protected] with the Log Information (if available), Unity & AT2 Version, Render Mode, DirectX Version and OS Information; any additional information would be extremely helpful in our debug process.
Warnings & Error handling
When an error occurs or you cancel the Virtual Texture build process, Amplify Texture will auto-deactivate by disabling the Manager component.

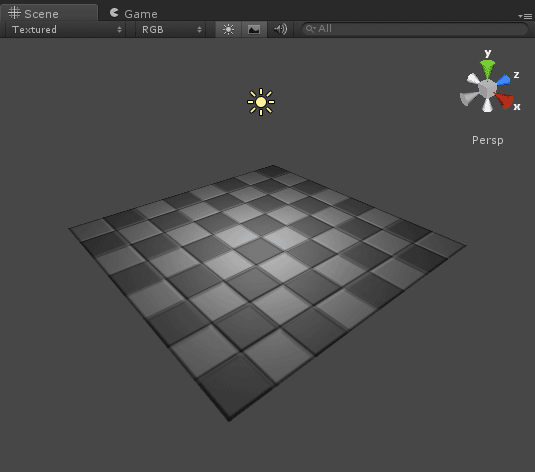
While Amplify Texture remains deactivated, a placeholder material will be shown instead of any virtualized materials. This means that, if your scene is shown with textures similar to the image below, your Manager was probably deactivated for some reason and you should have a look at your console to see if any errors were thrown by AmplifyTexture.
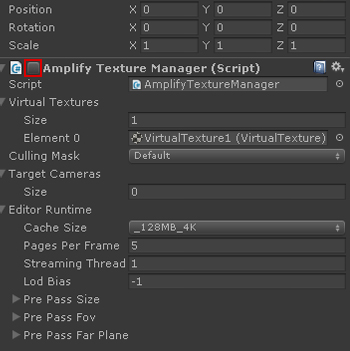
To reactivate Amplify Texture goto your scene Hierarchy, select your “AT » Manager” object and activate the “AmplifyTextureManager” component listed in the Inspector.
Notes:
Some warnings will require user action in order to continue.

This warning appears when the default search folder is not set in a used Virtual Texture; to proceed, simply add the appropriate folder and rebuild the Virtual Texture.
- Make sure that all warnings or errors are fixed before reactivating the Manager.
- If an incremental build was canceled, it will be resumed after reactivation.
How To Convert Your Own Shaders
Wait, there's an easier way!
Check out our node-based shader editor, it's the quickest way to create AT2 compatible shaders.Try it today: Amplify Shader Editor

You can convert any of your existing shaders to support texture virtualization, except semi-opaque/transparent. We provide a conversion pack to demonstrate how a regular shader like “Bumped Specular” can be adapted to work with virtualized textures.
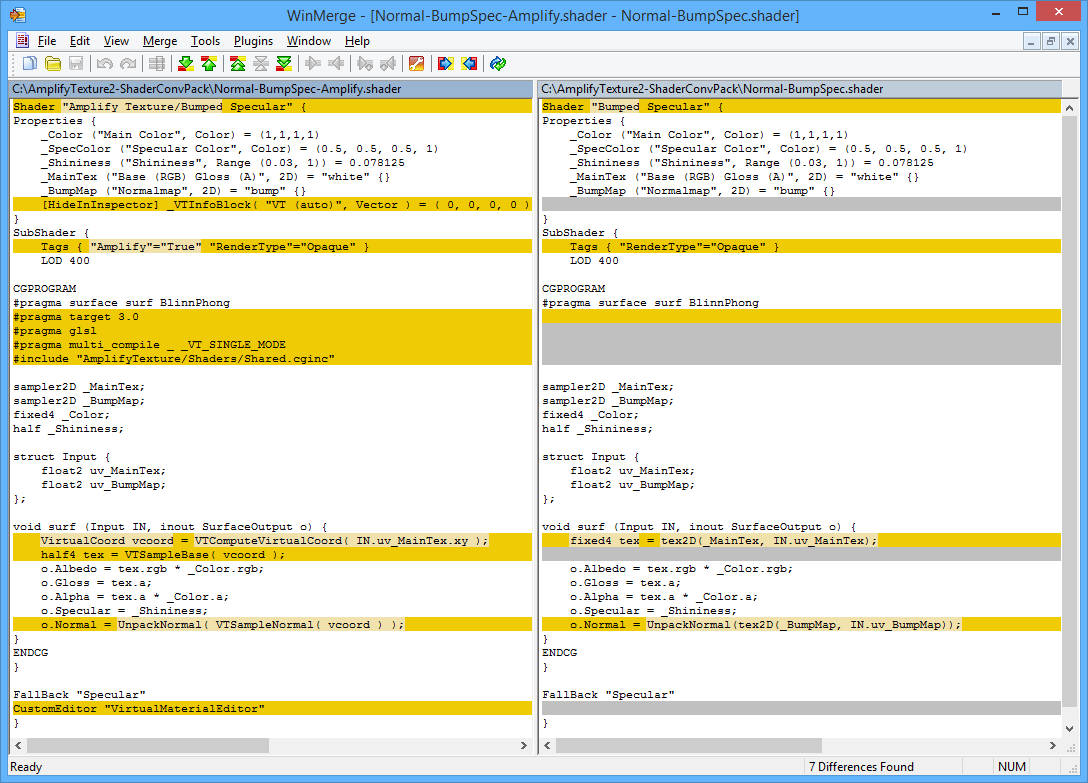
Amplify Texture 2 – Shader Conversion Pack: Download
Third Party Physically Based Shaders
Using compatible third party shaders with Amplify Texture 2 is extremely simple and quick to setup.
1. Import your preferred third-party package, Alloy, Skyshop or Lux. Be sure to use the latest version made available by the developer; using older versions may cause some shaders to display incorrectly.
2. Double-click on your package of choice located in “\AmplifyTexture\ThirdParty\” in order extract the AT2 compatible shaders. After extraction, you should see a folder with the same name as the third-party shader package.
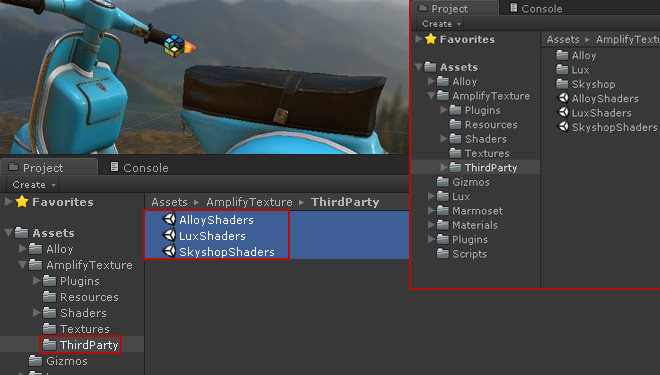
Note: We do not recommend moving the created folders at this stage, however, you may do so if you keep all folders at same level.
e.g. If you moved the Marmoset Folder from the Asset Folder root to “Assets\External Frameworks\”, in order to avoid possible issues, you would have to move the Amplify Texture folder as well.
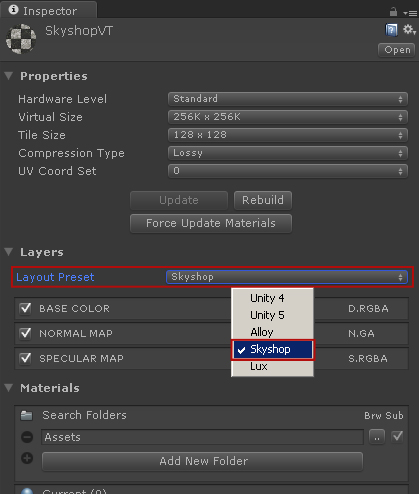
3. Create a Virtual Texture using the preset required and activate the required channels. e.g. Skyshop Preset + Specular Layer, we will be using a Bumped Specular Material as an example.
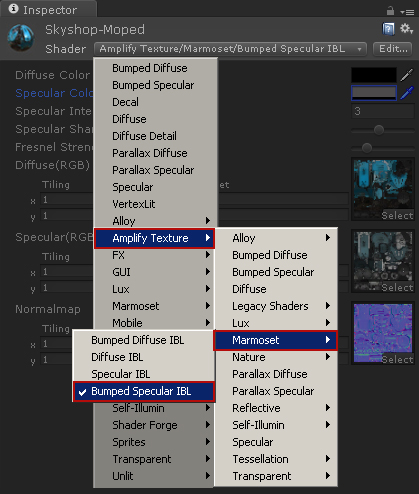
4. You are now ready to use third-party amplified shaders; simply select the shader and apply as you would with any other standard shader. Do note that depending on how you organize your folders the shader location in the Material Dialog might change; below is an example of the extraction result in step 2; “\AmplifyTexture\ThirdParty\”.
Tessellation & Displacement Support
Amplify Texture 2 supports Virtualized Displacement and Tessellation, to take advantage of this technique simply set your Unity Project Player Settings to DX11 and apply the AT2 Tessellation Shader to your Material.
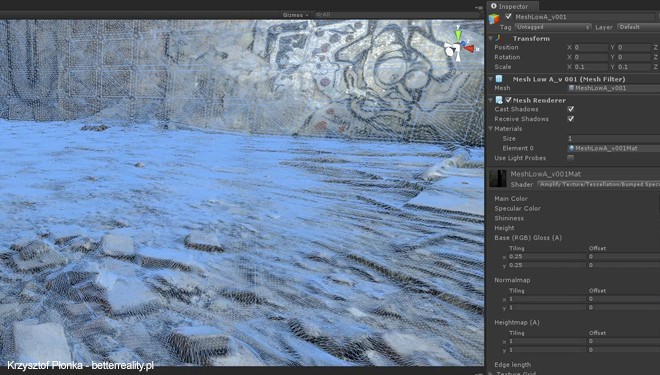
Be sure to use appropriate texture padding, especially if you are using Multi-Tile Uv collections. If you notice displacement seams on your model, insufficient padding is probably the cause.
Tips:
If recreating the texture is not an option you can always expand the texture edges in order to approximate padding. Manually with the Photoshop Minimum and Maximum filter or with Solidify.
Solidify for Photoshop: Windows Mac
Recommended Texture Padding
- 128×128 – 2px
- 256×256 – 2px
- 512×512 – 4px
- 1024×1024 – 8px
- 2048×2048 – 16px
- 4096×4096 – 32px
- 8192×8192 – 64px
- 16384×16384 – 128px
Transparent Surfaces and GUI/HUD Elements
Semi-opaque or Transparent surfaces cannot be virtualized and these surfaces may block virtualized surfaces’ texture tiles from being streamed. For example, when using GUI/HUD or similar elements, Particle System or other assets with a transparent materials, virtualized surfaces behind it may not stream correctly. To fix this, all you need to do is change the layer these objects to TransparentFX. This way they’ll be automatically ignored because the default Manager’s “Culling Mask” is set to include only the Default layer.
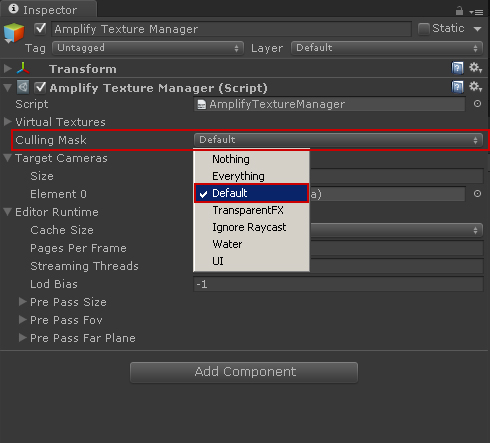
You can also solve this problem by creating a new layer specifically for virtualized surfaces. Then setting this Layer on all virtualized objects and changing Manager’s “Culling Mask” to include only that layer, exclusively.
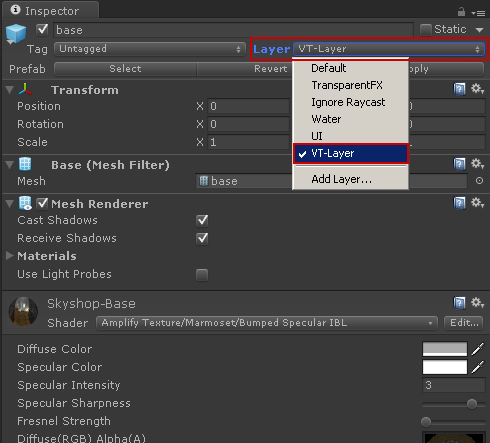
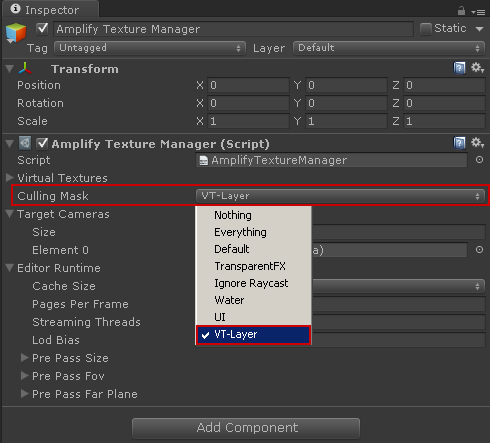
Note: Only virtualized surfaces need to be “seen” by Amplify Texture.
Artistic and Technical Considerations
Recommendations
- All textures should have power-of-two (POT) dimensions on both sides. Non-power-of-two (NPOT) textures will be rescaled to the next closest POT dimension. Avoid NPOT at all costs because it will slow down VT processing.
- All textures should have dimensions equal or larger than 128 pixels. Textures smaller than 128 pixels will be rescaled to match this requirement.
- For best results, the size of input textures should match on a per-material basis. Smaller textures will be rescaled using a cheap bilinear filter to match the largest texture on the material. E.g. match diffuse map size to normal map to avoid wasting space.
- When using Multi-Tile UV collections, avoid using special characters in your filenames. Some non-alphanumeric characters may throw off the detection process, instead try to use simple naming conventions. e.g. “Character1Diffuse.1001.tga”, “Character1Normal_x0_y0.tga”, “Character1Occlusion_x1_y1.tga”
- Non-square power-of-two textures are supported, however, not recommended due to irregular virtual texture packing.
- If the same square size is used for all textures, the virtual texture packing layout will be optimal.
Culling Mask
This plug-in works by using analyzing surfaces visible from the camera in order to select which tiles to load from the large virtual texture. More often than not, however, these surfaces may be blocked by transparent decals, particles, vegetation, or even partially covered by fully opaque or cutout/alpha-test surfaces. When this happens, due to this technique’s inability to handle transparent objects or multiple layers of opaque surfaces, the system will not be able to select and stream the correct pages, usually resulting in blurry tiles.
Amplify Texture provides a mechanism to prevent surfaces using regular materials from interfering with tile visibility analysis. This mechanism is provided by setting the Culling Mask field, in the Manager, to a value that identifies only surfaces that have been virtualized (contain Amplify Texture-compatible materials). Additionally, you may find a tool in the “Window/Amplify Texture/Tools” menu that will automatically traverse the whole scene and assign a specific layer to these virtualized/Amplified objects. After assigning a specific layer to these objects, and setting the Manager’s Culling Mask to the same value, these objects and their surfaces will be exclusively analyzed by the system without interference from regular Unity surfaces.
Multi-Tile UV Workflow
Multi-Tile UV workflows allow you to take your texture resolution into unrivaled levels of detail. Other than the increase in possible quality and overall texel density, this workflow brings a multitude of improvements regarding performance and management of texture collections.
Performance is key, you can take advantage of Multi-Tile UV workflows even if you are not aiming at extreme resolutions. Any texture tile collection, regardless of the number, will be considered to be a single texture by Amplify Texture 2. As you can imagine this brings fantastic opportunities for scene optimization without compromising texture quality.
Using Multi-Tile UV collections with Amplify Texture 2 is extremely simple. Our technology will automatically batch entire collections, be it MARI UDIM tiles, Zbrush, Mudbox or compatible naming conventions.
Most mainstream authoring software supports multi-tile uv’s. In very simple terms, it simply means that you can use more than 1 texture per material ID. Take a simple character for example, in the past if you wanted to use 1 texture for the body and 1 texture for the head, you would end up with 2 draw calls and wasted texel space, not to mention the added work and possible issues of dividing the actual mesh. With Amplify Texture 2 you can go beyond the usual 0,1 UV space without compromising performance.
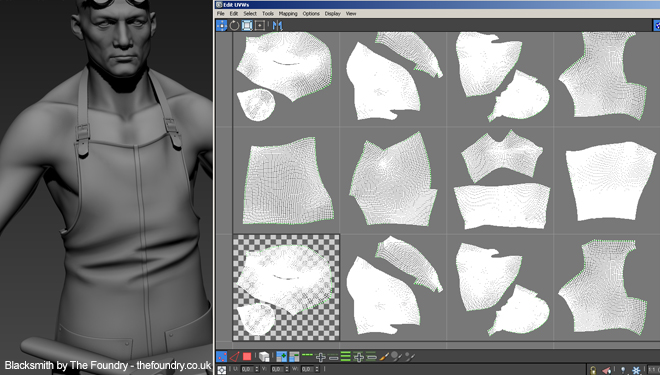
The possibilities are endless, imagine adding hundreds of 16k tiles to a terrain, batching dozens of textures in an entire set of shared materials for a given large level down to less than 10 texture draw calls; you are free from the usual limitations.
1. To use a texture collection, simple add the first tile to your Amplify Texture compatible Material and hit CTRL-S to save the scene. All the tiles will be automatically added to the virtual texture.
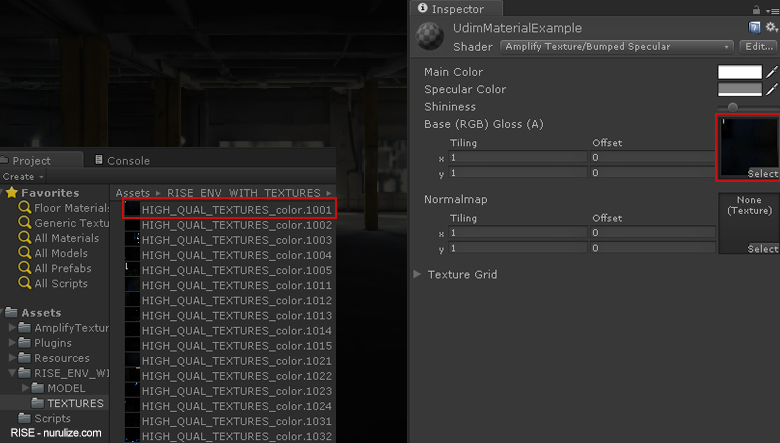
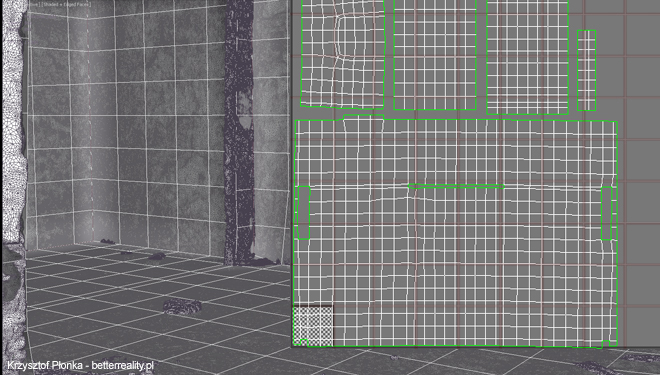
Note: Amplify Texture 2, like MARI, fully supports overlapped UV quadrants. (UV clusters/ across several tiles). Dividing your UV’s into isolated tiles is not mandatory.
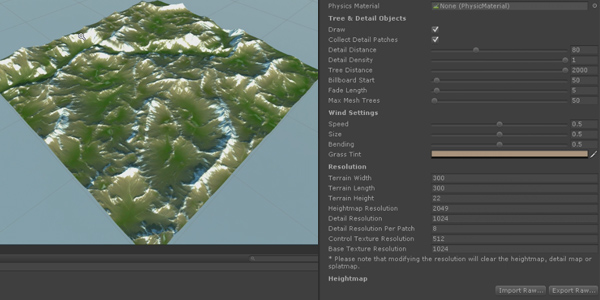
When using the Amplify Texture 2 Terrain Shader, Unity Terrains will automatically use Normals and Color Multi-Tile Collections without needing to manually adjust the UV’s.
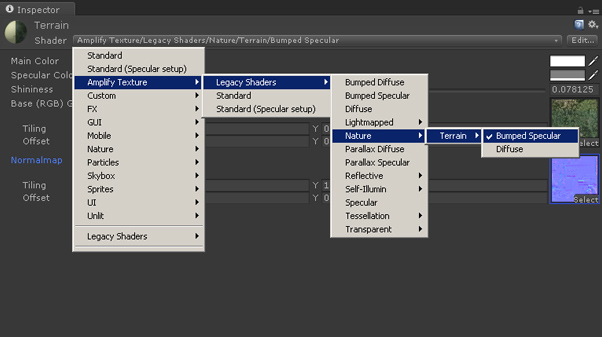
Users can still use Terrain Displacement Maps (RAW) but they will not be virtualized. Terrain support is currently in development, more features will be added in the future.
External Multi-Tile Bake Tools and Additional Resources
Many authoring software developers have already expanded on their Multi-Tile UV support and functionalities. In this section, we briefly cover, not in any particular order, some of main suites used across different fields. From Autodesk 3ds Max to Maya & Mudbox, Pixologic Zbrush, The Foundry MARI & Modo, 3D-Coat, World Machine and Global Mapper.

3ds Max
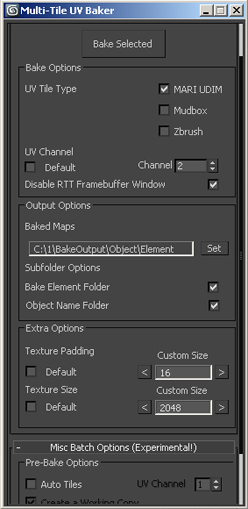
Multi-Tile UV Bake Tool for 3dsMax: This Tool is free for all Amplify Texture 2 users and will be included in the AT2 Unity Package.
Multi-Tile UV Bake Tool: Manual
Multi-Tile Bake Tool
|
|
Maya
Maya offers more flexible creation and bake tools when compared with 3ds Max. Although possible, the Multi-Tile bake process is mostly manual.
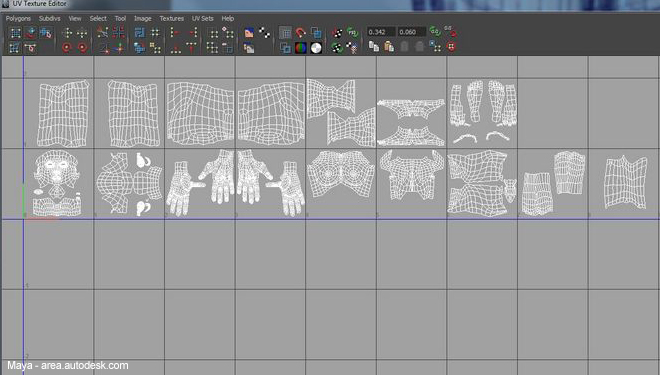
Tutorial
Maya Multi-Tile UV: Quick Start Tutorial]
Third-Party Scripts
Vray Dirt Bake by Andrew Kin: Homepage - Download
MARI UDIM Bake Tool by Will Earl: Homepage - Download
Mudbox
Mudbox fully supports Multi-Tile UV Mapping, sculpting, texturing and baking of tile collections; and it even supports interchangeable Ptex – UV bakes.
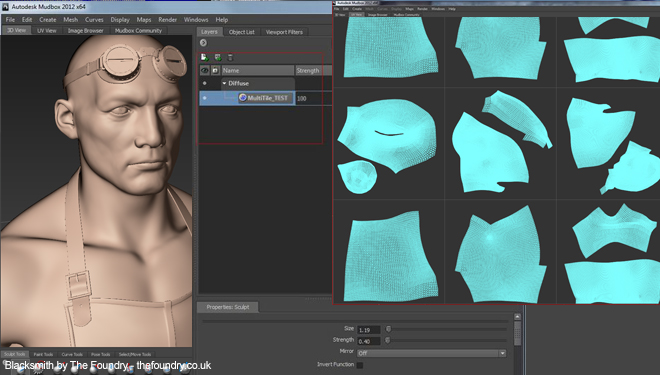
Tutorial Mudbox Multi-Tile UV: Quick Start Tutorial
MARI
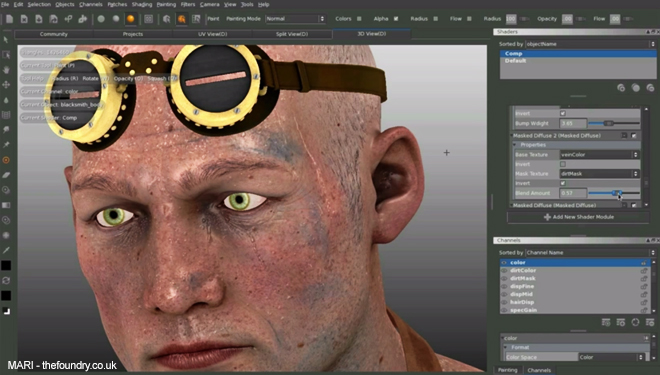
MARI is the industry standard for advanced, non-destructive, 3D Paint. Built around the concept of Multi-Tile UV and texture virtualization, it fully supports all required operations, including interchangeable Ptex – UV bakes.
Tutorials
MARI: Learning Resources
MODO
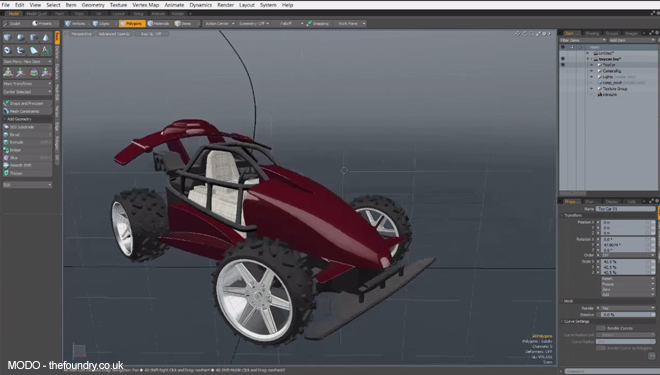
MODO combines powerful animation, sculpting, effects and rendering in a next generation 3D modeling integrated package. A all-in-one industry leading solution, from hobbyist to VFX Powerhouses, MODO is your gateway into professional level, affordable tools.
Tutorials
MODO: Learning Resources
MODO Baking UI Toolkit: UDIM Workflow
MODO: UDIM Workflow
Zbrush
Zbrush fully supports Multi-Tile UV Mapping, sculpting, UV Generation with UV Master, texturing and baking of tile collections.
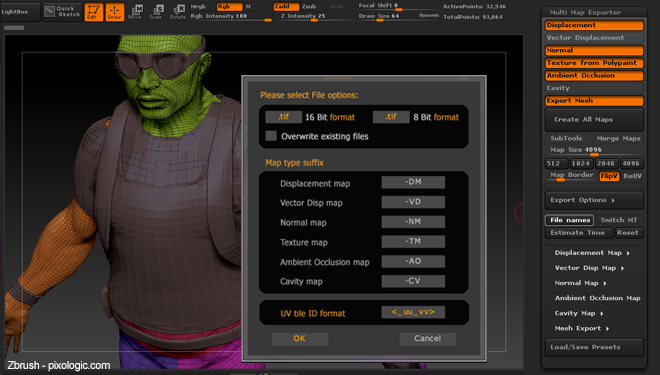
Export is easily accessible via the Multi Map Exporter; in order to use Multi-Tile UV in your meshes simply use UV Groups, found under Polygroups.
Resources
Manual Reference: Multi Map Exporter Multi Map Exporter: Reference PDF
3D Coat
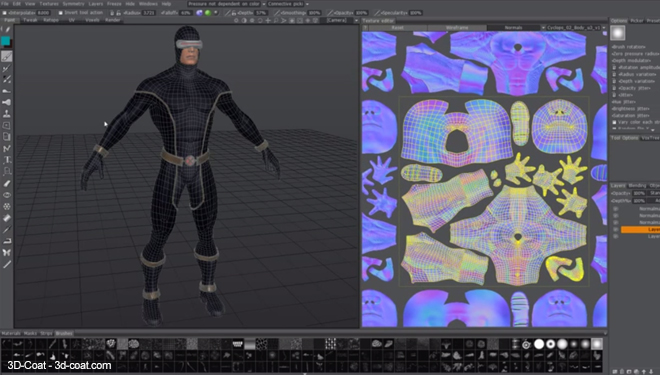
3D-Coat is a all-in-one toolbox for sculpting, texturing and retopology.
Tutorial
Multi UV: Overview
World Machine
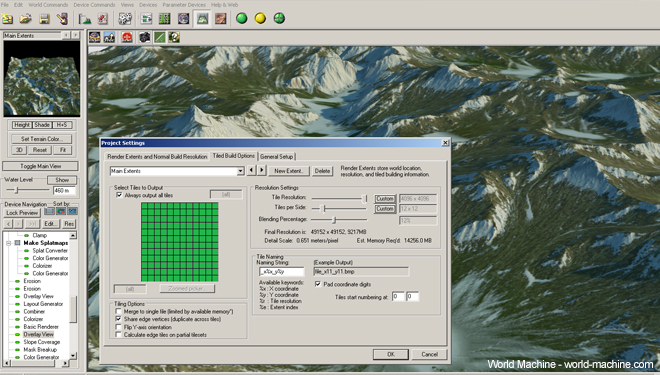
World Machine is an extremely powerful suite for procedural terrain generation, simulations of nature eroding processes and interactive editing. You can build and export high resolution heightfields, textures and meshes; full integrated tile export support.
Resources
World Machine: Manual
Global Mapper
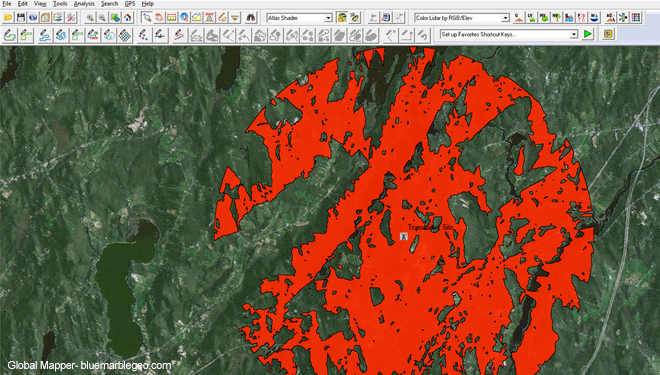
Global Mapper is an affordable and easy-to-use GIS Data processing application that offers access to an unparalleled variety of spatial datasets and integrated tile export support.
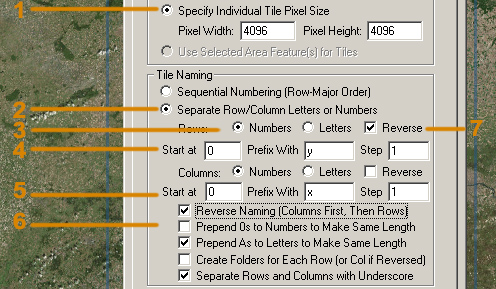
Note: In order to export collections compatible with AT2 or similar naming conventions some tile export options will have to be adjusted.
|
|
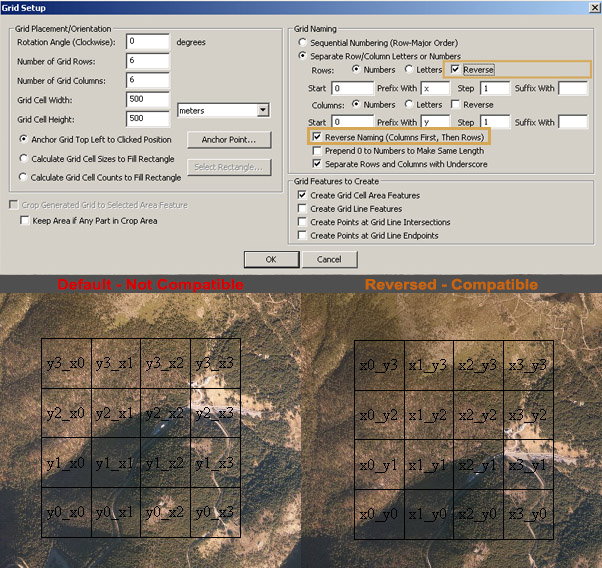
The same applies when adding grid areas to your workspace.
Tutorials
Global Mapper: Tutorials
World Composer
World Composer is a great way to quickly extract data sets from the Microsoft Bing Map service. You can easily extract Heightmaps and Colormaps up to 16kx16k pixels; do keep in mind that AT2 only supports the exported image result from World Composer, single images or compatible _x _y tile sets.
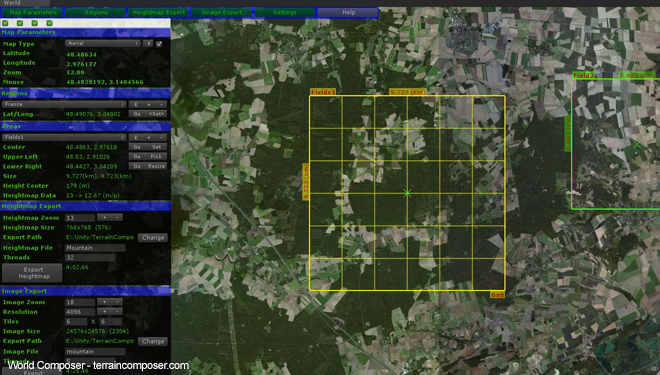
Product Page
World Composer: Unity Asset Store
VR Devices & Multiple Camera Setups
Amplify Texture 2 fully supports VR devices. In addition, AT2 is fully configurable and allows for flexible multi-camera setups.
HTC VIVE
Add the Amplify Texture Camera component to the Main Camera (eye). Alternatively, you can add the Main Camera (eye) to the camera list in the Amplify Texture Manager, the AT2 camera component will be automatically added.
Oculus
Add the Amplify Texture Camera component to the Main Oculus camera. Alternatively, you can add the Main Camera to the camera list in the Amplify Texture Manager, the AT2 camera component will be automatically added.
Compatible Devices
Add the Amplify Texture Camera component to the Main Camera responsible for drawing your game view, it’s usually the camera used for standard image effects. Alternatively, you can add your Main Camera to the camera list in the Amplify Texture Manager, the AT2 camera component will be automatically added.
Multiple Camera Setups for Legacy Hardware or Custom Requirements
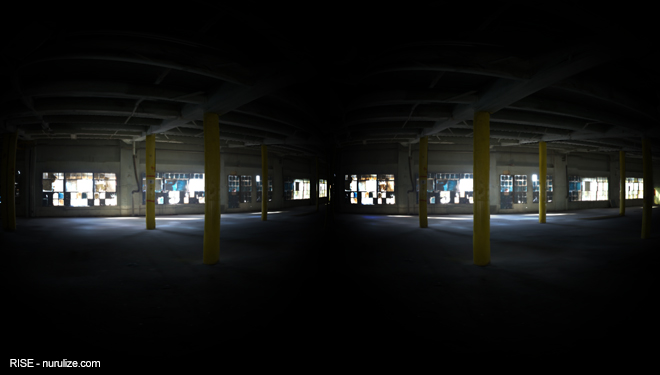
In order to use multiple cameras, simply set the number of cameras required and add them to the appropriate slots in the Amplify Texture Manager.
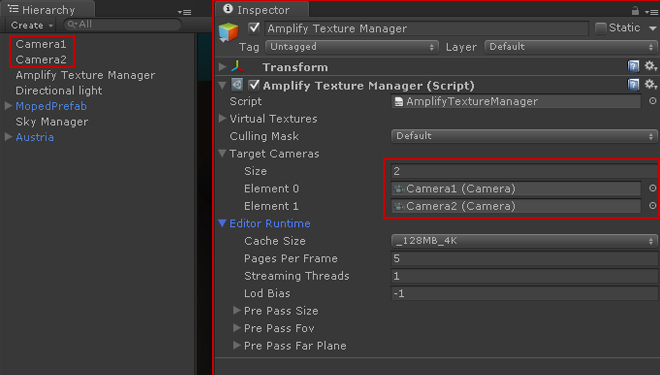
Note: Each active listed camera will independently stream from the available virtual textures; as a result, although it may not be an issue for 2 cameras, as you increase the number, so will the necessary computing resources.
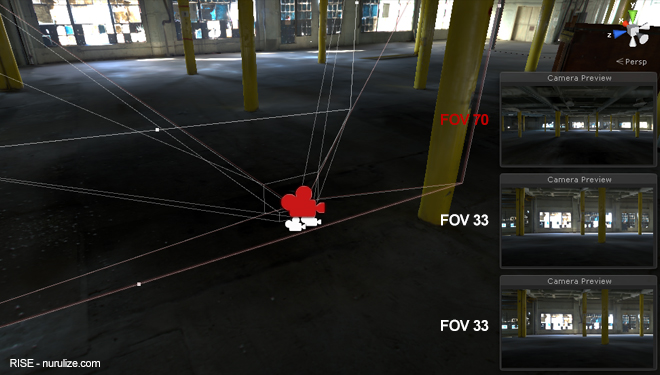
Consider the following; if both cameras point roughly to the same area, in other words, if you could fit the entire area covered by 2 cameras into a 3rd camera with a slightly higher FOV, it would be best to use the 3rd camera for Virtual Texture Streaming, processing requirements would be considerably reduced. Camera position offset exaggerated in the image below as an example.
Feedback
When a fatal error occurs within Amplify Texture, an error dump file is generated containing critical information to help solve the problem. You may find this file in the root of your assets folder — e.g. “YourProject/Assets/amperr.dump” — after a critical error. Please include this file when reporting fatal errors.
To file error reports, questions or suggestions, feel free to get in touch directly.
Legacy Updates (2.0.3 a32)
Updating from version version 2.0.3 a32 or higher
As of version 2.0.3 a32, we simplified the process of updating Amplify Texture 2. From Trial to Full, or simply when updating your current full version. The following instructions apply both to Unity 4.6 and Unity 5.
- Disable the Amplify Texture Manager component – or create a new empty scene.
- Close and reopen Unity.
- Import the new package.
- The update is complete and ff you followed all the steps required, all the component connections should still be active.
Updating from version version 2.0.3 a31 or lower
Updating the trial or full version to the latest amplify texture 2 build, version 2.0.3 a 32 and up involves a few manual steps. The following instructions apply both to Unity 4.6 and Unity 5.
- Disable the Amplify Texture Manager component – or create a new empty scene.
- Close Unity.
- Delete the native AT2 DLLs AmplifyTextureNative.dll and AmplifyTextureNativeEditor.dll, both present in [PROJECT]/Assets/Plugins/x86 and the /x86_64 folder.
- Reopen Unity.
- Import the AT2 new package.
- If you followed all the steps required, you are now ready to take advantage of the latest AT2 version and all the great features available. Keep in mind that updating from older versions to 2.0.3 a 32 or higher will likely break your component connections.
Third Party Libraries
This software uses the FreeImage open source image library. See http://freeimage.sourceforge.net for details. FreeImage is used under the FreeImage Public License, version 1.0. This software uses jpeg-compressor, by Rich Geldreich. See http://code.google.com/p/jpeg-compressor for details