3ds Max Products:Multi-Tile UV Bake Tool/Manual
Installation
Automated installation with administrator rights
When installing the tool be sure to run 3dsMax as Administrator. On restricted machines you may get a few runtime errors, be sure to run as administrator if that is the case. If the problem persists please contact support via email. This manual is a work in progress and subject to change.
1. With 3dsMax open, drag & drop the mzp package into your viewport, or execute the script directly from the “Maxscript/Run Script” option. Make sure your have Administrator permissions; the tool needs to alter the default RTT script.
2. After the installation, run 3dsMax and customize your UI as you would with any other script. The Tool is located under “Multi-Tile UV Bake Tools”
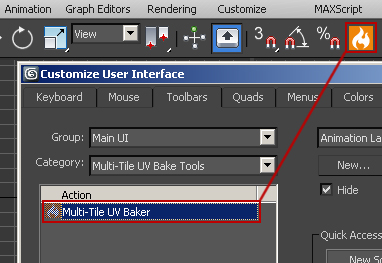
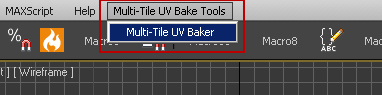
Alternatively, use the Main Menu Item.
Manual installation without administrator rights
Use this method if you’re unable to run 3ds Max with administrator rights.
1. Close 3ds Max and open Macro_BakeTextures.mcr (Your_3dsMax_Folder/MacroScripts/ or, if necessary, UI/MacroScripts/).
2. Add the following function around line 1660, before “on bRender pressed do if workingObjects.count != 0 do".
//Custom Function
  function myBakes objList =
    (
     print "myBakes Begin"
     selectedObjects = objList
     print objList
     selection = objList
     OnObjectSelectionChange()
     print workingObjects
     BatchBake workingObjects
     print "myBakes End"
    )
3. Save Macro_BakeTextures.mcr and open 3ds Max.
4. You can now use the tool by simply dragging and dropping MultiTileUVBake.mse, or MultiTileUVBakeTrial.mse when using the trial version, into the viewport. Alternatively, you can place the script in your 3ds Max script folder and setup a Toolbar shortcut.
General Tool Info
This tool automates the manual and time consuming process of baking multiple tiles in 3dsMax. It takes the required bake information from the RTT Dialogue, UV Channels available and automatically offsets and renders the required tiles.
- The bake tool does not force you to select from a pre-made list of render elements or render engines. Work as you always did; after creating your scene simply add the appropriate render elements and projection settings using the Render To Texture Dialog. All Render Engines and file formats are supported, provided that they are supported by the default 3dsMax Render To Texture process.
- When adding render elements, besides the type, the only crucial element is the file format used. Given that the bake tool not only overrides the exported texture name, but also allows you to override Texture/Padding Size and the UV Channel to use, you can save time by keeping the unaltered default values and instead use the tool to efficiently apply the required values to the baked objects. We strongly recommend that you simply input the name/format of the file and use the bake tool to define the remaining attributes.
- We recommend backing up your scene before using the bake tool, the “Create a Working Copy” option is currently disabled. The Tile texture output will overwrite any existing files/folders.
- Objects that don’t contain render elements should not be included in the bake, this may result in runtime errors on some Max versions.
- After the bake process, UV’s will be transferred and depending on the options used the Modifier Stack could be collapsed, always backup you scene or models.
- It’s a good rule of thumb to check for isolated or overlapping Vertices/Edges and reset transforms after completing a model. In the long run this will save you quite a lot of time from random crashes due to incorrect/corrupted transforms.
- The bake tool will only process Editable Polys.
Tool Overview
Info and Bake
Bake Options
Output Options
Extra Options
Post-Bake Options (EXPERIMENTAL)
Pre-Bake Options (EXPERIMENTAL)
|

|
Usage Instructions
General Rendering Technical Considerations
- The following applies to Single and Multi-Tile Bakes, with or without using the bake tool: When using GI engines in the Render To Texture process, such as Vray or FinalRender, avoid using camera based lighting calculations like lightcache or simple irradiance maps.
- As you’ve probably noticed, a Standard Render and a Render To Texture Render will often show slightly different results. This is mainly caused by the misuse of certain camera based GI techniques. Since such techniques require, in simplistic terms, “a point of origin and destination in 3d space” in order to properly calculate the GI, sort of speak; given the computing method the Render To Texture Engine uses, the use of Brute Force or Properly Pre-Cached Irradiance is recommended.
Method 1 – Manual UV Tiles
1. Manually setup your UV Tiles using a new/empty UV channel; this will be your UV Channel used in the bake.
2. Using the Render To Texture Dialog add your render elements and projection options, if any.
3. In the Bake Tool Dialog, select your bake UV Channel; the channel created in step 1.
4. Select the Tile Type.
5. This step introduces some optional settings.
5.1. Set the output folder and check the Object Folder & Element Sub-Folder Options if necessary.
5.2. Set the Texture and Padding override size, if required.
6. Select the objects to bake, Hit the Bake Button, sit back and enjoy the automated process.
Method 2 – Automatic UV Tiles (EXPERIMENTAL)
1. Using the Render To Texture Dialog add your render elements and projection options if any.
3. In the Bake Tool Dialog, select your bake UV Channel; any empty channel available.
4. Toggle the Auto Tiles in the pre-bake options.
5. Set the desired pixel density per square meter or kilometer.
6. Adjust the bake UV Channel if required, the value in this section is linked to the UV Channel value in the Bake Options above.
7. Setup the UV Flatten and Packing options or use the default settings. The options displayed in this section correspond to the standard options provided by the Unwrap Modifier.
8. Select the objects to Bake, Hit the Bake and enjoy the automated process.
Mixed Method – Automatic Tiles Without Flattening the UV’s
- Pre-Bake options can be mixed with the manual mode. e.g. Manually setup your UV’s and toggle the Pack Only option. Instead of flattening the UV’s, the tool will simply pack them accordingly to the target Pixel Density, without altering your original UV groups.
Post-Bake Options
- The automated Post-Bake option for UV transfer can and should be used with both methods.