Unity Products:Amplify Painter/Quick Guide
Quick Guide
Introduction
Amplify Painter is a painting tool where a user can freely paint assets directly in a Unity scene.
It's important to note that its on a pre-alpha stage. All can, and most likely will, be changed in the future according to your feedback.
To start using Amplify Painter select it on the Unity Custom Editor Tools.
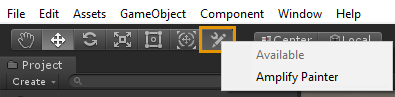
As soon as the tool is selected, the Amplify logo will appear on it.

With Amplify Painter active, simply select an object in the Hierarchy tab to start painting; to exit the painting mode, select another tool such as move or rotate.
Notice that when hovering the object the mouse cursor will change to our brush preview.
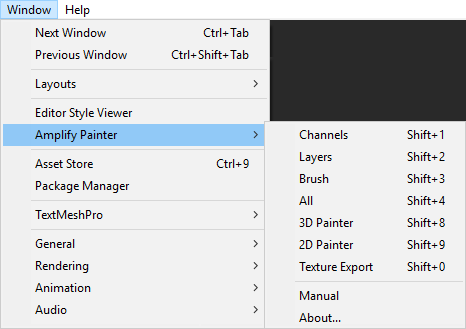
Windows
A user has access to multiple new windows, each one is responsible for configuring/setting specific settings of Amplify Painter. Each windows will be briefly explained and all of them are listed under the Window > Amplify Painter menu.
But first, we'll show what new tools appear on the Scene View.
Scene View
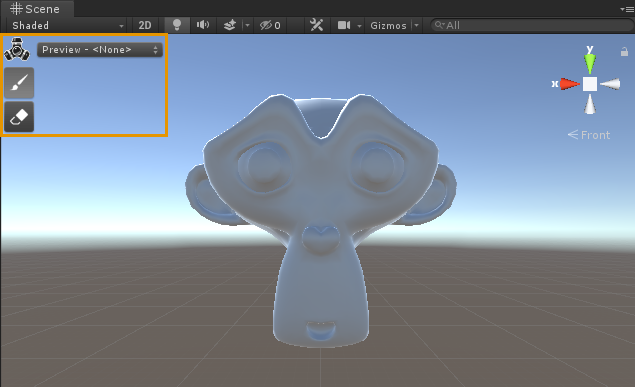
Scene View now has four new UI elements.
Shortcuts button: Clicking on this will show general shortcuts available to the user. Context driven shortcuts appear if either Shift or Control keys are pressed.
Preview mode: Allows the user to cycle each individual channel and apply it to the selected. By default its turned off, Preview - <None>, and all the channels are applied to the object.
A user can also cycle between Preview Modes by hitting either the V key (cycle forward) or Shift + V keys (cycle backwards).
Brush Tool: Selects the main brush tool to paint over the selected object. Each of its options will be explained further below.
Eraser Tool: Selects the Eraser tool. For now no options are available specifically for this tool as it simply erases the current selected content.
Users can switch between Eraser and Brush tool by hitting the B key.
Besides the usual camera controls, we introduced a couple of new brush controls:
- Ctrl + Mousewheel Up: Increase brush size
- Ctrl + Mousewheel Down: Decrease brush size
- Ctrl + LMB Pressed + Horizontal Drag: Modify brush opacity
- Ctrl + LMB Pressed + Vertical Drag: Modify brush rotation
Channels Window
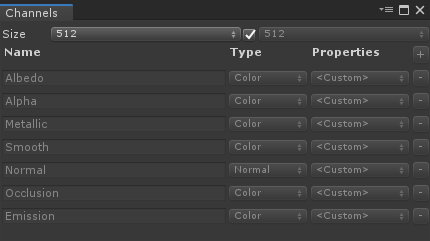
This window can be opened either from the Window menu or through the keyboard shortcut ( Shift + 1 ).
All channels will be managed through here where a user can:
- Add new channels
- Configured channel settings
- Remove channels
The Size of the final generated textures can be also set through this window. Users can either create squared textures or specify different values for width and height.
When selecting an object using a Standard Metallic or Standard Specular material, we automatically create and setup all the necessary channels. Over this alpha build, these channels will be locked from being either configured or deleted.
On a object using a custom material, users can freely create, delete and configure channels.
Layers Window
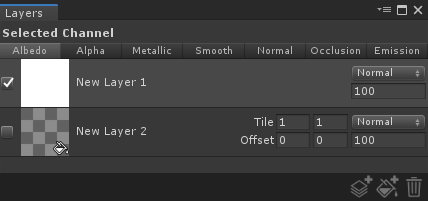
This window can be opened either from the Window menu or through the keyboard shortcut ( Shift + 2 ).
All layers for each channel will be managed through this window.
Users can:
- Select channel to inspect layers
- Create regular layer
- Create Smart Fill layer
- Apply a tile and offset transform ( only on Smart Fill layers )
- Set layer name, double click it to rename
- Select layer blend mode
- Select layer opacity
- Delete the currently selected layer
Regular layers are the default paintable layers.
With Smart Fill layers users can drag and drop a texture or shader onto it and use it as a reference, meaning that if either one is modified externally it will modify the layer itself.
Brush Window
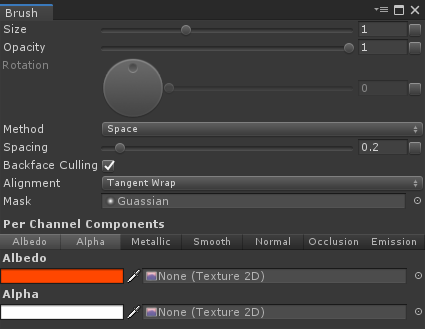
This window can be opened either from the Window menu or through the keyboard shortcut ( Shift + 3 ).
Each brush setting can configured through this window. From here you can set the brush’s
Global Settings:
Per Channels Components:
- Color
- Texture
Global Settings will be used across all channels as Per Channels Components is data set to each specific channel.
[1] These properties value can bound to pen pressure by hitting the toggle right next to their value.
[2] Pen pressure is currently only available on Windows, OSX support will be added at a later stage.
The Per Channels Components tabs define which channels are painted, users can either select a single channel using LMB or multiple channels with Shift + LMB.
- LMB on Channel: Select channel to paint
- Shift + LMB on Channel: Append channel to ones to paint
- Alt + LMB on Channel: Select All channels to paint
3D Paint Window
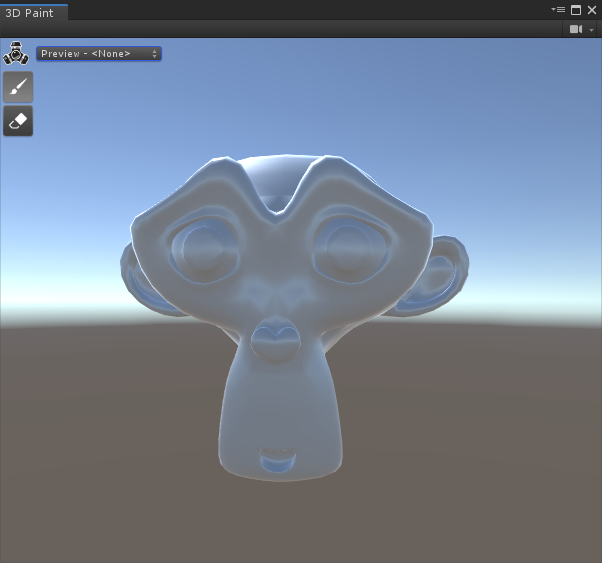
This window can be opened either from the Window menu or through the keyboard shortcut ( Shift + 8 ).
Amplify Painter provides a custom 3D view of the object currently being painted. This way a user can isolate it from all other objects present on the scene view.
Default camera controls are set over this view, as well as controlling a directional light.
- Alt + LMB: Orbit camera
- Alt + RMB or Mousewheel: Zoom camera
- MMB: Pan camera
- Shift + RMB: Rotate light
2D Paint Window
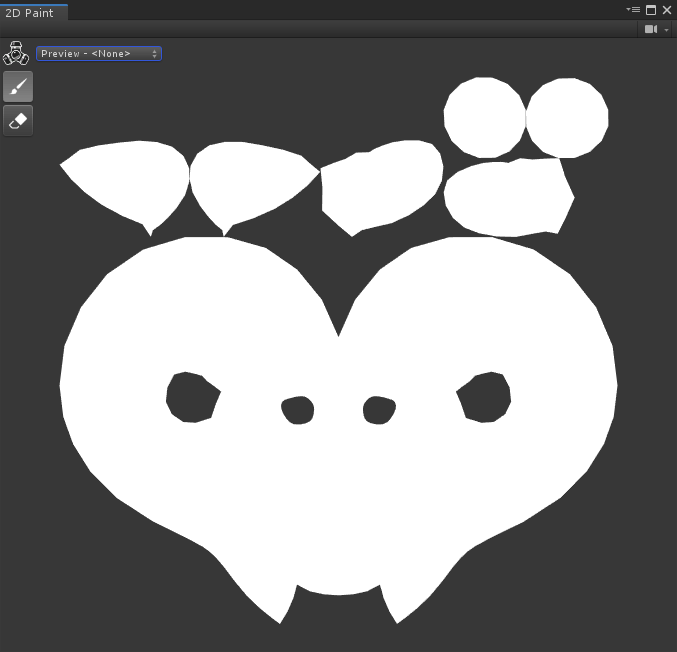
This window can be opened either from the Window menu or through the keyboard shortcut ( Shift + 9 ).
Amplify Painter provides a custom 2D view of the object currently being painted, which unwraps it according to its UVs.
- Alt + RMB or Mousewheel: Zoom camera
- Alt + LMB: Rotate Camera
- MMB: Pan camera
Texture Export Window
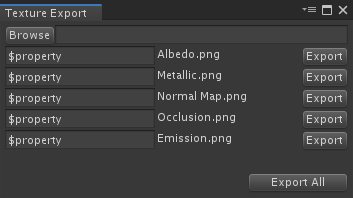
This window can be opened either from the Window menu or through the keyboard shortcut ( Shift + 0 ).
Channels can be properly exported into textures through this window. The users can export them individually or export all on a single button press.
We're still in the process of implementing our own Amplify Painter asset which will allow users to store all layers in a non-destructive manner.
Over this build, when working with custom materials each exported texture corresponds to a channel. However when using Standard Metallic or Standard Specular each texture will be created from more than one channel. P.e. the Albedo texture will have the Albedo channel contents over its RGB color channel and the Alpha channel contents over its A color channel.
Shortcuts List
Windows
- Shift + 1: Open Channels window
- Shift + 2: Open Layers window
- Shift + 3: Open Brush window
- Shift + 4: Open Channels + Layers + Brush windows
- Shift + 8: Open 3D Painter window
- Shift + 9: Open 2D Painter window
- Shift + 0: Open Texture Export window
General
- I: Show shortcuts overlay
- C: Open color picker
- V: Cycle preview channels forward
- Shift + V: Cycle preview channels backward
- B: Toggle between Brush and Eraser tool
- Ctrl + Mousewheel Up: Increase brush size
- Ctrl + Mousewheel Down: Decrease brush size
- Ctrl + LMB Pressed + Horizontal Drag: Modify brush opacity
- Ctrl + LMB Pressed + Vertical Drag: Modify brush rotation
- Alt + LMB: Orbit camera
- Alt + RMB or Mousewheel: Zoom camera
- MMB: Pan camera
Brush Window
- LMB on Channel: Select channel to paint
- Shift + LMB on Channel: Append channel to ones to paint
- Alt + LMB on Channel: Select All channels to paint
3D Painter Window
- Shift + RMB: Rotate light
2D Painter Window
- Alt + LMB: Rotate camera
Supported Unity Version
- Unity 2019.1 or newer