Unreal Products:Amplify Animation Pack/Manual
Product Page - Manual - Tutorials - Animation Catalogue
What's in the PackageAmplify Animation Pack includes a varied collection of over 600 animation sequences for third-person projects, a starter Character Controller, and Blender source files. Entirely built with Blueprints, you can start using with just a few simple steps.
Demo Character and Rig
Animation CatalogueVideo Reference: Amplify Animation Pack Overview #1 Collection details available in its dedicated page: Animation List Blender SourceThis pack includes the Blender Source project used to create all animations; you may adjust and re-export them as necessary. In addition to the project and editable animation content, it also includes a few scripts and the appropriate required rigs for Unreal use. Demo SceneA simple level with the core Actors already set up, it's the perfect playground to test the available animations. (this level will not be visible in the the Content Browser if the the Unreal Water plugin is disabled)
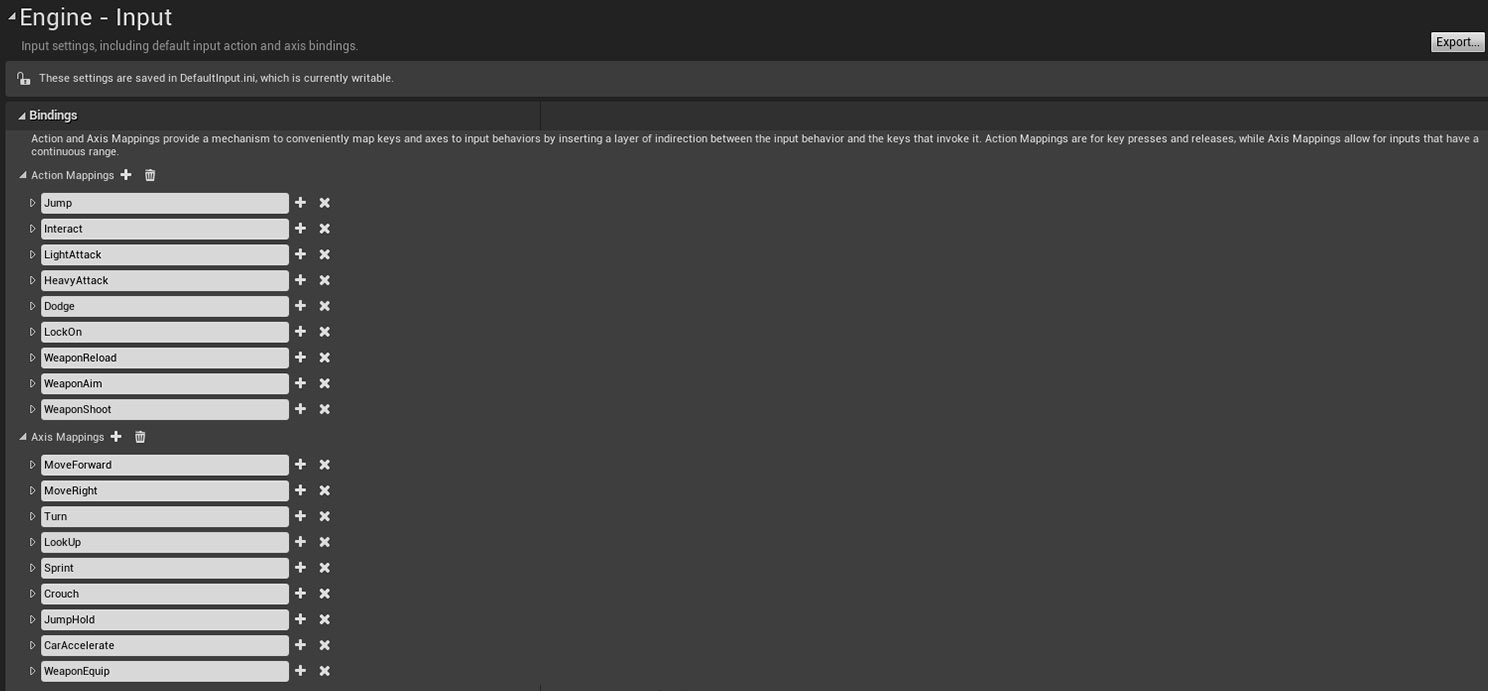
How to useQuick Start InstructionsBefore you add the Amplify Animation Package to your Unreal Project, consider if you're going to use the included Character Controller or just the provided Animations with your own characters. Using the starter Character Controller requires additional configuration steps in order to ensure that everything works as expected. You can skip this step if you just want to use the animations without our Character Controller, scroll down to the Retargeting Instructions for instructions on how to do so. Project Configuration with Character Controller 1. On the Unreal Vault, Add the Amplify Animation Pack to your project. 2. Go to your project Content Folder, Amplify Animation Pack, and locate the file AmplifyConfig.Zip file, here you'll find the Input.ini and Collision.ini file. 3. Import the Input.ini file to your Project Settings’ “Engine - Input” window, this will change your Input settings to the ones required for the “Character_BP”.
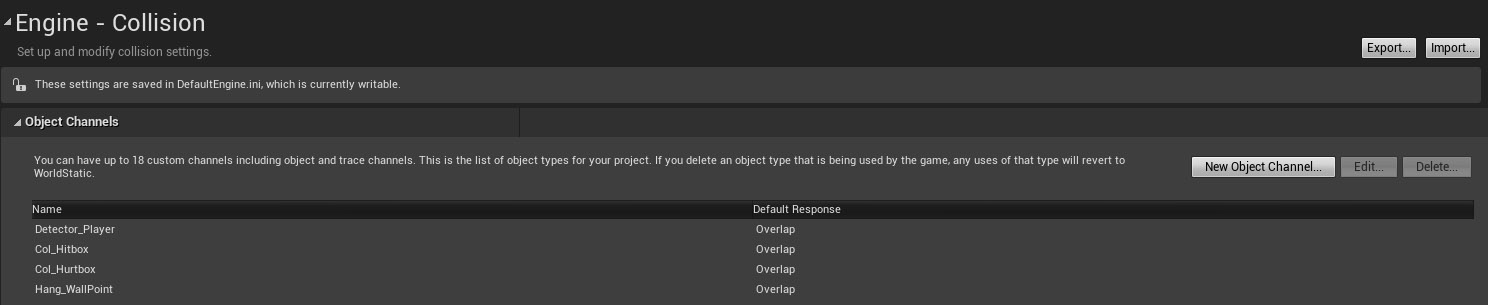
4. Import the Collision.ini file to your Project Settings’ “Engine - Collision” window.
5. Restart the editor for the config changes to take effect.
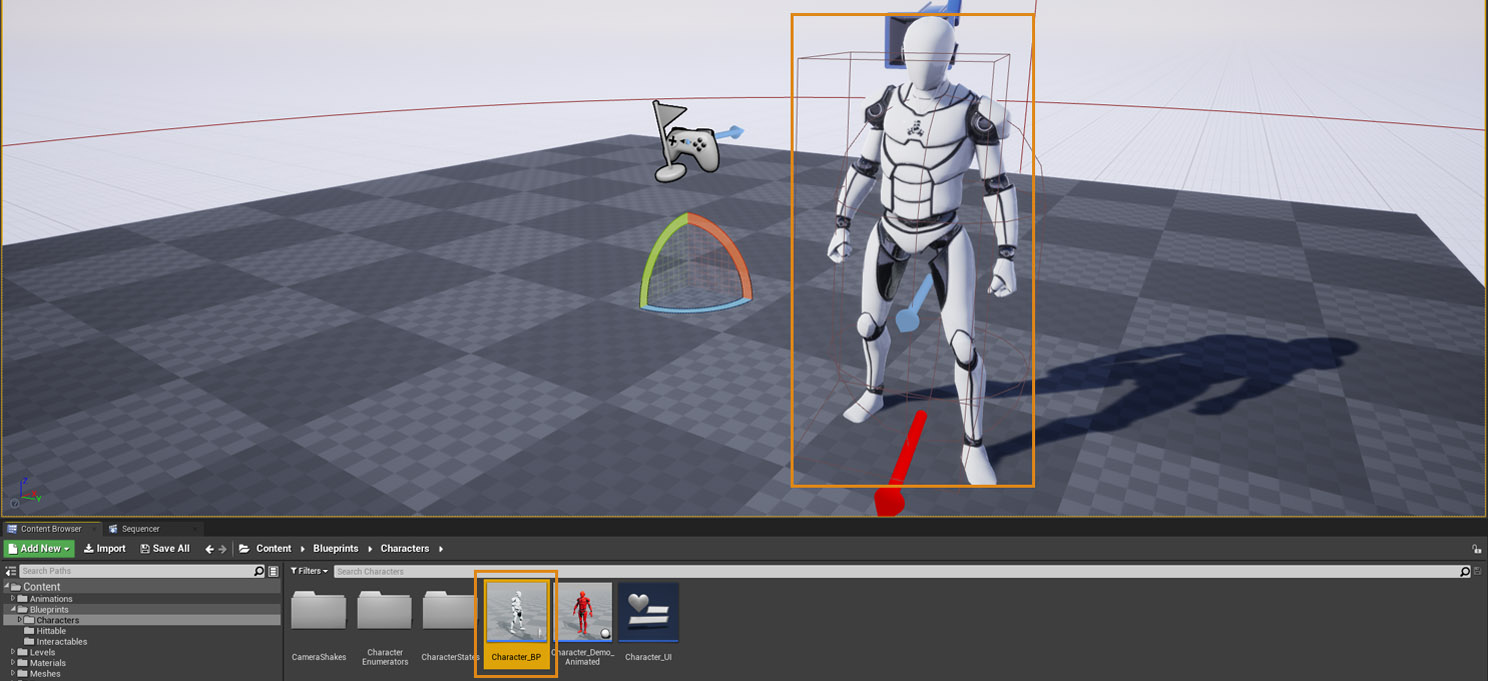
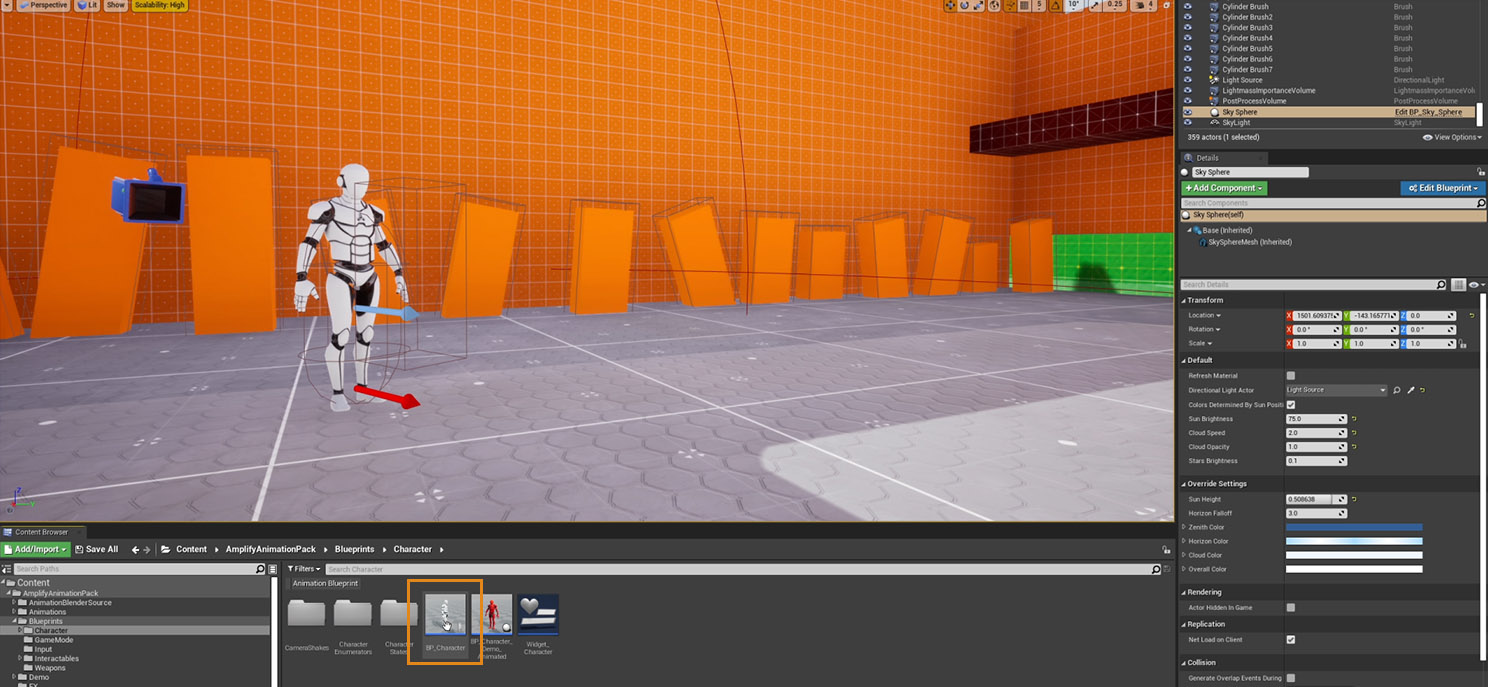
7. Drag and drop the “Character_BP” Blueprint class onto your level; alternatively, open the included DemoScene level to start playing immediately.
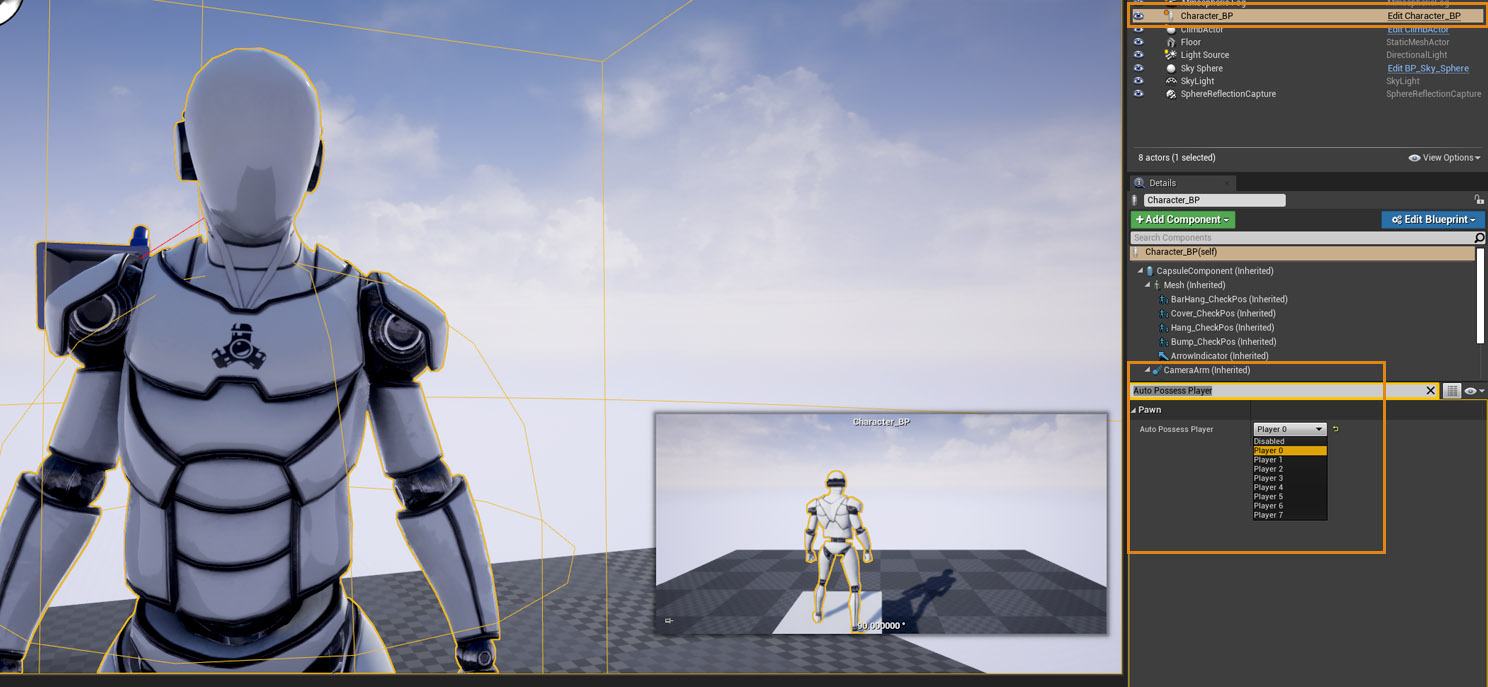
8. When using a new scene, select the Character and scroll down to Pawn, you'll need to set the Auto Possess Player option to Player 0 or any other you may require. Instead of scrolling down, you can use the Search Box to quickly find parameter.
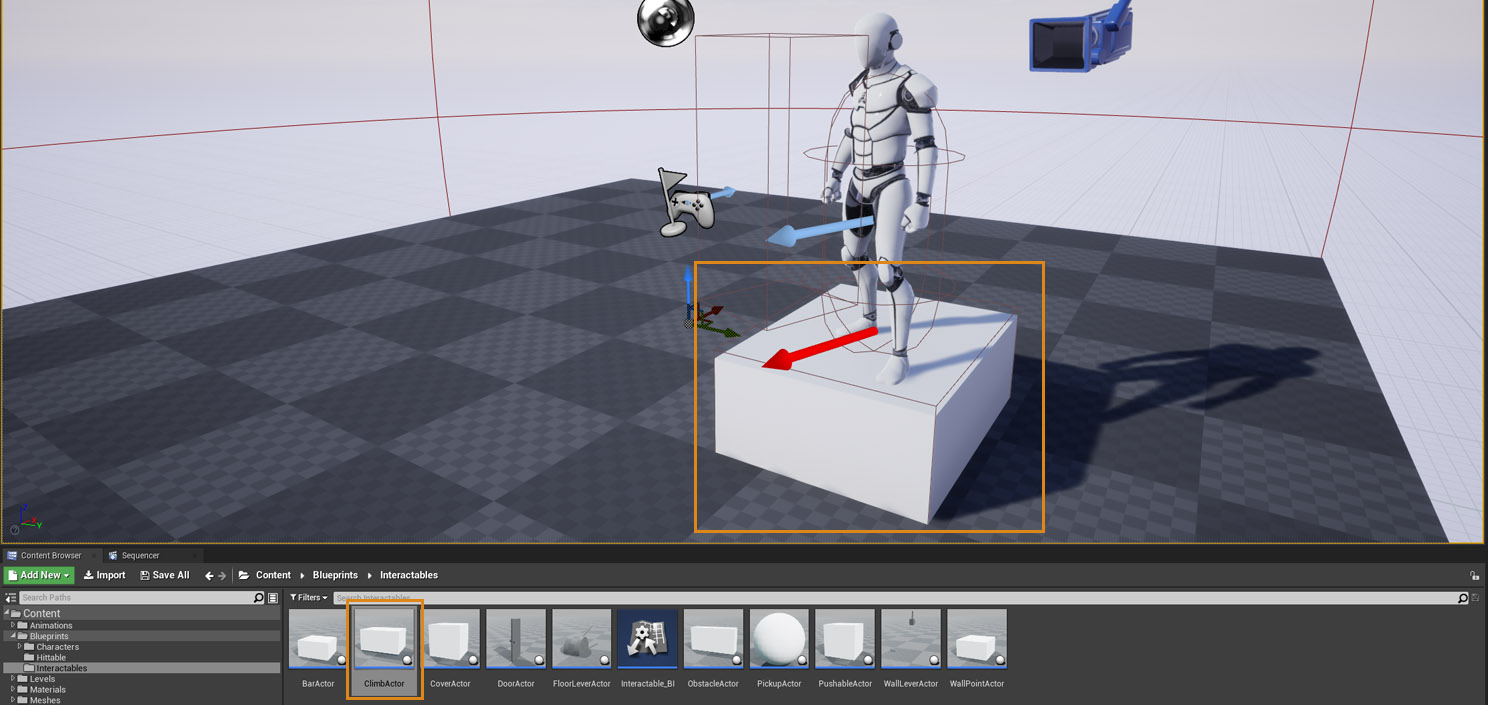
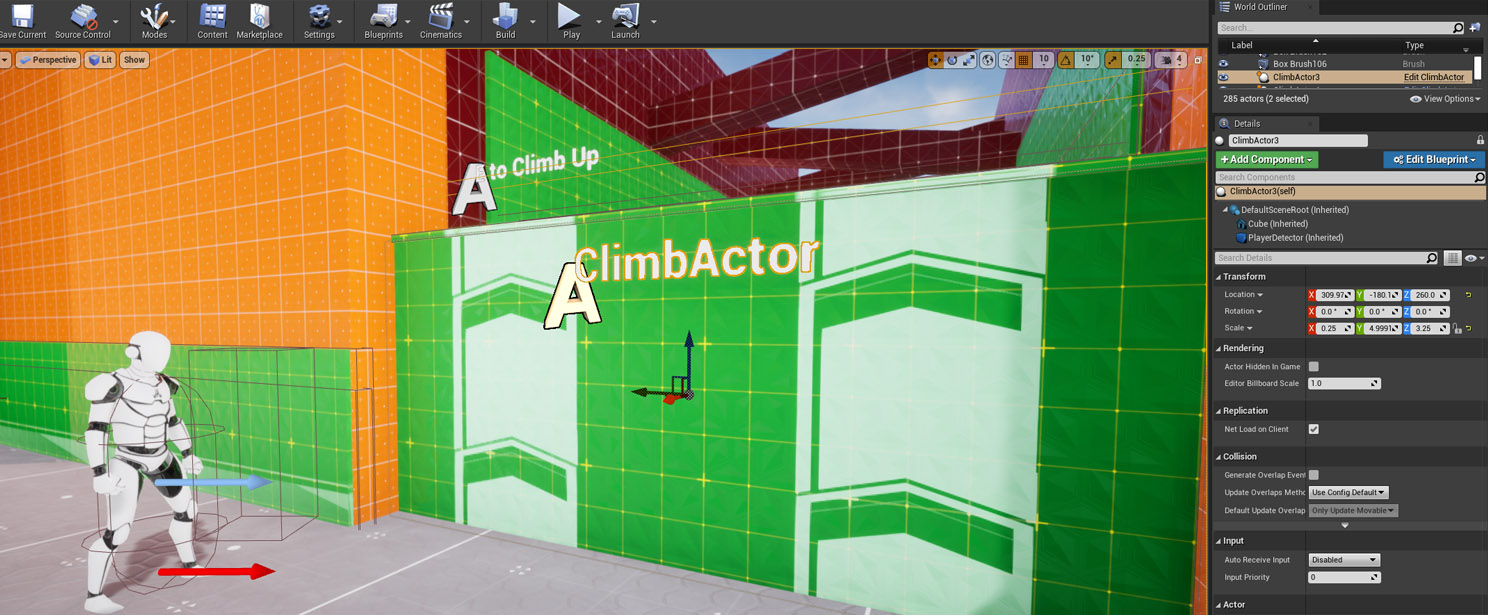
9. Drag and drop any Contextual Actions you want using the rules specified in the contextual actions section. This refers specifically to the action you execute such as climbing or opening a door. Below is an example of the default climb actor.
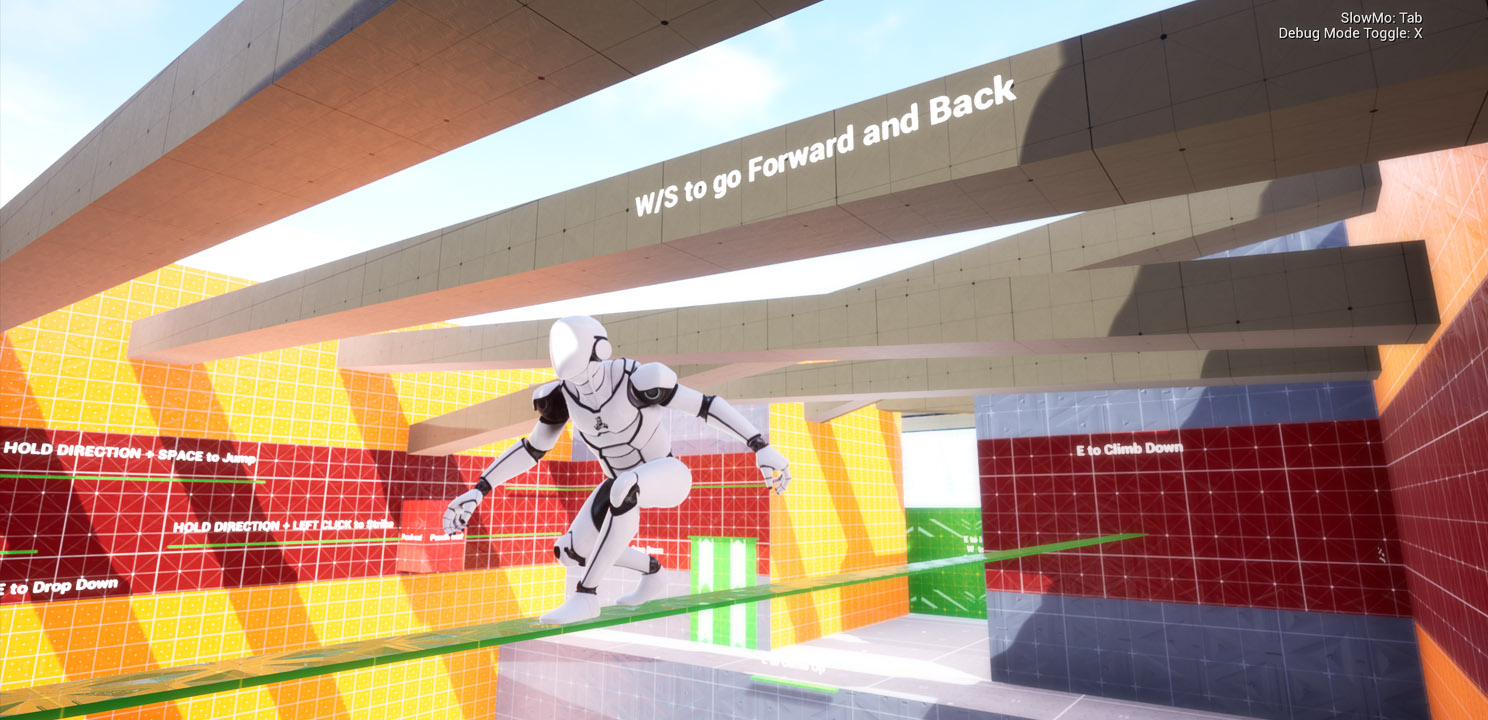
NOTE: If you're only using the animations with your own content, the Blueprints and additional content pertaining to the Character Controller is not required. Input MappingsThe following table provides a list of all the actions and inputs available in the Character Controller.
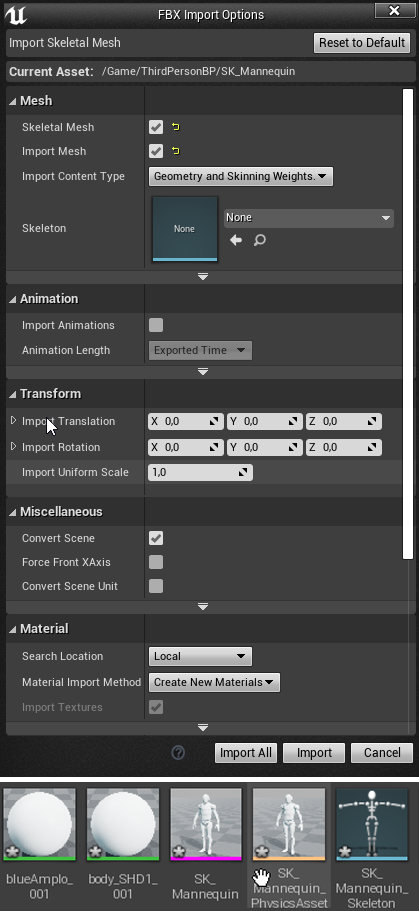
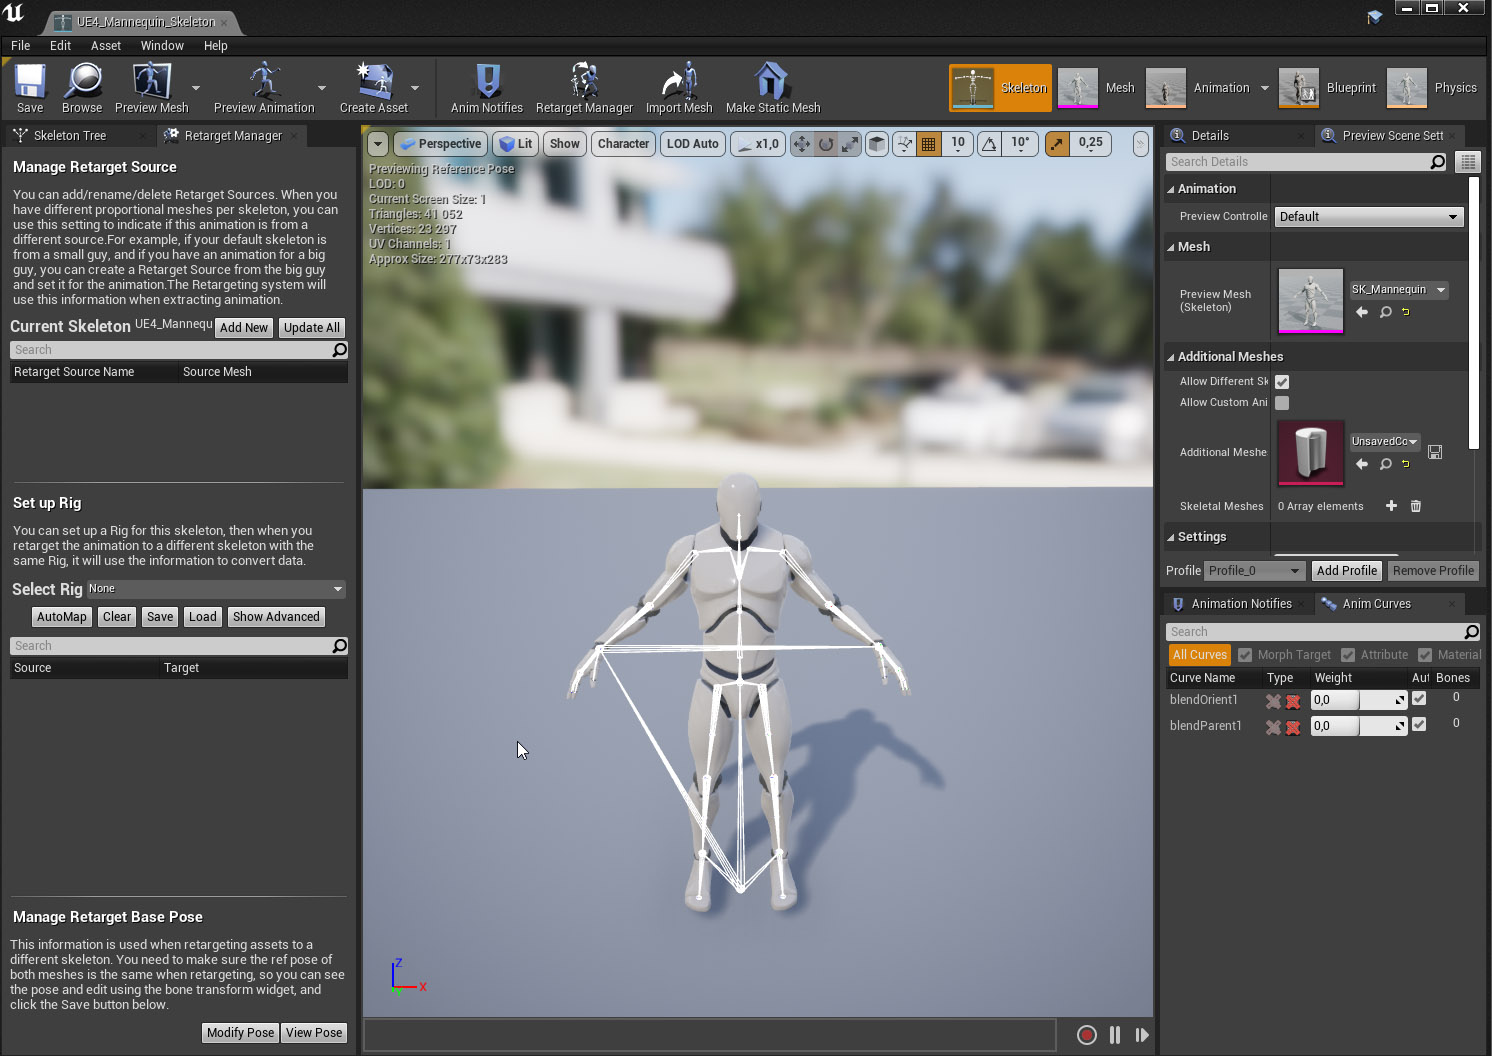
Using the Animations on your own Characters (retargeting)To use the included animations on your own characters you'll have to retarget the animations from the Amplify character. Before you proceed, be sure to check the official Unreal Engine retargeting documentation if you're unfamiliar with the process. 1. Import the SK_Mannequin and double click the SK_Mannequin_Skeleton.
2. You should see this window, click on the right apply to asset.
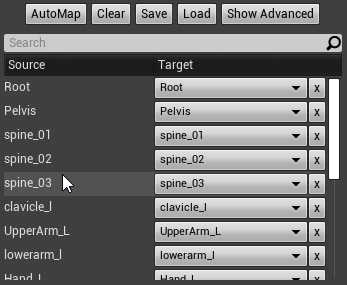
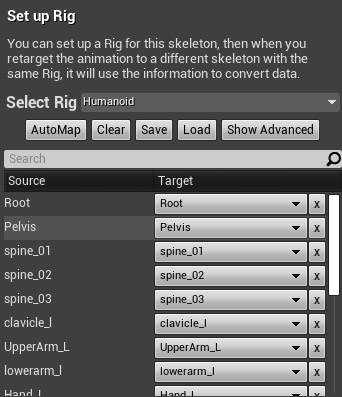
3. Go to:
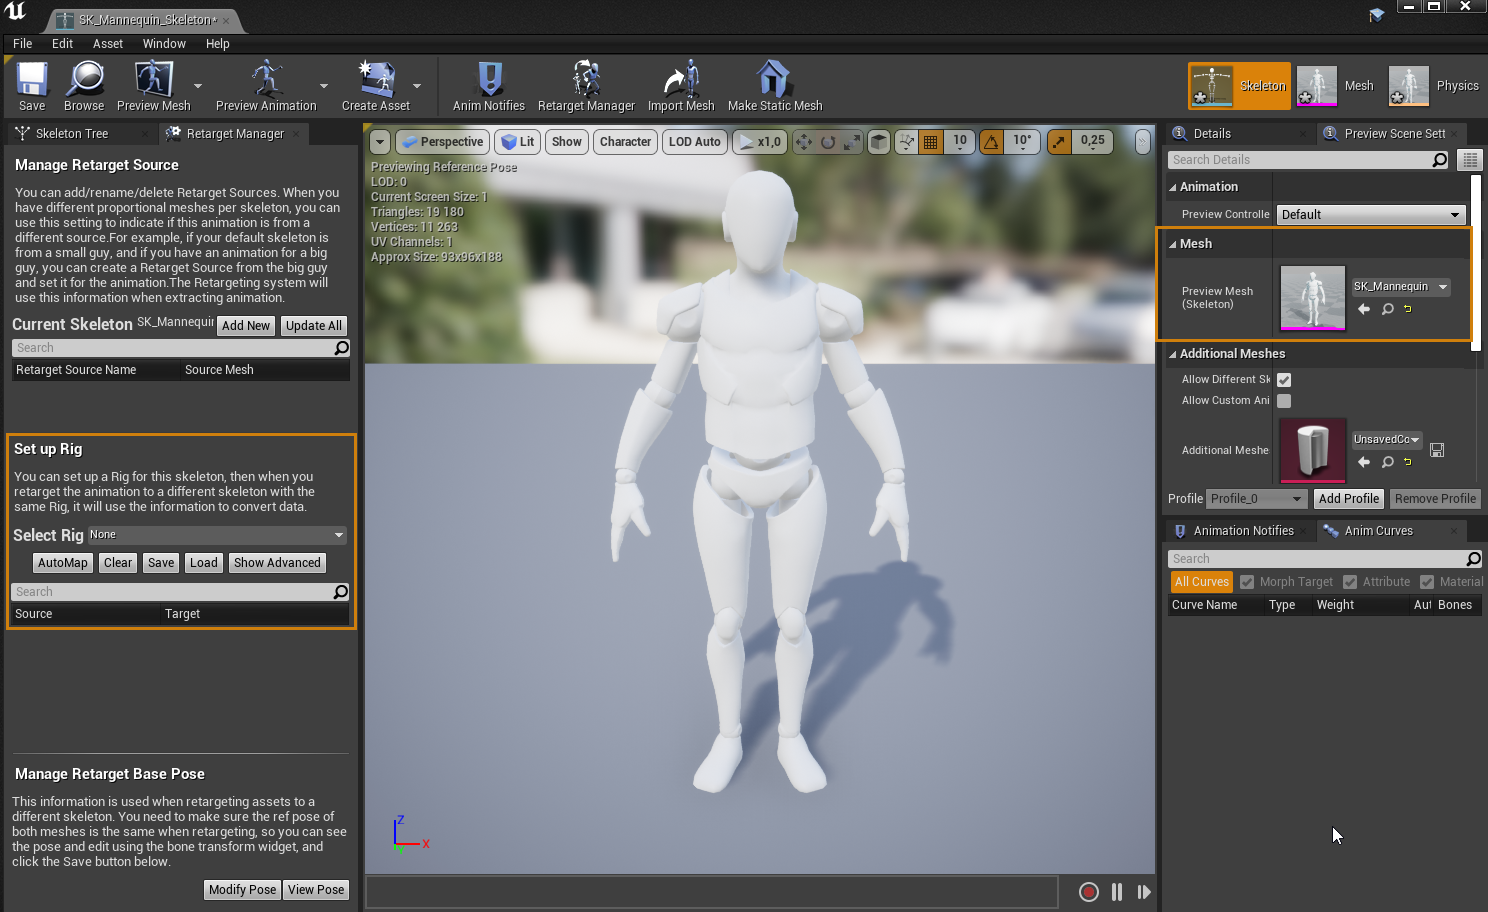
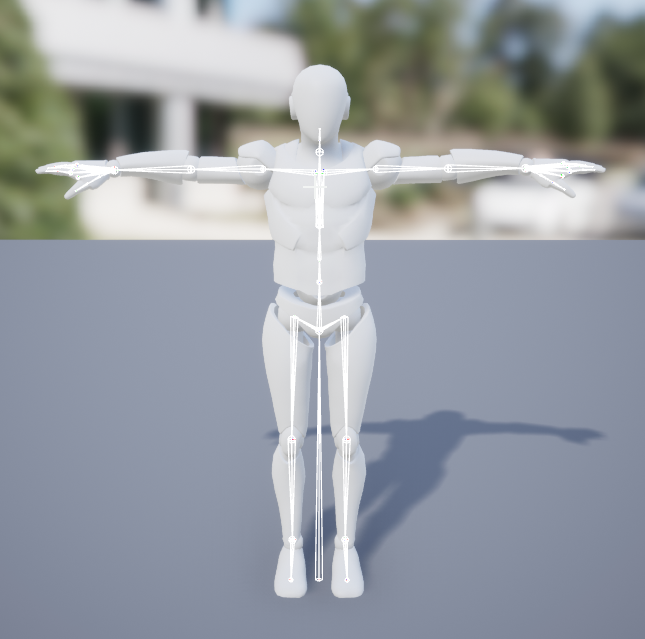
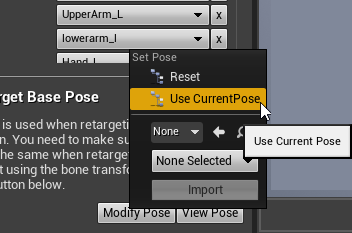
4. It's a good practice to ensure that rigs have matching poses. In our case we're using a T pose instead of an A pose; in this example we turn the bones visible and adjust our character bones to place him in T pose. With the character in T pose, go to Modify Pose - Use CurrentPose
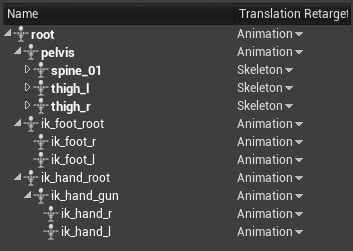
5. Another good practice, specially if the target skeleton has different proportions from the original, is to change both skeletons' Bones Translation Retargetting Mode. This can be accessed in the Options dropdown from the Skeleton Tree tab, and should be like the following picture, with the root, pelvis and any IK bones being "Animation", while the rest are "Skeleton".
6. This character is ready so let's do the same for the other character we're going to use for the retargeting process. (don't forget to hit save)
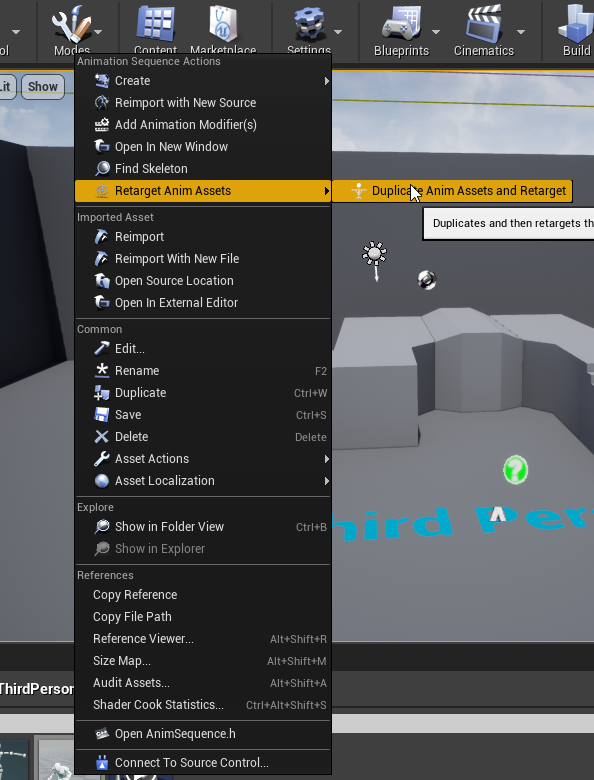
7. Repeat the same process with the new character. Locate the animations you intend to use under AmplifyAnimationPack/Animations/Animation_Sequences. Right click on the animation(s) and you will see the following menu:
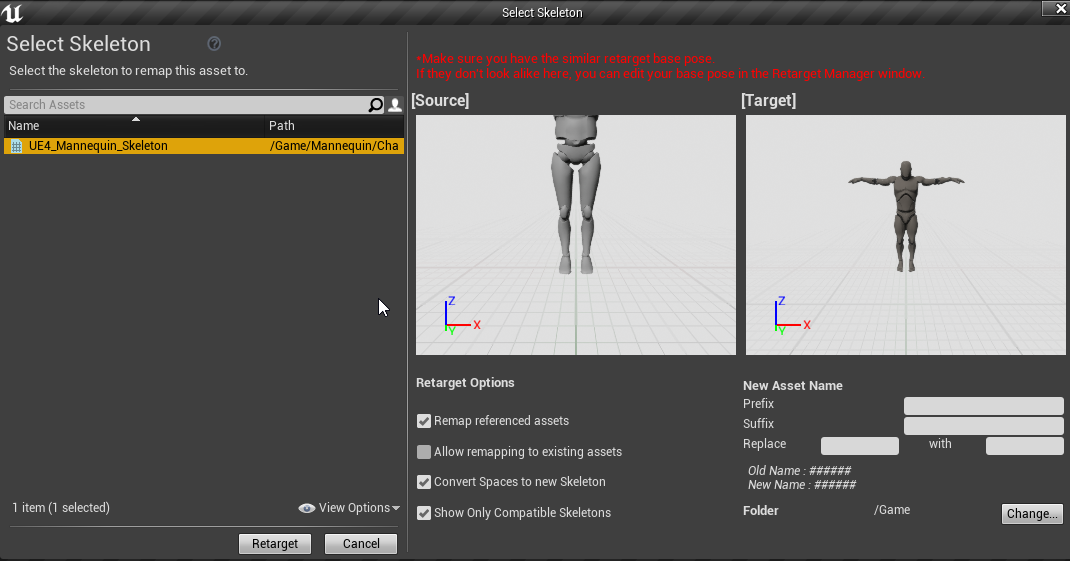
2. Select the animations you want to exchange between rigs.
3. Hit Retarget to conclude the process. A new animation asset will be created with the retarget animation. Retargeting is a great way to share animations between rigs, keep in mind that both rigs should have a similar pose for a successful retarget. 4. When using the animations with a custom mesh, there may be some rare instances where bones appear twisted. In that case, please refer to UE4's official documentation: Character ControllerThe Character Controller is a plug-and-play implementation of a character to be use on third-person projects. This implementation includes nearly all the animation provided in the pack and features a wide range of locomotion mechanics, actions and interactions. In this section you'll find a thorough explanation on how the Character Controller works and all of its technical details. This will include:
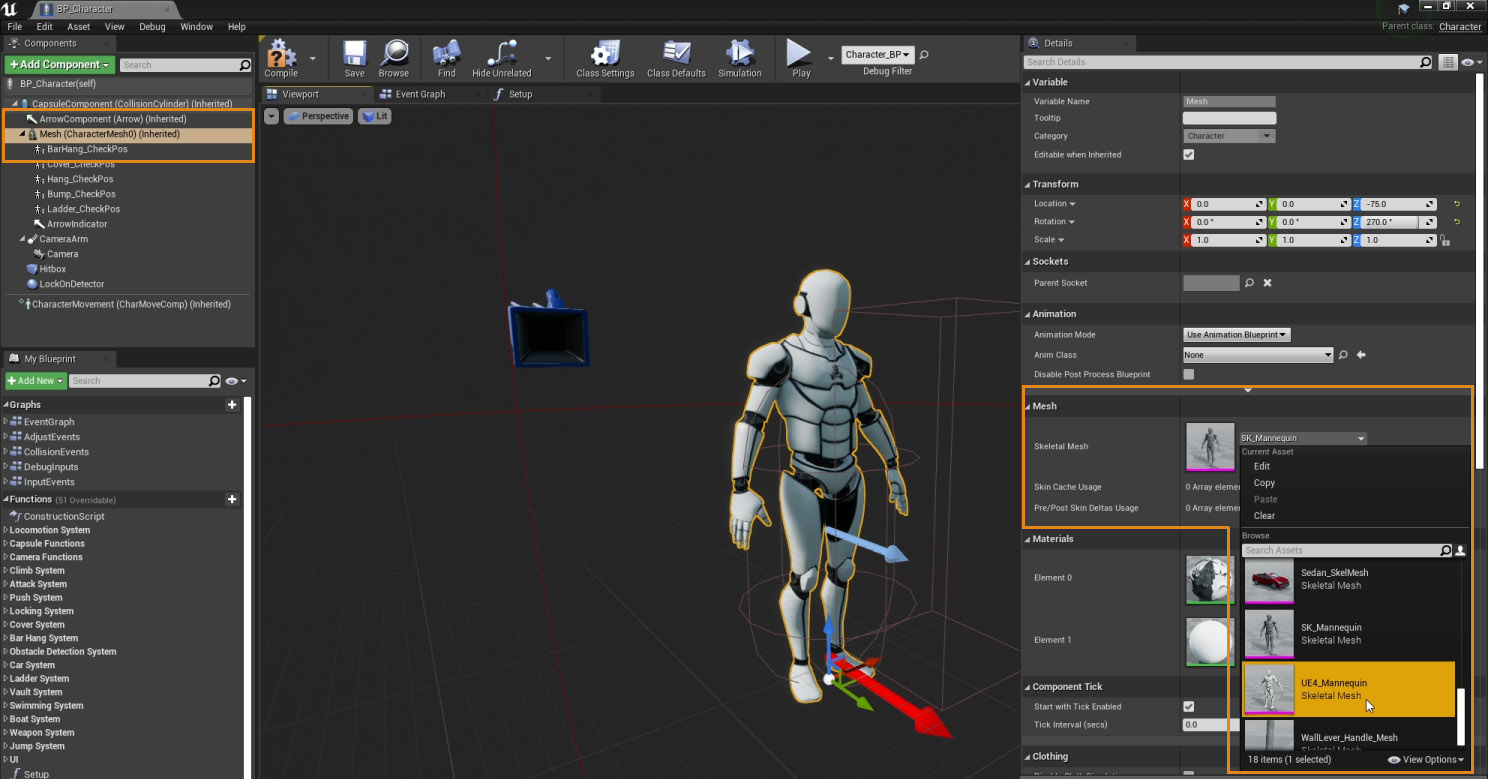
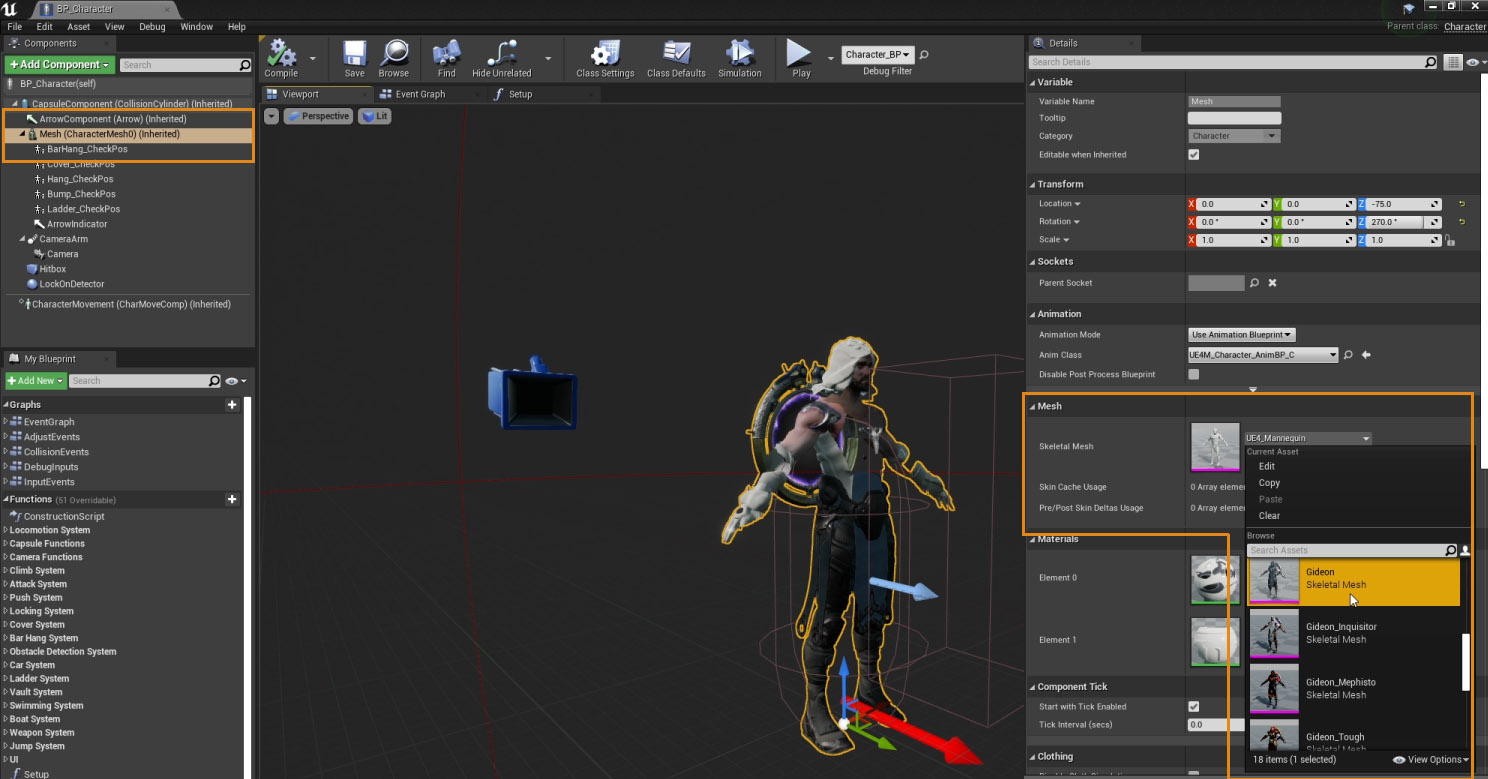
Replacing the Default Character ModelAs of version 1.07, we've simplified the steps required to replace the default Amplify Mannequin. Using a Custom Character model involves a few steps, please keep in mind that some additional tweaking may be required depending on your assets. (capsule collider, physical properties, etc.) Learn more in our dedicated video tutorial or follow the steps below: Using Custom Characters Replacing the Amplify Mannequin witht he included Unreal Manequin. 1. Open the Amplify Character Blueprint BP_Character located under AmplifyAnimationPack/Blueprints/Character.
2. Select the mesh, replace the Skeletal Mesh(we're using the included UE4 Mannequin here) with your own.
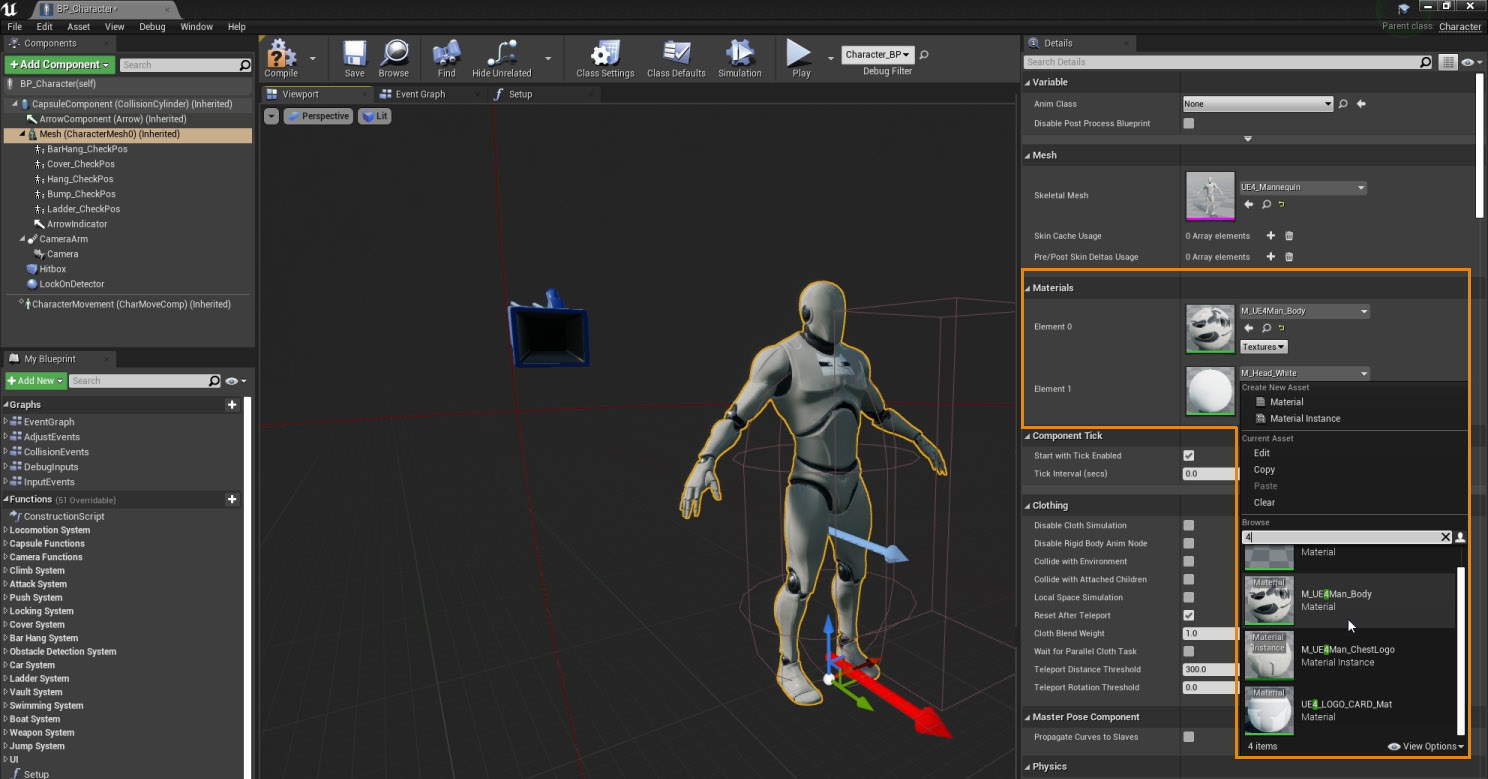
3. Replace any required materials.
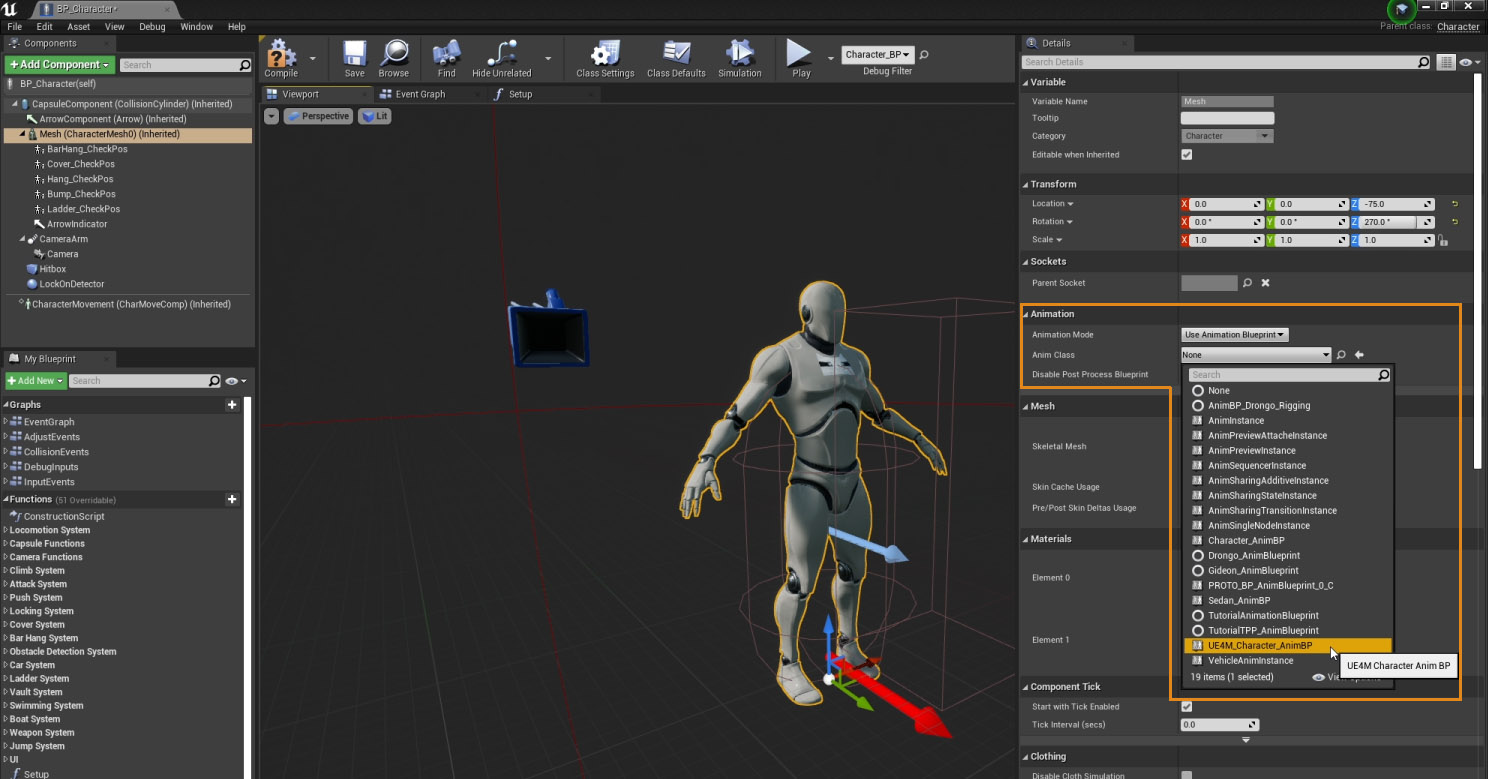
4. Set the respective Animation Blueprint; which in this case, we've already retargeted it for you.
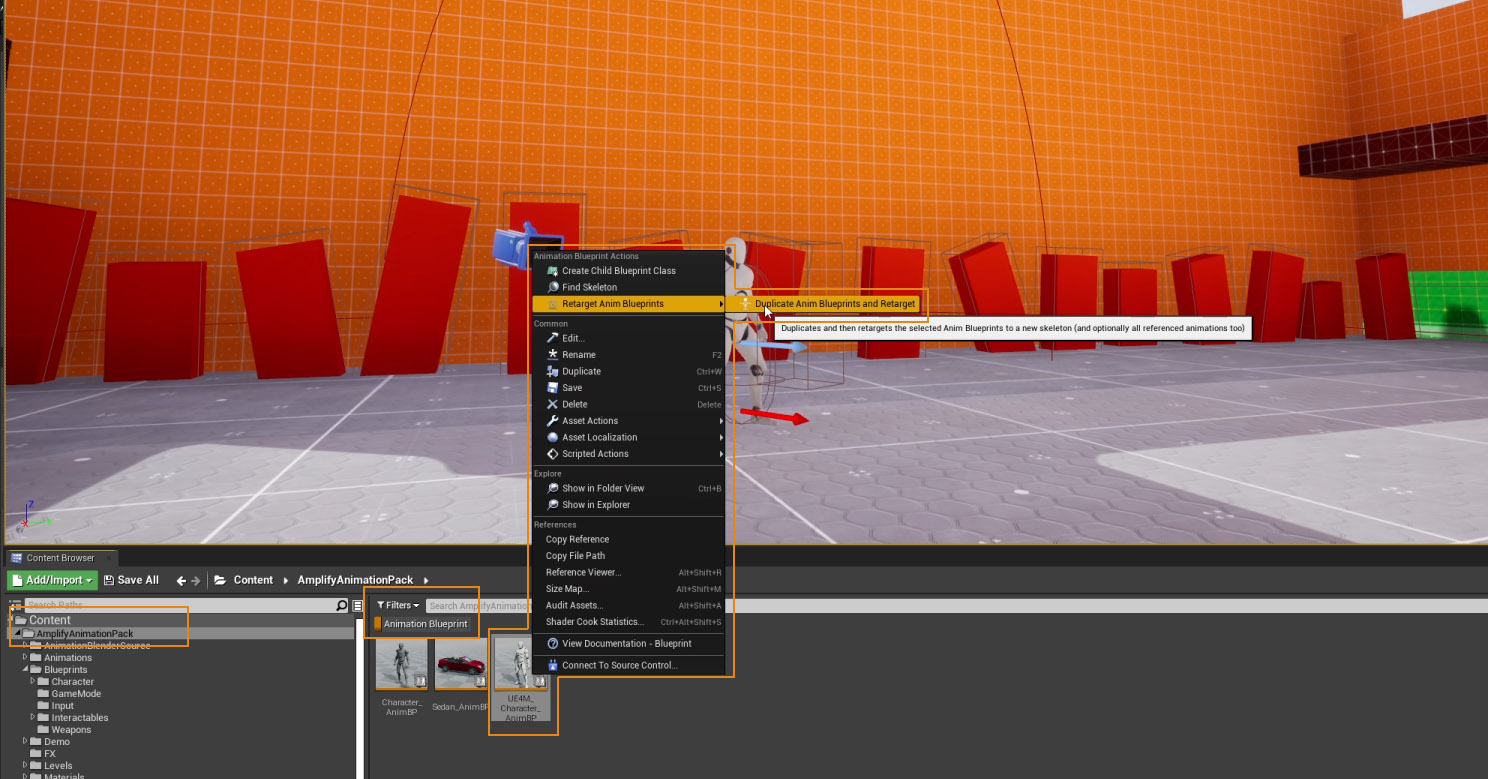
5. Save and Play, that's all you need to do in this case. Replacing the Amplify Mannequin witht your own Custom Character 1. You'll first have to retarget your character. Use the included UE4M_Character_AnimBP Blueprint; right-click and choose "Retarget Anim Blueprints > Duplicate Anim Blueprints and Retarget". You can Filter by Animation Blueprint, this will make it easier to find the required file.
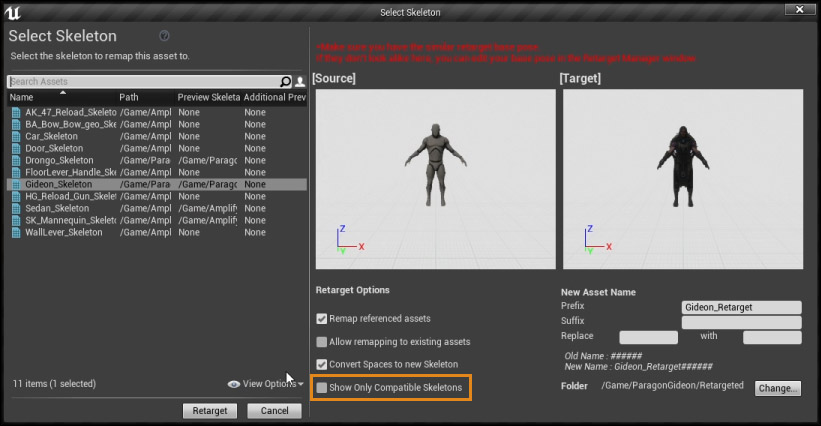
2. Your Target is probably hidden, untoggle "Show Only Compatible Skeletons".
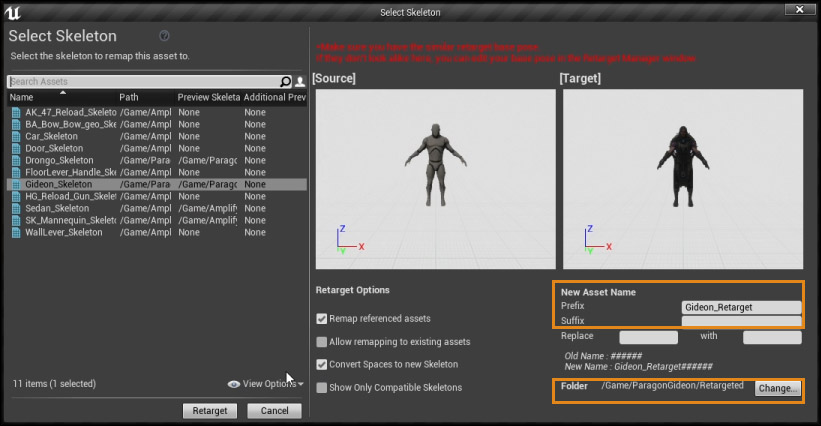
3. Before setting the destination folder to store your retargeted Asset, we recommend setting a unique Preffix or Suffix to easily identify it.
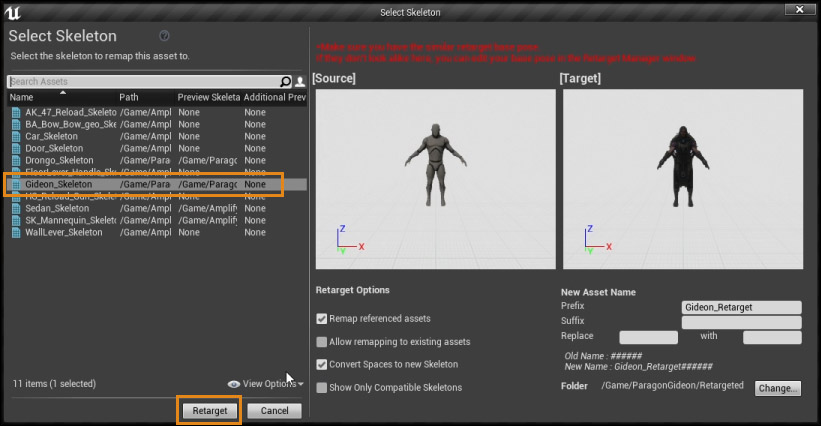
4. Select your character Skeleton and click Retarget.
5. Open the Amplify Character Blueprint BP_Character located under AmplifyAnimationPack/Blueprints/Character.
6. Select the mesh, replace the Skeletal Mesh with your own.
7. Replace/add materials as required by your custom character.
8. Set the respective Animation Blueprint.
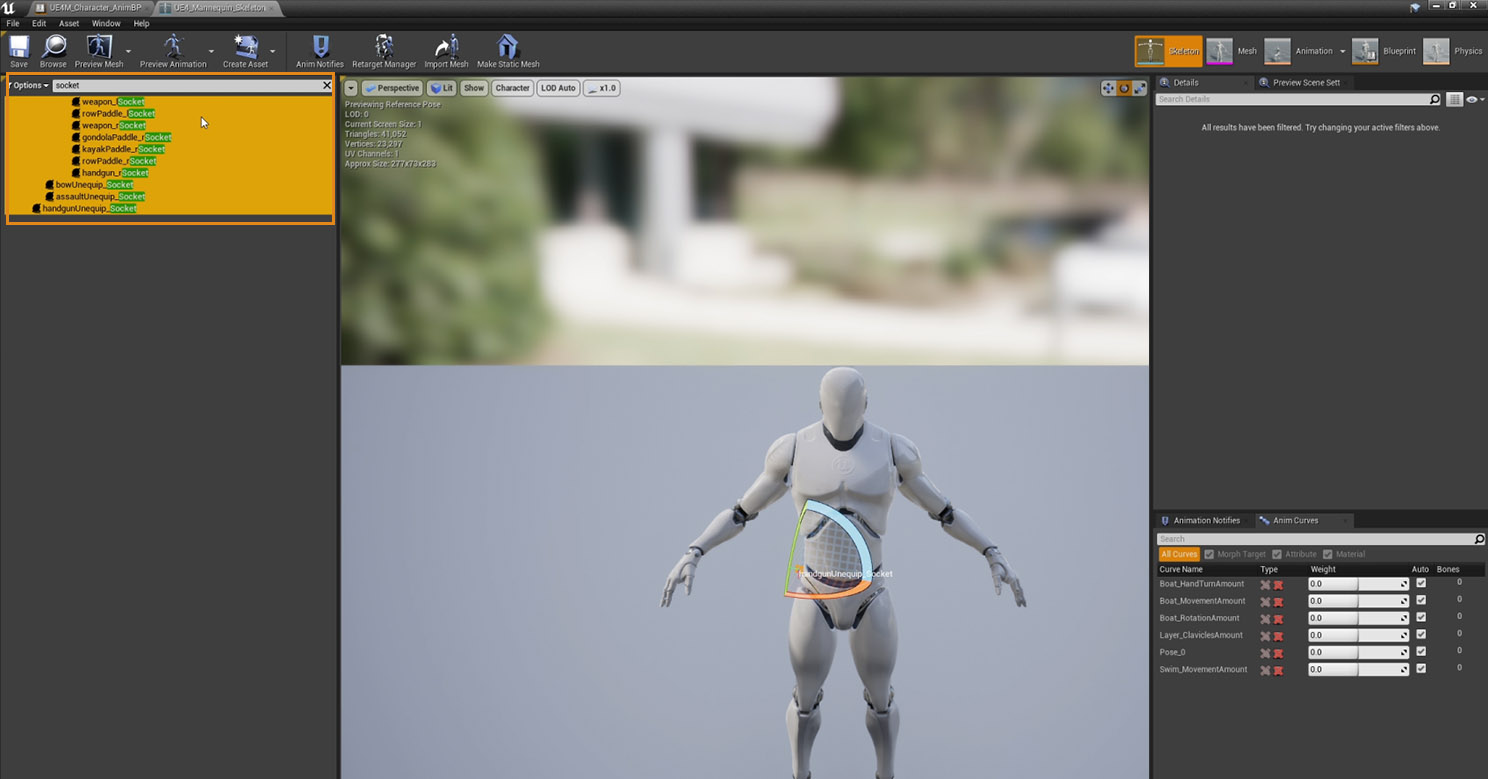
Note: Our controller uses specific Sockets for weapons, boats, etc, which you may need to add your models; depending on how you use our character controller, we recommend checking our included UE4_Mannequin_Skeleton.
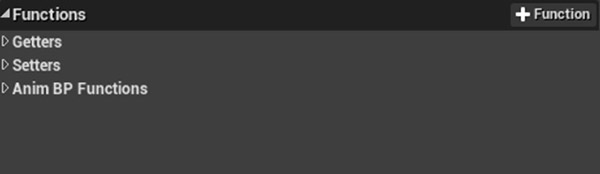
Custom GameMode and PlayerController ClassesThe Amplify Animation Pack project uses two main custom classes that ensure its proper functionality: a custom GameMode and a custom PlayerController class. Both these classes are implemented in the Project Settings menu. The custom GameMode, called GameMode_Custom, is different from the base GameMode class in two ways. Firstly, it removes any unnecessary base classes for instantiation, like the HUD and Default Pawn classes. And secondly, it changes the PlayerController class to our custom PlayerController class, the BP_InputPollable_PlayerController. The BP_InputPollable_PlayerController is the project’s custom PlayerController class and it is required for getting the input to the possessable classes. These include the BP_Character, BP_CarVehicle and BP_BoatActor. This is, therefore, the class that will bridge the inputs gathered by the InputAction and InputAxis events and the specific possessed actor at the time. The AnimComunicatorFor the BP_Character to communicate with the AnimBP, a layer of communication is used called the BPI_AnimComunicator. This is an interface implemented in both AnimBPs provided in the package. This interface is what allows the BP_Character to communicate with the AnimBP and all its variables. This is done by a set of functions that can be of three types:
In the BP_Character class this interface is referenced by the charAnimCommunicator class and its value is set in the Setup function. This method of communication is recommended if you want to add further functionality to the controller. Character Controller ActionsMovement
Camera Rotation
Sprint
Crouch
Jump
Interact
Roll/Dodge
Light/Heavy Attack
Lock-On
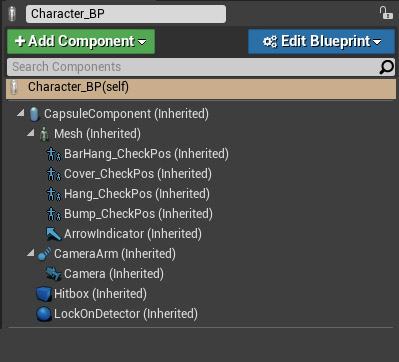
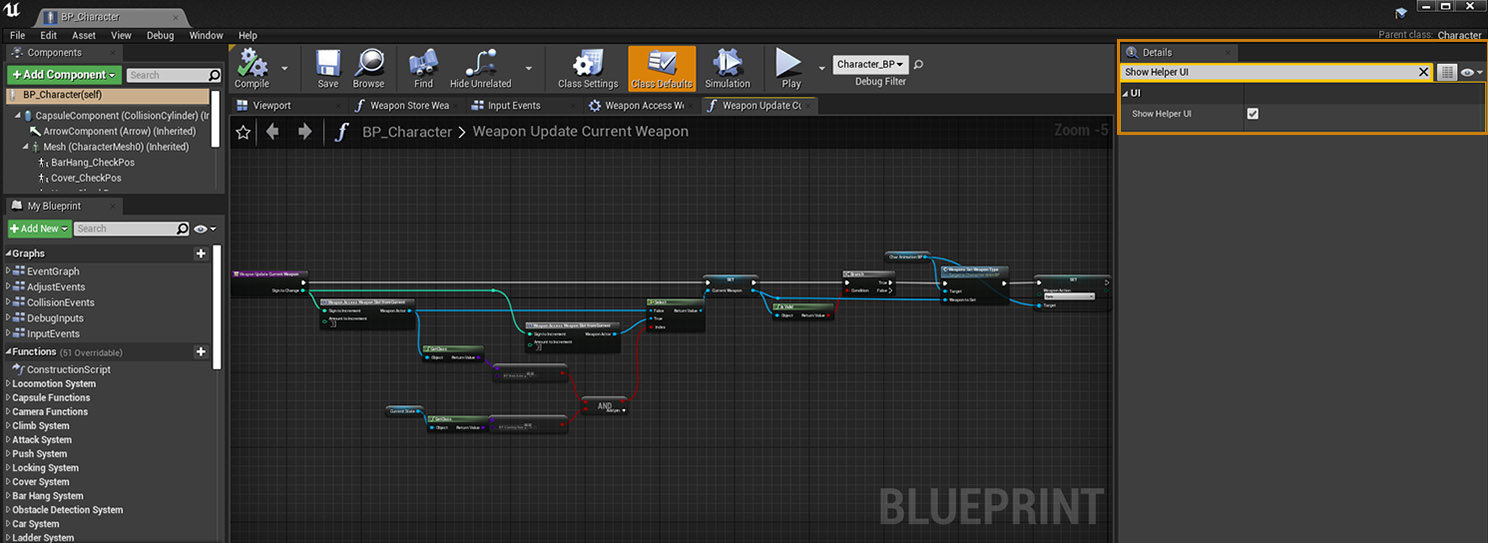
Character Controller Blueprint ArchitectureThe Character Controller is implemented fully using the Unreal Blueprints system. The BP class that defines the character is called Character_BP, a child class of UE’s Pawn class, and it encompasses the following aspects:
Character_BP Components
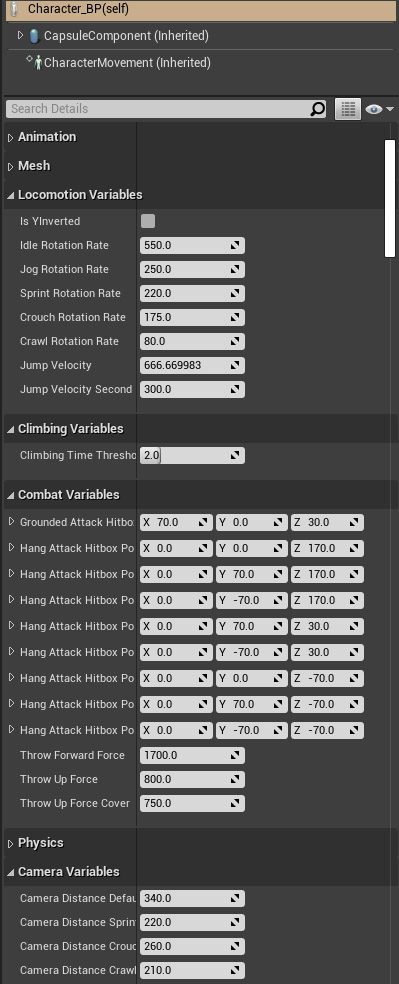
Character_BP Customizable Variables
Character_BP BehaviorWhen it comes to the Character’s logic, the implementation starts on the “Character_BP” class itself.
All graphs operate based on the character’s currentState variable. This variable refers to the custom CharacterStateBase class which, as its name implies, refers to the state that the character is in at any given time. This class is further detailed in the next section, CharacterStateBase class. This blueprint is also home to all the Linetrace and Spheretrace functions related to the character, as well as several functions (mostly related to the camera) that are independent of the current state of the character. CharacterStateBase ClassThe CharacterStateBase is a class that represents any state that the character can be in. This class is of type Object, which means that it cannot be placed in a scene or have any visual/rendering components. With this, every state to be added to the system must inherit from this class.
Additionally, this class also defines a charRef variable. This is a reference to the "Character_BP" that is assigned when the class is constructed, it's used to access everything related to the “Character_BP” that contains the state. Weapons and the LayeringSystemWeapons in the Amplify Animation Pack are implemented in the WeaponLayer state machine that is located in both provided AnimBPs. This state machine includes all the necessary states for the weapon animations, including actions like Aiming or Shooting, among others. Inside each of these states there is always a blend by WeaponType node, which takes into account the different weapons that the character can have in his possession. The WeaponLayer state machine is then combined with the FullBody state machine using a layered blend per bone node. This allows the system to combine animations from the FullBody state, like walking and running, with animations from the WeaponLayer, creating a dynamic system that can be further customized to suit any need. Furthermore, depending on the animation, this layering system can be blended on the spine bone or the shoulders, as is implemented in the AnimGraph. Contextual ActionsActions that the player can execute are directly linked to interactable Blueprints created for the effect. The pack includes a varied collection of generic actors that serve as a starting point for your own game requirements.
All of these actors can be customized in their appearance, size and behavior. However, the colliders provided must be left untouched or, at the very least, replicated when it comes to their Object Channels and Responses. There are also some positioning rules to be followed in regards to certain actions of these contextual objects. This is required to better accommodate the animations provided. Water setup There are three main components required for it to work like in the DemoScene level:
Additionally, the previously mentioned WaterDetectorActor can also be added to either trigger the diving animation or the transition from swimming to walking, depending on if the character is facing the water or not. Contextual Actions rules
Additionally, each action that involves climbing has the character moving a set fixed units upward. As such, all the heights for these actions can be found in the following table.
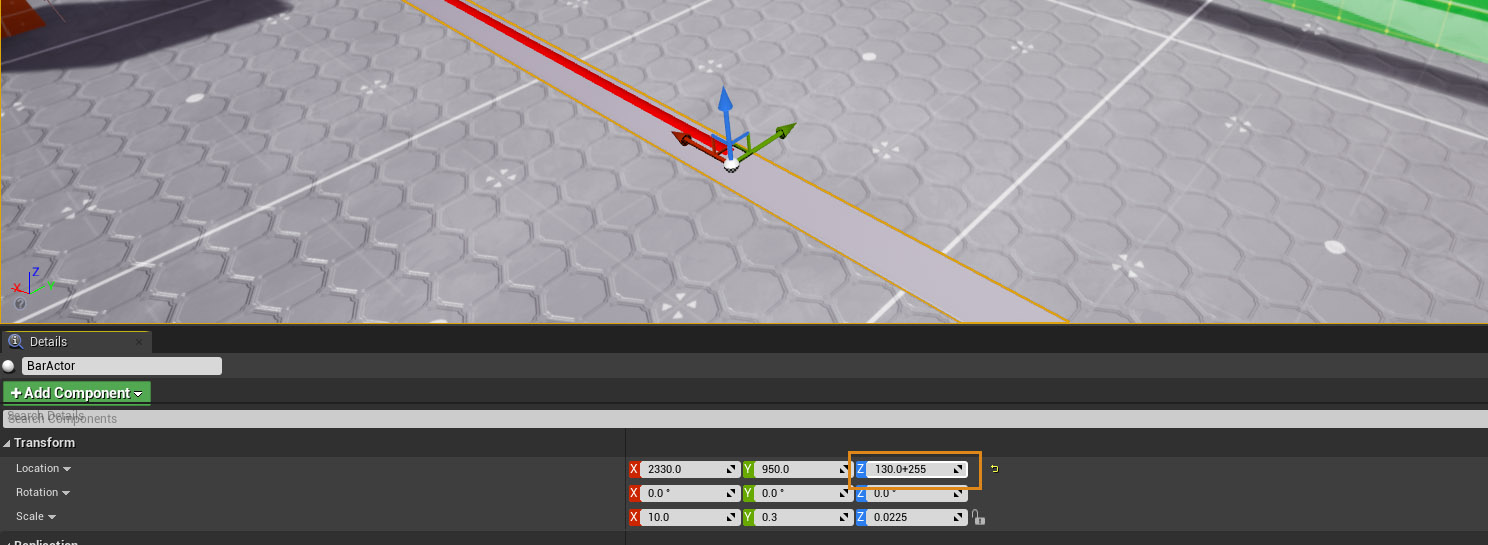
NOTE 1: When adding an actor to an existing level, keep in mind that you can add the required height values directly on the Actor Transform input box. Say that you add the Bar to your ground surface and now you want to increase its height, you simply need to add "+255" into its Z Axis and press Enter; this will ensure that the Actor is moved exactly 255 units up.
NOTE 2: Modifying/replacing interactable meshes. When checking for interactions, the character controller uses the provided classes (BP_ClimbActor, BP_ObstacleActor, etc.) to check for whether the object is interactable or not. From the screenshot, I've noticed that you're duplicating the class and changing the mesh there, and that is the issue here. Instead, there are three main ways to change the mesh of your interactables: 1. Change the mesh directly on the interactable class (for instance, on the BP_ClimbActor). This will make it so that the default mesh for this class is the new mesh that you assign here (WARNING: this may change the layout of the DemoScene level). 2. Change the mesh on the instance of the class. Here, you put the default class in your level and change the mesh on that actor instead. This is useful if you want to change your mesh on an actor-per-actor basis. 3. Create a new child class from our interactable. Instead of duplicating the BP class, you can instead create a child BP class from the interactables provided, and assign your own defaults this way. By doing this, you can have several classes that inherit our behaviour, and thus work with the current controller, while also having custom made looks, VFXs, components or aditional logic. This can be useful if you want to have several defaults of our classes (for instance, like a wall and a fence for the BP_ClimbActor with its own custom meshes and effects). You can also "ignore" our meshes, and use a separate actor for the mesh, while using our actors for the collisions. While this may lead to a very messy scene in the long run, it can be quite useful when prototyping and using UE's BSP system, for example! Blender SourceOverviewSource files are located under the Content folder, Amplify_AnimationPack.zip. The Scene contains the control rig and the export rig (SK_Mannequin Collection)
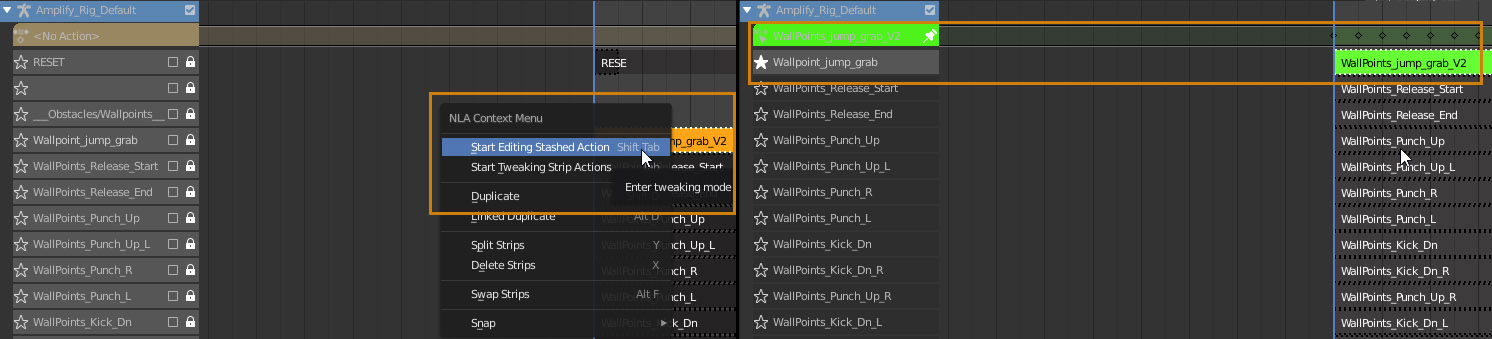
Here you'll find all the animations included in the pack, you can also search for them in the action editor.
You can enter an animation by right clicking and Start Editing Stashed Action. The layer will turn green signifying that you can now edit it.
Make sure you have the dope sheet open in Action Editor Mode.
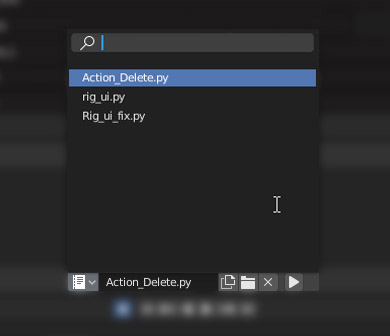
ScriptsThe file contains 3 scripts.
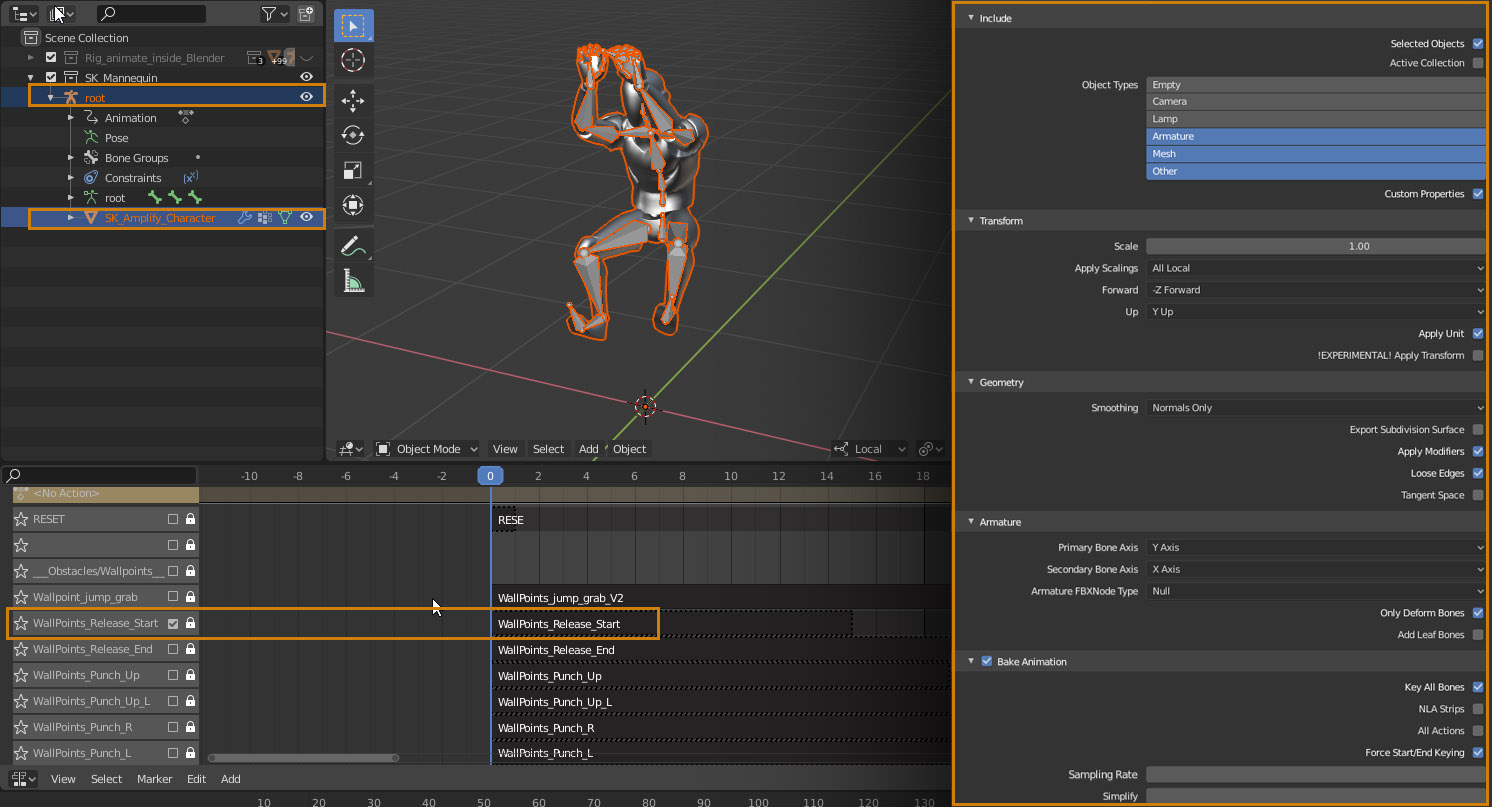
Action delete lets you delete actions by name, newer Blender versions already have this options. Since the rig was created in Blender 2.79 you have to load rig_ui.py, press run and select the rig_ui_fix.py, and press run to use IK snap and FK snap. If you don't do this step the IK to FK snap will throw an error Export SettingsWith the rig(root) and mesh(SK_Amplify_Character) selected, and the correct NLA strip active, Go to File - Export - FBX and use the following export settings. Make sure you only have one NLA toggled, also be sure to adjust the timeline to have the same time as the NLA; for example if the NLA has 30f and your timeline is at 50f, you should set it to 30f before exporting it to Unreal in order to avoid exporting the actual 50 frames.
DISCLAIMER - Character ControllerThe third-person system is meant to be used solely as a starting point for your own controller, it's a complement to the package but not a production ready option. |