Unity Products:Amplify Impostors/Manual
Product Page - Manual - Custom Baking - Lightmap Baking - Roadmap
Description
Amplify Impostors is a small but powerful tool that allows the creation of different types of Impostors, which are substitutes of complex high polycount objects made from flat and simple polygons, that render a fake version of the original object (hence the name). Much like traditional sprites, they usually consist of a single flat quad polygon or simple polygonal shapes and, like classic billboards, always face the camera. Think of them as a camera facing cardboard version of the object you want to render. The common purpose of using such technique is to be able to represent far distant objects with a very low polycount, for instance, trees, bushes, rocks, ruins, buildings, props, etc.
There are various ways these impostors can be created, each with their own advantages and disadvantages. This tool intends to provide the most useful and popular techniques while making the process of creating them as simple as possible.
Installation
- Open AmplifyImpostors.unitypackage
- After Unity loads it will display the "Importing package" window, select All and click Import
- Warning - If you're using Amplify Shader Editor in the same project, please make sure that you have both packages up-to-date; check your console for any errors pertaining to it.
Quick Start Instructions
- Select a game object in the scene or a prefab in your project
- In the inspector window search for and add the "Amplify Impostor" component
- Press "Bake Impostor" and select where you want to save the impostor files
Current Features
Impostor Types
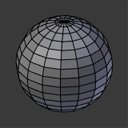
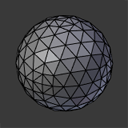
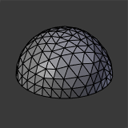
Three pre-baked Impostor types are currently supported
(Real mesh on the left, impostor on the right)

|
|
|

|
|
|

|
|
|
Realtime Rendering
Each one of these pre-baked solutions render surface component maps in order to support realtime lighting. This comes with support for:
- Scriptable Render Pipeline (HD and LW) (v4.9.0+)
- Standard/Legacy Forward and Deferred rendering
- Dynamic Lights and Shadows
- Depth writing for object intersections
- Global Illumination
- Baked Lightmaps (via custom baking)
- GPU instancing
- Dithering cross fade
Others
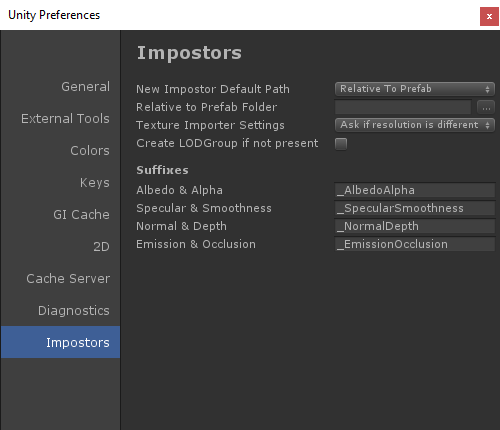
- Custom Packed Maps: Render up to 4 maps and a custom material for standard material baking and up to 8 different maps using custom baking (support for PNG and uncompressed TGA)
- Albedo (RGB) | Alpha Mask (A)
- Specular (RGB) | Smoothness (A)
- Object Normals (RGB) | Depth (A)
- Emission (RGB) | Ambient Occlusion (A)
- Custom Shape Editor: Automatically generates a custom shape to remove most of the transparent areas of the impostor to reduce overdraw. Also supports manual editing.
- Baking Presets: Defines presets for baking impostors which also contain various import and export options.
Scriptable Render Pipeline
In order to use Amplify Impostors with SRP, be sure to import the required package( AmplifyImpostors\Plugins\EditorResources\RenderPipelinePackages ).
Please not that for HDRP there are two available packages since the latest HDRP 10 changed quite a bit and a new set of shaders and baking tools had to be created.
When using HDRP versions up to 9.x.x then the correct package to import is:
- AmplifyImpostors\Plugins\EditorResources\RenderPipelinePackages\Legacy\ImpostorsHDRP 9xx (Legacy).unitypackage
For HDRP 10 version please import:
- AmplifyImpostors\Plugins\EditorResources\RenderPipelinePackages\ImpostorsHDRP.unitypackage
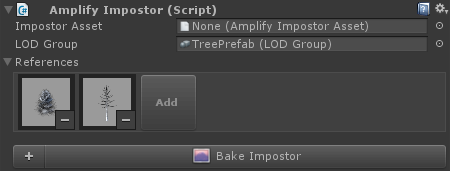
The Inspector
The inspector for the impostor is divided in two main sections, one is to setup its basic definitions and the other gives access to more advanced bake settings.
Here's the main inspector:
|
|
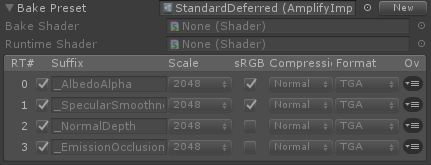
When an impostor asset is assigned to the component you can configure the advance bake settings:
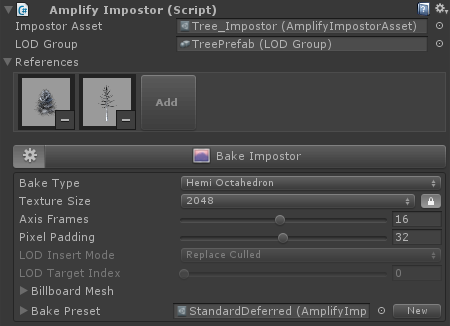
|
|
Billboard Mesh
The baker uses unity's built in shape editor to find a good approximation of the shape in place. This approximation might still need improvements in terms of polycount and shape, so some additional options are provided to better control it. Usually there's no need to touch these settings, but there might exist some odd cases where even the manual mode is necessary for some finer adjustments.
|
|
|
|
|
|

|
|
Bake Preset
Sometimes you want to bake an impostor with standard settings but with one or two changes, this bake preset allows you to create and use a preset of configurations to customize the baking result. This is particular useful for custom baking, as it's also used to link the shader and baked textures to the final impostor material.
With the first field you can select your previously created preset or you can create a new one. Do note that you can only change the preset itself in the preset inspector when you select the preset file. Otherwise, all changes done in the impostor inspector are just individual overrides that are saved per impostor. This is reason that, by default, all other fields are greyed out and locked.
|
|
Global Preferences
Some behaviors of the inspector and resulting bakes can be changed globally. You can find these settings in Edit > Preferences > Impostors.
|
|
Known Issues
HDRP Custom Diffusion profile bakes can result in incorrect bakes, we're looking into this.
FAQ
Q: Does it support Scriptable Render Pipeline like Universal(URP) or HighDefinition (HDRP) SRP?
A: Yes, as of version 0.9.3 both Render Pipelines are supported, just make sure to import the corresponding package(AmplifyImpostors\Plugins\EditorResources\RenderPipelinePackages) before creating an impostor and that your SRP of choices uses any version >=4.9.0. Render pipeline used is automatically detected. If you are using your own render pipeline you'll need to create the appropriate bake and runtime shaders using custom baking.
Q: I can see some artifacts at the edge of my impostor, how do I fix it?
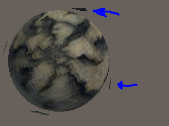
A: This issue rarely happens because it's dependent on the original object shape. Those artifacts are actually the neighboring frames peeking through, in order to remove it you can't try to adjust the mesh to more tightly fit the object. If that still doesn't help, you can activate a shader define that removes it at a cost of a few extra instructions:
- Search and open for the AmplifyImpostorsConfig.cginc file.
- At the top find the
#define AI_CLIP_NEIGHBOURS_FRAMES 0entry and activate it by changing it to#define AI_CLIP_NEIGHBOURS_FRAMES 1and saving.
Q: Does it work with Amplify Shader Editor?
A: Yes, specifically in regards to the creation of custom Bake and Runtime Impostor shaders. Be sure to use the latest version available, otherwise you will likely encounter a few errors. Check your console after importing AI or ASE for any possible issues.
Q: Does this replaces LODs?
A: Mainly no. Don't think of this as a replacement of regular LODs since impostors look progressively worse at close range, but more as an extension of it by replacing the last LOD level. For close to medium ranges you still want to use regular LOD meshes.
Q: Does it support unity LOD groups?
A: Yes, and also supports cross-fading. Just make sure to bake an impostor that matches the previous LOD level object for the best match when transitioning between the LOD levels.
Q: Why are impostor shadows so weird? Especially up-close.
A: It's partially due to the blending done between the frames which doesn't always match the binary nature of shadows, and also the differences in the depth between what lights "see" and what the camera renders. We'll try to improve this in the future, meanwhile you can try to refine how the shadow looks by changing the "Shadow Bias" and "Shadow View" in the light settings and/or in the impostor material property. The first pushes the shadow further away and the second flattens the shadow depth according to the view.
Q: Does it supports Anti-Aliasing?
A: Mostly. Just like regular sprites MSAA is not supported because it only helps the edges of geometry, but other screen space solutions do work, like FXAA or TXAA.
Q: Does it support Image Effects?
A: In most cases it should. There might be some precision issues if the effect is depth dependent, like SSAO, but for the most part it should work properly.
Q: Does it support metallic and specular pipelines?
A: Yes. Currently the baker generates a specular map regardless of the input materials for standard materials. This ensures both pipelines are supported, as metallic maps are transformed into specular ones. However you can use custom baking to specify the use of metallic pipeline and even pack it together with other maps reducing the overall texture count.
Q: Does it support skinned mesh objects?
A: No. It does however support animation of objects like moving, rotating and scaling, but not animated skinned meshes like characters. We do plan to provide a realtime baking variant that allows for animated objects to be rendered as impostors at some specified rate.
Q: Does it support SpeedTree assets?
A: Yes, and also supports hue variation. By default hue variation is off but you can turn it on in the impostor material.
Q: What can I do to improve the quality at close range?
A: Unfortunately the only thing you can do right now is to increase the texture resolution. This usually isn't enough to properly render an impostor at close range since other artifacts start to become obvious. Please notice that impostors are NOT intended to be rendered at close range, they are not a substitute for "real meshes", but rather an improvement of performance when rendering them from afar. So it's recommended that you use resolutions that are good enough for long distances. 2k maps are usually okay for that, and for mobile you can even get away with 1k maps.
Technical Considerations
Note that currently, standard baking, is only supported if the shader exposes a Deferred path, such as Unity Standard shaders. However, the Impostors created can be used in both Forward and Deferred modes. If the original mesh has a custom forward-only shader(e.g. Cartoon Custom Lighting) like many assets from the asset store do, you'll need to bake it using a custom baking shader.
When using Amplify Impostors in conjunction with Amplify Shader Editor, be sure to use the latest versions available as not doing so will result in a few errors.
References
- Octahedral Impostors by Ryan Brucks
- Chapter 21. True Impostors by Eric Risser
- Real-time Realistic Rendering and Lighting of Forests by Eric Bruneton, Fabrice Neyret